
diff options
| -rw-r--r-- | .gitignore | 1 | ||||
| -rw-r--r-- | python-neural-style.spec | 1056 | ||||
| -rw-r--r-- | sources | 1 |
3 files changed, 1058 insertions, 0 deletions
@@ -0,0 +1 @@ +/neural-style-0.5.7.tar.gz diff --git a/python-neural-style.spec b/python-neural-style.spec new file mode 100644 index 0000000..270b896 --- /dev/null +++ b/python-neural-style.spec @@ -0,0 +1,1056 @@ +%global _empty_manifest_terminate_build 0 +Name: python-neural-style +Version: 0.5.7 +Release: 1 +Summary: A PyTorch implementation of artistic style transfer +License: MIT License +URL: https://github.com/ProGamerGov/neural-style-pt/tree/pip-master/ +Source0: https://mirrors.nju.edu.cn/pypi/web/packages/f9/06/72be88a4f63b51e47fcdace7ee030ccca7925b3c704e07302dbec0dc3e22/neural-style-0.5.7.tar.gz +BuildArch: noarch + +Requires: python3-torch +Requires: python3-torchvision +Requires: python3-pillow + +%description +# neural-style-pt + +This is a PyTorch implementation of the paper [A Neural Algorithm of Artistic Style](http://arxiv.org/abs/1508.06576) +by Leon A. Gatys, Alexander S. Ecker, and Matthias Bethge. The code is based on Justin Johnson's [Neural-Style](https://github.com/jcjohnson/neural-style). + +The paper presents an algorithm for combining the content of one image with the style of another image using +convolutional neural networks. Here's an example that maps the artistic style of +[The Starry Night](https://en.wikipedia.org/wiki/The_Starry_Night) +onto a night-time photograph of the Stanford campus: + +<div align="center"> + +<img src="https://raw.githubusercontent.com/ProGamerGov/neural-style-pt/master/examples/inputs/starry_night_google.jpg" height="223px"> +<img src="https://raw.githubusercontent.com/ProGamerGov/neural-style-pt/master/examples/inputs/hoovertowernight.jpg" height="223px"> +<img src="https://user-images.githubusercontent.com/10626398/66707704-310a8000-ed02-11e9-92f9-e2f74ef74270.jpg" width="710px"> + +</div> + +Applying the style of different images to the same content image gives interesting results. +Here we reproduce Figure 2 from the paper, which renders a photograph of the Tubingen in Germany in a +variety of styles: + +<div align="center"> + +<img src="https://raw.githubusercontent.com/ProGamerGov/neural-style-pt/master/examples/inputs/tubingen.jpg" height="250px"> +<img src="https://raw.githubusercontent.com/ProGamerGov/neural-style-pt/master/examples/outputs/tubingen_shipwreck.png" height="250px"> + +<img src="https://raw.githubusercontent.com/ProGamerGov/neural-style-pt/master/examples/outputs/tubingen_starry.png" height="250px"> +<img src="https://raw.githubusercontent.com/ProGamerGov/neural-style-pt/master/examples/outputs/tubingen_scream.png" height="250px"> + +<img src="https://raw.githubusercontent.com/ProGamerGov/neural-style-pt/master/examples/outputs/tubingen_seated_nude.png" height="250px"> +<img src="https://raw.githubusercontent.com/ProGamerGov/neural-style-pt/master/examples/outputs/tubingen_composition_vii.png" height="250px"> + +</div> + +Here are the results of applying the style of various pieces of artwork to this photograph of the +golden gate bridge: + + +<div align="center" +<img src="https://raw.githubusercontent.com/ProGamerGov/neural-style-pt/master/examples/inputs/golden_gate.jpg" height="200px"> + +<img src="https://raw.githubusercontent.com/ProGamerGov/neural-style-pt/master/examples/inputs/frida_kahlo.jpg" height="160px"> +<img src="https://raw.githubusercontent.com/ProGamerGov/neural-style-pt/master/examples/outputs/golden_gate_kahlo.png" height="160px"> +<img src="https://raw.githubusercontent.com/ProGamerGov/neural-style-pt/master/examples/inputs/escher_sphere.jpg" height="160px"> +<img src="https://raw.githubusercontent.com/ProGamerGov/neural-style-pt/master/examples/outputs/golden_gate_escher.png" height="160px"> +</div> + +<div align="center"> +<img src="https://raw.githubusercontent.com/ProGamerGov/neural-style-pt/master/examples/inputs/woman-with-hat-matisse.jpg" height="160px"> +<img src="https://raw.githubusercontent.com/ProGamerGov/neural-style-pt/master/examples/outputs/golden_gate_matisse.png" height="160px"> +<img src="https://raw.githubusercontent.com/ProGamerGov/neural-style-pt/master/examples/inputs/the_scream.jpg" height="160px"> +<img src="https://raw.githubusercontent.com/ProGamerGov/neural-style-pt/master/examples/outputs/golden_gate_scream.png" height="160px"> +</div> + +<div align="center"> +<img src="https://raw.githubusercontent.com/ProGamerGov/neural-style-pt/master/examples/inputs/starry_night_crop.png" height="160px"> +<img src="https://raw.githubusercontent.com/ProGamerGov/neural-style-pt/master/examples/outputs/golden_gate_starry.png" height="160px"> +<img src="https://raw.githubusercontent.com/ProGamerGov/neural-style-pt/master/examples/inputs/seated-nude.jpg" height="160px"> +<img src="https://raw.githubusercontent.com/ProGamerGov/neural-style-pt/master/examples/outputs/golden_gate_seated.png" height="160px"> +</div> + +### Content / Style Tradeoff + +The algorithm allows the user to trade-off the relative weight of the style and content reconstruction terms, +as shown in this example where we port the style of [Picasso's 1907 self-portrait](http://www.wikiart.org/en/pablo-picasso/self-portrait-1907) onto Brad Pitt: + +<div align="center"> +<img src="https://raw.githubusercontent.com/ProGamerGov/neural-style-pt/master/examples/inputs/picasso_selfport1907.jpg" height="220px"> +<img src="https://raw.githubusercontent.com/ProGamerGov/neural-style-pt/master/examples/inputs/brad_pitt.jpg" height="220px"> +</div> + +<div align="center"> +<img src="https://raw.githubusercontent.com/ProGamerGov/neural-style-pt/master/examples/outputs/pitt_picasso_content_5_style_100.png" height="220px"> +<img src="https://raw.githubusercontent.com/ProGamerGov/neural-style-pt/master/examples/outputs/pitt_picasso_content_1_style_100.png" height="220px"> +<img src="https://raw.githubusercontent.com/ProGamerGov/neural-style-pt/master/examples/outputs/pitt_picasso_content_01_style_100.png" height="220px"> +<img src="https://raw.githubusercontent.com/ProGamerGov/neural-style-pt/master/examples/outputs/pitt_picasso_content_0025_style_100.png" height="220px"> +</div> + +### Style Scale + +By resizing the style image before extracting style features, we can control the types of artistic +features that are transfered from the style image; you can control this behavior with the `-style_scale` flag. +Below we see three examples of rendering the Golden Gate Bridge in the style of The Starry Night. +From left to right, `-style_scale` is 2.0, 1.0, and 0.5. + +<div align="center"> +<img src="https://raw.githubusercontent.com/ProGamerGov/neural-style-pt/master/examples/outputs/golden_gate_starry_scale2.png" height=175px> +<img src="https://raw.githubusercontent.com/ProGamerGov/neural-style-pt/master/examples/outputs/golden_gate_starry_scale1.png" height=175px> +<img src="https://raw.githubusercontent.com/ProGamerGov/neural-style-pt/master/examples/outputs/golden_gate_starry_scale05.png" height=175px> +</div> + +### Multiple Style Images +You can use more than one style image to blend multiple artistic styles. + +Clockwise from upper left: "The Starry Night" + "The Scream", "The Scream" + "Composition VII", +"Seated Nude" + "Composition VII", and "Seated Nude" + "The Starry Night" + +<div align="center"> +<img src="https://raw.githubusercontent.com/ProGamerGov/neural-style-pt/master/examples/outputs/tubingen_starry_scream.png" height="250px"> +<img src="https://raw.githubusercontent.com/ProGamerGov/neural-style-pt/master/examples/outputs/tubingen_scream_composition_vii.png" height="250px"> + +<img src="https://raw.githubusercontent.com/ProGamerGov/neural-style-pt/master/examples/outputs/tubingen_starry_seated.png" height="250px"> +<img src="https://raw.githubusercontent.com/ProGamerGov/neural-style-pt/master/examples/outputs/tubingen_seated_nude_composition_vii.png" height="250px"> +</div> + + +### Style Interpolation +When using multiple style images, you can control the degree to which they are blended: + +<div align="center"> +<img src="https://raw.githubusercontent.com/ProGamerGov/neural-style-pt/master/examples/outputs/golden_gate_starry_scream_3_7.png" height="175px"> +<img src="https://raw.githubusercontent.com/ProGamerGov/neural-style-pt/master/examples/outputs/golden_gate_starry_scream_5_5.png" height="175px"> +<img src="https://raw.githubusercontent.com/ProGamerGov/neural-style-pt/master/examples/outputs/golden_gate_starry_scream_7_3.png" height="175px"> +</div> + +### Transfer style but not color +If you add the flag `-original_colors 1` then the output image will retain the colors of the original image. + +<div align="center"> +<img src="https://raw.githubusercontent.com/ProGamerGov/neural-style-pt/master/examples/outputs/tubingen_starry.png" height="185px"> +<img src="https://raw.githubusercontent.com/ProGamerGov/neural-style-pt/master/examples/outputs/tubingen_scream.png" height="185px"> +<img src="https://raw.githubusercontent.com/ProGamerGov/neural-style-pt/master/examples/outputs/tubingen_composition_vii.png" height="185px"> + +<img src="https://raw.githubusercontent.com/ProGamerGov/neural-style-pt/master/examples/outputs/original_color/tubingen_starry.png" height="185px"> +<img src="https://raw.githubusercontent.com/ProGamerGov/neural-style-pt/master/examples/outputs/original_color/tubingen_scream.png" height="185px"> +<img src="https://raw.githubusercontent.com/ProGamerGov/neural-style-pt/master/examples/outputs/original_color/tubingen_composition_vii.png" height="185px"> +</div> + +## Setup: + +While you can use Python 2's pip, it's recommended that you use Python 3's pip: + +``` +# in a terminal, run the command +pip3 install neural-style +``` + + +After installing neural-style-pt, you'll need to run the following script to download the default VGG and NIN models: + + +``` +neural-style -download_models +``` + +By default the models are downloaded to your home directory, but you can specify a download location with: + +``` +neural-style -download_models <download_path> +``` + +This will download the original [VGG-19 model](https://gist.github.com/ksimonyan/3785162f95cd2d5fee77#file-readme-md). +The original [VGG-16 model](https://gist.github.com/ksimonyan/211839e770f7b538e2d8#file-readme-md) will also be downloaded. By default the original VGG-19 model is used. + +If you have a smaller memory GPU then using NIN Imagenet model will be better and gives slightly worse yet comparable results. You can get the details on the model from [BVLC Caffe ModelZoo](https://github.com/BVLC/caffe/wiki/Model-Zoo). The NIN model is downloaded when you run `neural-style -download_models`. + +## Usage +Basic usage: +``` +neural-style -style_image <image.jpg> -content_image <image.jpg> +``` + +cuDNN usage with NIN Model: +``` +neural-style -style_image examples/inputs/picasso_selfport1907.jpg -content_image examples/inputs/brad_pitt.jpg -output_image profile.png -model_file models/nin_imagenet.pth -gpu 0 -backend cudnn -num_iterations 1000 -seed 123 -content_layers relu0,relu3,relu7,relu12 -style_layers relu0,relu3,relu7,relu12 -content_weight 10 -style_weight 500 -image_size 512 -optimizer adam +``` + +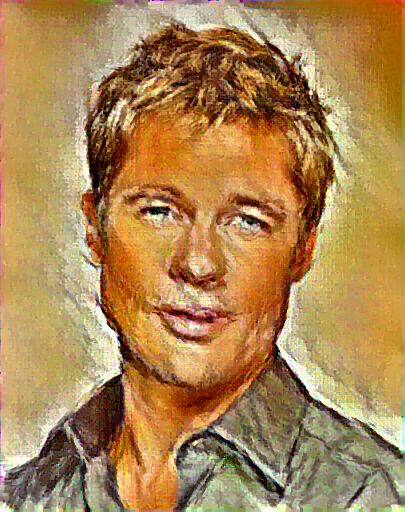 + + +To use multiple style images, pass a comma-separated list like this: + +`-style_image starry_night.jpg,the_scream.jpg`. + +Note that paths to images should not contain the `~` character to represent your home directory; you should instead use a relative +path or a full absolute path. + +**Options**: + +* `-image_size`: Maximum side length (in pixels) of the generated image. Default is 512. +* `-style_blend_weights`: The weight for blending the style of multiple style images, as a + comma-separated list, such as `-style_blend_weights 3,7`. By default all style images + are equally weighted. +* `-gpu`: Zero-indexed ID of the GPU to use; for CPU mode set `-gpu` to `c`. + +**Optimization options**: + +* `-content_weight`: How much to weight the content reconstruction term. Default is 5e0. +* `-style_weight`: How much to weight the style reconstruction term. Default is 1e2. +* `-tv_weight`: Weight of total-variation (TV) regularization; this helps to smooth the image. + Default is 1e-3. Set to 0 to disable TV regularization. +* `-num_iterations`: Default is 1000. +* `-init`: Method for generating the generated image; one of `random` or `image`. + Default is `random` which uses a noise initialization as in the paper; `image` + initializes with the content image. +* `-init_image`: Replaces the initialization image with a user specified image. +* `-optimizer`: The optimization algorithm to use; either `lbfgs` or `adam`; default is `lbfgs`. + L-BFGS tends to give better results, but uses more memory. Switching to ADAM will reduce memory usage; + when using ADAM you will probably need to play with other parameters to get good results, especially + the style weight, content weight, and learning rate. +* `-learning_rate`: Learning rate to use with the ADAM optimizer. Default is 1e1. + +**Output options**: + +* `-output_image`: Name of the output image. Default is `out.png`. +* `-print_iter`: Print progress every `print_iter` iterations. Set to 0 to disable printing. +* `-save_iter`: Save the image every `save_iter` iterations. Set to 0 to disable saving intermediate results. + +**Layer options**: + +* `-content_layers`: Comma-separated list of layer names to use for content reconstruction. + Default is `relu4_2`. +* `-style_layers`: Comma-separated list of layer names to use for style reconstruction. + Default is `relu1_1,relu2_1,relu3_1,relu4_1,relu5_1`. + +**Other options**: + +* `-style_scale`: Scale at which to extract features from the style image. Default is 1.0. +* `-original_colors`: If you set this to 1, then the output image will keep the colors of the content image. +* `-model_file`: Path to the `.pth` file for the VGG Caffe model. Default is the original VGG-19 model; you can also try the original VGG-16 model. +* `-pooling`: The type of pooling layers to use; one of `max` or `avg`. Default is `max`. + The VGG-19 models uses max pooling layers, but the paper mentions that replacing these layers with average + pooling layers can improve the results. I haven't been able to get good results using average pooling, but + the option is here. +* `-seed`: An integer value that you can specify for repeatable results. By default this value is random for each run. +* `-multidevice_strategy`: A comma-separated list of layer indices at which to split the network when using multiple devices. See [Multi-GPU scaling](https://github.com/ProGamerGov/neural-style-pt/tree/pip-master#multi-gpu-scaling) for more details. +* `-backend`: `nn`, `cudnn`, or `mkl`. Default is `nn`. + `mkl` requires Intel's MKL backend. +* `-cudnn_autotune`: When using the cuDNN backend, pass this flag to use the built-in cuDNN autotuner to select + the best convolution algorithms for your architecture. This will make the first iteration a bit slower and can + take a bit more memory, but may significantly speed up the cuDNN backend. +* `-download_models`: Path to where the VGG-19, VGG-16, and NIN models will be downloaded to. If no path is specified, the models will be downloaded to your home directory. + +## Frequently Asked Questions + +**Problem:** The program runs out of memory and dies + +**Solution:** Try reducing the image size: `-image_size 256` (or lower). Note that different image sizes will likely +require non-default values for `-style_weight` and `-content_weight` for optimal results. +If you are running on a GPU, you can also try running with `-backend cudnn` to reduce memory usage. + +**Problem:** `-backend cudnn` is slower than default NN backend + +**Solution:** Add the flag `-cudnn_autotune`; this will use the built-in cuDNN autotuner to select the best convolution algorithms. + +**Problem:** Get the following error message: + +`Missing key(s) in state_dict: "classifier.0.bias", "classifier.0.weight", "classifier.3.bias", "classifier.3.weight". Unexpected key(s) in state_dict: "classifier.1.weight", "classifier.1.bias", "classifier.4.weight", "classifier.4.bias".` + +**Solution:** Due to a mix up with layer locations, older models require a fix to be compatible with newer versions of PyTorch. Donwloading the models with `neural-style -download_models` will automatically perform these fixes after downloading the models. You can find other compatible models [here](https://github.com/ProGamerGov/neural-style-pt/wiki/Other-Models). + + + +## Memory Usage +By default, `neural-style-pt` uses the `nn` backend for convolutions and L-BFGS for optimization. These give good results, but can both use a lot of memory. You can reduce memory usage with the following: + +* **Use cuDNN**: Add the flag `-backend cudnn` to use the cuDNN backend. This will only work in GPU mode. +* **Use ADAM**: Add the flag `-optimizer adam` to use ADAM instead of L-BFGS. This should significantly + reduce memory usage, but may require tuning of other parameters for good results; in particular you should + play with the learning rate, content weight, and style weight. + This should work in both CPU and GPU modes. +* **Reduce image size**: If the above tricks are not enough, you can reduce the size of the generated image; + pass the flag `-image_size 256` to generate an image at half the default size. + +With the default settings, neural-style-pt uses about 3.7 GB of GPU memory on my system; switching to ADAM and cuDNN reduces the GPU memory footprint to about 1GB. + +## Speed +Speed can vary a lot depending on the backend and the optimizer. +Here are some times for running 500 iterations with `-image_size=512` on a Tesla K80 with different settings: +* `-backend nn -optimizer lbfgs`: 117 seconds +* `-backend nn -optimizer adam`: 100 seconds +* `-backend cudnn -optimizer lbfgs`: 124 seconds +* `-backend cudnn -optimizer adam`: 107 seconds +* `-backend cudnn -cudnn_autotune -optimizer lbfgs`: 109 seconds +* `-backend cudnn -cudnn_autotune -optimizer adam`: 91 seconds + +Here are the same benchmarks on a GTX 1080: +* `-backend nn -optimizer lbfgs`: 56 seconds +* `-backend nn -optimizer adam`: 38 seconds +* `-backend cudnn -optimizer lbfgs`: 40 seconds +* `-backend cudnn -optimizer adam`: 40 seconds +* `-backend cudnn -cudnn_autotune -optimizer lbfgs`: 23 seconds +* `-backend cudnn -cudnn_autotune -optimizer adam`: 24 seconds + +## Multi-GPU scaling +You can use multiple CPU and GPU devices to process images at higher resolutions; different layers of the network will be +computed on different devices. You can control which GPU and CPU devices are used with the `-gpu` flag, and you can control +how to split layers across devices using the `-multidevice_strategy` flag. + +For example in a server with four GPUs, you can give the flag `-gpu 0,1,2,3` to process on GPUs 0, 1, 2, and 3 in that order; by also giving the flag `-multidevice_strategy 3,6,12` you indicate that the first two layers should be computed on GPU 0, layers 3 to 5 should be computed on GPU 1, layers 6 to 11 should be computed on GPU 2, and the remaining layers should be computed on GPU 3. You will need to tune the `-multidevice_strategy` for your setup in order to achieve maximal resolution. + +We can achieve very high quality results at high resolution by combining multi-GPU processing with multiscale +generation as described in the paper +<a href="https://arxiv.org/abs/1611.07865">**Controlling Perceptual Factors in Neural Style Transfer**</a> by Leon A. Gatys, +Alexander S. Ecker, Matthias Bethge, Aaron Hertzmann and Eli Shechtman. + + +Here is a 4016 x 2213 image generated on a server with eight Tesla K80 GPUs: + +<img src="https://raw.githubusercontent.com/ProGamerGov/neural-style-pt/master/examples/outputs/starry_stanford_bigger.png" height="400px"> + +The script used to generate this image <a href='examples/scripts/starry_stanford_bigger.sh'>can be found here</a>. + +## Implementation details +Images are initialized with white noise and optimized using L-BFGS. + +We perform style reconstructions using the `conv1_1`, `conv2_1`, `conv3_1`, `conv4_1`, and `conv5_1` layers +and content reconstructions using the `conv4_2` layer. As in the paper, the five style reconstruction losses have +equal weights. + +## Citation + +If you find this code useful for your research, please cite: + +``` +@misc{ProGamerGov2018, +author = {ProGamerGov}, +title = {neural-style-pt}, +year = {2018}, +publisher = {GitHub}, +journal = {GitHub repository}, +howpublished = {\url{https://github.com/ProGamerGov/neural-style-pt}}, +} +``` + + + + +%package -n python3-neural-style +Summary: A PyTorch implementation of artistic style transfer +Provides: python-neural-style +BuildRequires: python3-devel +BuildRequires: python3-setuptools +BuildRequires: python3-pip +%description -n python3-neural-style +# neural-style-pt + +This is a PyTorch implementation of the paper [A Neural Algorithm of Artistic Style](http://arxiv.org/abs/1508.06576) +by Leon A. Gatys, Alexander S. Ecker, and Matthias Bethge. The code is based on Justin Johnson's [Neural-Style](https://github.com/jcjohnson/neural-style). + +The paper presents an algorithm for combining the content of one image with the style of another image using +convolutional neural networks. Here's an example that maps the artistic style of +[The Starry Night](https://en.wikipedia.org/wiki/The_Starry_Night) +onto a night-time photograph of the Stanford campus: + +<div align="center"> + +<img src="https://raw.githubusercontent.com/ProGamerGov/neural-style-pt/master/examples/inputs/starry_night_google.jpg" height="223px"> +<img src="https://raw.githubusercontent.com/ProGamerGov/neural-style-pt/master/examples/inputs/hoovertowernight.jpg" height="223px"> +<img src="https://user-images.githubusercontent.com/10626398/66707704-310a8000-ed02-11e9-92f9-e2f74ef74270.jpg" width="710px"> + +</div> + +Applying the style of different images to the same content image gives interesting results. +Here we reproduce Figure 2 from the paper, which renders a photograph of the Tubingen in Germany in a +variety of styles: + +<div align="center"> + +<img src="https://raw.githubusercontent.com/ProGamerGov/neural-style-pt/master/examples/inputs/tubingen.jpg" height="250px"> +<img src="https://raw.githubusercontent.com/ProGamerGov/neural-style-pt/master/examples/outputs/tubingen_shipwreck.png" height="250px"> + +<img src="https://raw.githubusercontent.com/ProGamerGov/neural-style-pt/master/examples/outputs/tubingen_starry.png" height="250px"> +<img src="https://raw.githubusercontent.com/ProGamerGov/neural-style-pt/master/examples/outputs/tubingen_scream.png" height="250px"> + +<img src="https://raw.githubusercontent.com/ProGamerGov/neural-style-pt/master/examples/outputs/tubingen_seated_nude.png" height="250px"> +<img src="https://raw.githubusercontent.com/ProGamerGov/neural-style-pt/master/examples/outputs/tubingen_composition_vii.png" height="250px"> + +</div> + +Here are the results of applying the style of various pieces of artwork to this photograph of the +golden gate bridge: + + +<div align="center" +<img src="https://raw.githubusercontent.com/ProGamerGov/neural-style-pt/master/examples/inputs/golden_gate.jpg" height="200px"> + +<img src="https://raw.githubusercontent.com/ProGamerGov/neural-style-pt/master/examples/inputs/frida_kahlo.jpg" height="160px"> +<img src="https://raw.githubusercontent.com/ProGamerGov/neural-style-pt/master/examples/outputs/golden_gate_kahlo.png" height="160px"> +<img src="https://raw.githubusercontent.com/ProGamerGov/neural-style-pt/master/examples/inputs/escher_sphere.jpg" height="160px"> +<img src="https://raw.githubusercontent.com/ProGamerGov/neural-style-pt/master/examples/outputs/golden_gate_escher.png" height="160px"> +</div> + +<div align="center"> +<img src="https://raw.githubusercontent.com/ProGamerGov/neural-style-pt/master/examples/inputs/woman-with-hat-matisse.jpg" height="160px"> +<img src="https://raw.githubusercontent.com/ProGamerGov/neural-style-pt/master/examples/outputs/golden_gate_matisse.png" height="160px"> +<img src="https://raw.githubusercontent.com/ProGamerGov/neural-style-pt/master/examples/inputs/the_scream.jpg" height="160px"> +<img src="https://raw.githubusercontent.com/ProGamerGov/neural-style-pt/master/examples/outputs/golden_gate_scream.png" height="160px"> +</div> + +<div align="center"> +<img src="https://raw.githubusercontent.com/ProGamerGov/neural-style-pt/master/examples/inputs/starry_night_crop.png" height="160px"> +<img src="https://raw.githubusercontent.com/ProGamerGov/neural-style-pt/master/examples/outputs/golden_gate_starry.png" height="160px"> +<img src="https://raw.githubusercontent.com/ProGamerGov/neural-style-pt/master/examples/inputs/seated-nude.jpg" height="160px"> +<img src="https://raw.githubusercontent.com/ProGamerGov/neural-style-pt/master/examples/outputs/golden_gate_seated.png" height="160px"> +</div> + +### Content / Style Tradeoff + +The algorithm allows the user to trade-off the relative weight of the style and content reconstruction terms, +as shown in this example where we port the style of [Picasso's 1907 self-portrait](http://www.wikiart.org/en/pablo-picasso/self-portrait-1907) onto Brad Pitt: + +<div align="center"> +<img src="https://raw.githubusercontent.com/ProGamerGov/neural-style-pt/master/examples/inputs/picasso_selfport1907.jpg" height="220px"> +<img src="https://raw.githubusercontent.com/ProGamerGov/neural-style-pt/master/examples/inputs/brad_pitt.jpg" height="220px"> +</div> + +<div align="center"> +<img src="https://raw.githubusercontent.com/ProGamerGov/neural-style-pt/master/examples/outputs/pitt_picasso_content_5_style_100.png" height="220px"> +<img src="https://raw.githubusercontent.com/ProGamerGov/neural-style-pt/master/examples/outputs/pitt_picasso_content_1_style_100.png" height="220px"> +<img src="https://raw.githubusercontent.com/ProGamerGov/neural-style-pt/master/examples/outputs/pitt_picasso_content_01_style_100.png" height="220px"> +<img src="https://raw.githubusercontent.com/ProGamerGov/neural-style-pt/master/examples/outputs/pitt_picasso_content_0025_style_100.png" height="220px"> +</div> + +### Style Scale + +By resizing the style image before extracting style features, we can control the types of artistic +features that are transfered from the style image; you can control this behavior with the `-style_scale` flag. +Below we see three examples of rendering the Golden Gate Bridge in the style of The Starry Night. +From left to right, `-style_scale` is 2.0, 1.0, and 0.5. + +<div align="center"> +<img src="https://raw.githubusercontent.com/ProGamerGov/neural-style-pt/master/examples/outputs/golden_gate_starry_scale2.png" height=175px> +<img src="https://raw.githubusercontent.com/ProGamerGov/neural-style-pt/master/examples/outputs/golden_gate_starry_scale1.png" height=175px> +<img src="https://raw.githubusercontent.com/ProGamerGov/neural-style-pt/master/examples/outputs/golden_gate_starry_scale05.png" height=175px> +</div> + +### Multiple Style Images +You can use more than one style image to blend multiple artistic styles. + +Clockwise from upper left: "The Starry Night" + "The Scream", "The Scream" + "Composition VII", +"Seated Nude" + "Composition VII", and "Seated Nude" + "The Starry Night" + +<div align="center"> +<img src="https://raw.githubusercontent.com/ProGamerGov/neural-style-pt/master/examples/outputs/tubingen_starry_scream.png" height="250px"> +<img src="https://raw.githubusercontent.com/ProGamerGov/neural-style-pt/master/examples/outputs/tubingen_scream_composition_vii.png" height="250px"> + +<img src="https://raw.githubusercontent.com/ProGamerGov/neural-style-pt/master/examples/outputs/tubingen_starry_seated.png" height="250px"> +<img src="https://raw.githubusercontent.com/ProGamerGov/neural-style-pt/master/examples/outputs/tubingen_seated_nude_composition_vii.png" height="250px"> +</div> + + +### Style Interpolation +When using multiple style images, you can control the degree to which they are blended: + +<div align="center"> +<img src="https://raw.githubusercontent.com/ProGamerGov/neural-style-pt/master/examples/outputs/golden_gate_starry_scream_3_7.png" height="175px"> +<img src="https://raw.githubusercontent.com/ProGamerGov/neural-style-pt/master/examples/outputs/golden_gate_starry_scream_5_5.png" height="175px"> +<img src="https://raw.githubusercontent.com/ProGamerGov/neural-style-pt/master/examples/outputs/golden_gate_starry_scream_7_3.png" height="175px"> +</div> + +### Transfer style but not color +If you add the flag `-original_colors 1` then the output image will retain the colors of the original image. + +<div align="center"> +<img src="https://raw.githubusercontent.com/ProGamerGov/neural-style-pt/master/examples/outputs/tubingen_starry.png" height="185px"> +<img src="https://raw.githubusercontent.com/ProGamerGov/neural-style-pt/master/examples/outputs/tubingen_scream.png" height="185px"> +<img src="https://raw.githubusercontent.com/ProGamerGov/neural-style-pt/master/examples/outputs/tubingen_composition_vii.png" height="185px"> + +<img src="https://raw.githubusercontent.com/ProGamerGov/neural-style-pt/master/examples/outputs/original_color/tubingen_starry.png" height="185px"> +<img src="https://raw.githubusercontent.com/ProGamerGov/neural-style-pt/master/examples/outputs/original_color/tubingen_scream.png" height="185px"> +<img src="https://raw.githubusercontent.com/ProGamerGov/neural-style-pt/master/examples/outputs/original_color/tubingen_composition_vii.png" height="185px"> +</div> + +## Setup: + +While you can use Python 2's pip, it's recommended that you use Python 3's pip: + +``` +# in a terminal, run the command +pip3 install neural-style +``` + + +After installing neural-style-pt, you'll need to run the following script to download the default VGG and NIN models: + + +``` +neural-style -download_models +``` + +By default the models are downloaded to your home directory, but you can specify a download location with: + +``` +neural-style -download_models <download_path> +``` + +This will download the original [VGG-19 model](https://gist.github.com/ksimonyan/3785162f95cd2d5fee77#file-readme-md). +The original [VGG-16 model](https://gist.github.com/ksimonyan/211839e770f7b538e2d8#file-readme-md) will also be downloaded. By default the original VGG-19 model is used. + +If you have a smaller memory GPU then using NIN Imagenet model will be better and gives slightly worse yet comparable results. You can get the details on the model from [BVLC Caffe ModelZoo](https://github.com/BVLC/caffe/wiki/Model-Zoo). The NIN model is downloaded when you run `neural-style -download_models`. + +## Usage +Basic usage: +``` +neural-style -style_image <image.jpg> -content_image <image.jpg> +``` + +cuDNN usage with NIN Model: +``` +neural-style -style_image examples/inputs/picasso_selfport1907.jpg -content_image examples/inputs/brad_pitt.jpg -output_image profile.png -model_file models/nin_imagenet.pth -gpu 0 -backend cudnn -num_iterations 1000 -seed 123 -content_layers relu0,relu3,relu7,relu12 -style_layers relu0,relu3,relu7,relu12 -content_weight 10 -style_weight 500 -image_size 512 -optimizer adam +``` + + + + +To use multiple style images, pass a comma-separated list like this: + +`-style_image starry_night.jpg,the_scream.jpg`. + +Note that paths to images should not contain the `~` character to represent your home directory; you should instead use a relative +path or a full absolute path. + +**Options**: + +* `-image_size`: Maximum side length (in pixels) of the generated image. Default is 512. +* `-style_blend_weights`: The weight for blending the style of multiple style images, as a + comma-separated list, such as `-style_blend_weights 3,7`. By default all style images + are equally weighted. +* `-gpu`: Zero-indexed ID of the GPU to use; for CPU mode set `-gpu` to `c`. + +**Optimization options**: + +* `-content_weight`: How much to weight the content reconstruction term. Default is 5e0. +* `-style_weight`: How much to weight the style reconstruction term. Default is 1e2. +* `-tv_weight`: Weight of total-variation (TV) regularization; this helps to smooth the image. + Default is 1e-3. Set to 0 to disable TV regularization. +* `-num_iterations`: Default is 1000. +* `-init`: Method for generating the generated image; one of `random` or `image`. + Default is `random` which uses a noise initialization as in the paper; `image` + initializes with the content image. +* `-init_image`: Replaces the initialization image with a user specified image. +* `-optimizer`: The optimization algorithm to use; either `lbfgs` or `adam`; default is `lbfgs`. + L-BFGS tends to give better results, but uses more memory. Switching to ADAM will reduce memory usage; + when using ADAM you will probably need to play with other parameters to get good results, especially + the style weight, content weight, and learning rate. +* `-learning_rate`: Learning rate to use with the ADAM optimizer. Default is 1e1. + +**Output options**: + +* `-output_image`: Name of the output image. Default is `out.png`. +* `-print_iter`: Print progress every `print_iter` iterations. Set to 0 to disable printing. +* `-save_iter`: Save the image every `save_iter` iterations. Set to 0 to disable saving intermediate results. + +**Layer options**: + +* `-content_layers`: Comma-separated list of layer names to use for content reconstruction. + Default is `relu4_2`. +* `-style_layers`: Comma-separated list of layer names to use for style reconstruction. + Default is `relu1_1,relu2_1,relu3_1,relu4_1,relu5_1`. + +**Other options**: + +* `-style_scale`: Scale at which to extract features from the style image. Default is 1.0. +* `-original_colors`: If you set this to 1, then the output image will keep the colors of the content image. +* `-model_file`: Path to the `.pth` file for the VGG Caffe model. Default is the original VGG-19 model; you can also try the original VGG-16 model. +* `-pooling`: The type of pooling layers to use; one of `max` or `avg`. Default is `max`. + The VGG-19 models uses max pooling layers, but the paper mentions that replacing these layers with average + pooling layers can improve the results. I haven't been able to get good results using average pooling, but + the option is here. +* `-seed`: An integer value that you can specify for repeatable results. By default this value is random for each run. +* `-multidevice_strategy`: A comma-separated list of layer indices at which to split the network when using multiple devices. See [Multi-GPU scaling](https://github.com/ProGamerGov/neural-style-pt/tree/pip-master#multi-gpu-scaling) for more details. +* `-backend`: `nn`, `cudnn`, or `mkl`. Default is `nn`. + `mkl` requires Intel's MKL backend. +* `-cudnn_autotune`: When using the cuDNN backend, pass this flag to use the built-in cuDNN autotuner to select + the best convolution algorithms for your architecture. This will make the first iteration a bit slower and can + take a bit more memory, but may significantly speed up the cuDNN backend. +* `-download_models`: Path to where the VGG-19, VGG-16, and NIN models will be downloaded to. If no path is specified, the models will be downloaded to your home directory. + +## Frequently Asked Questions + +**Problem:** The program runs out of memory and dies + +**Solution:** Try reducing the image size: `-image_size 256` (or lower). Note that different image sizes will likely +require non-default values for `-style_weight` and `-content_weight` for optimal results. +If you are running on a GPU, you can also try running with `-backend cudnn` to reduce memory usage. + +**Problem:** `-backend cudnn` is slower than default NN backend + +**Solution:** Add the flag `-cudnn_autotune`; this will use the built-in cuDNN autotuner to select the best convolution algorithms. + +**Problem:** Get the following error message: + +`Missing key(s) in state_dict: "classifier.0.bias", "classifier.0.weight", "classifier.3.bias", "classifier.3.weight". Unexpected key(s) in state_dict: "classifier.1.weight", "classifier.1.bias", "classifier.4.weight", "classifier.4.bias".` + +**Solution:** Due to a mix up with layer locations, older models require a fix to be compatible with newer versions of PyTorch. Donwloading the models with `neural-style -download_models` will automatically perform these fixes after downloading the models. You can find other compatible models [here](https://github.com/ProGamerGov/neural-style-pt/wiki/Other-Models). + + + +## Memory Usage +By default, `neural-style-pt` uses the `nn` backend for convolutions and L-BFGS for optimization. These give good results, but can both use a lot of memory. You can reduce memory usage with the following: + +* **Use cuDNN**: Add the flag `-backend cudnn` to use the cuDNN backend. This will only work in GPU mode. +* **Use ADAM**: Add the flag `-optimizer adam` to use ADAM instead of L-BFGS. This should significantly + reduce memory usage, but may require tuning of other parameters for good results; in particular you should + play with the learning rate, content weight, and style weight. + This should work in both CPU and GPU modes. +* **Reduce image size**: If the above tricks are not enough, you can reduce the size of the generated image; + pass the flag `-image_size 256` to generate an image at half the default size. + +With the default settings, neural-style-pt uses about 3.7 GB of GPU memory on my system; switching to ADAM and cuDNN reduces the GPU memory footprint to about 1GB. + +## Speed +Speed can vary a lot depending on the backend and the optimizer. +Here are some times for running 500 iterations with `-image_size=512` on a Tesla K80 with different settings: +* `-backend nn -optimizer lbfgs`: 117 seconds +* `-backend nn -optimizer adam`: 100 seconds +* `-backend cudnn -optimizer lbfgs`: 124 seconds +* `-backend cudnn -optimizer adam`: 107 seconds +* `-backend cudnn -cudnn_autotune -optimizer lbfgs`: 109 seconds +* `-backend cudnn -cudnn_autotune -optimizer adam`: 91 seconds + +Here are the same benchmarks on a GTX 1080: +* `-backend nn -optimizer lbfgs`: 56 seconds +* `-backend nn -optimizer adam`: 38 seconds +* `-backend cudnn -optimizer lbfgs`: 40 seconds +* `-backend cudnn -optimizer adam`: 40 seconds +* `-backend cudnn -cudnn_autotune -optimizer lbfgs`: 23 seconds +* `-backend cudnn -cudnn_autotune -optimizer adam`: 24 seconds + +## Multi-GPU scaling +You can use multiple CPU and GPU devices to process images at higher resolutions; different layers of the network will be +computed on different devices. You can control which GPU and CPU devices are used with the `-gpu` flag, and you can control +how to split layers across devices using the `-multidevice_strategy` flag. + +For example in a server with four GPUs, you can give the flag `-gpu 0,1,2,3` to process on GPUs 0, 1, 2, and 3 in that order; by also giving the flag `-multidevice_strategy 3,6,12` you indicate that the first two layers should be computed on GPU 0, layers 3 to 5 should be computed on GPU 1, layers 6 to 11 should be computed on GPU 2, and the remaining layers should be computed on GPU 3. You will need to tune the `-multidevice_strategy` for your setup in order to achieve maximal resolution. + +We can achieve very high quality results at high resolution by combining multi-GPU processing with multiscale +generation as described in the paper +<a href="https://arxiv.org/abs/1611.07865">**Controlling Perceptual Factors in Neural Style Transfer**</a> by Leon A. Gatys, +Alexander S. Ecker, Matthias Bethge, Aaron Hertzmann and Eli Shechtman. + + +Here is a 4016 x 2213 image generated on a server with eight Tesla K80 GPUs: + +<img src="https://raw.githubusercontent.com/ProGamerGov/neural-style-pt/master/examples/outputs/starry_stanford_bigger.png" height="400px"> + +The script used to generate this image <a href='examples/scripts/starry_stanford_bigger.sh'>can be found here</a>. + +## Implementation details +Images are initialized with white noise and optimized using L-BFGS. + +We perform style reconstructions using the `conv1_1`, `conv2_1`, `conv3_1`, `conv4_1`, and `conv5_1` layers +and content reconstructions using the `conv4_2` layer. As in the paper, the five style reconstruction losses have +equal weights. + +## Citation + +If you find this code useful for your research, please cite: + +``` +@misc{ProGamerGov2018, +author = {ProGamerGov}, +title = {neural-style-pt}, +year = {2018}, +publisher = {GitHub}, +journal = {GitHub repository}, +howpublished = {\url{https://github.com/ProGamerGov/neural-style-pt}}, +} +``` + + + + +%package help +Summary: Development documents and examples for neural-style +Provides: python3-neural-style-doc +%description help +# neural-style-pt + +This is a PyTorch implementation of the paper [A Neural Algorithm of Artistic Style](http://arxiv.org/abs/1508.06576) +by Leon A. Gatys, Alexander S. Ecker, and Matthias Bethge. The code is based on Justin Johnson's [Neural-Style](https://github.com/jcjohnson/neural-style). + +The paper presents an algorithm for combining the content of one image with the style of another image using +convolutional neural networks. Here's an example that maps the artistic style of +[The Starry Night](https://en.wikipedia.org/wiki/The_Starry_Night) +onto a night-time photograph of the Stanford campus: + +<div align="center"> + +<img src="https://raw.githubusercontent.com/ProGamerGov/neural-style-pt/master/examples/inputs/starry_night_google.jpg" height="223px"> +<img src="https://raw.githubusercontent.com/ProGamerGov/neural-style-pt/master/examples/inputs/hoovertowernight.jpg" height="223px"> +<img src="https://user-images.githubusercontent.com/10626398/66707704-310a8000-ed02-11e9-92f9-e2f74ef74270.jpg" width="710px"> + +</div> + +Applying the style of different images to the same content image gives interesting results. +Here we reproduce Figure 2 from the paper, which renders a photograph of the Tubingen in Germany in a +variety of styles: + +<div align="center"> + +<img src="https://raw.githubusercontent.com/ProGamerGov/neural-style-pt/master/examples/inputs/tubingen.jpg" height="250px"> +<img src="https://raw.githubusercontent.com/ProGamerGov/neural-style-pt/master/examples/outputs/tubingen_shipwreck.png" height="250px"> + +<img src="https://raw.githubusercontent.com/ProGamerGov/neural-style-pt/master/examples/outputs/tubingen_starry.png" height="250px"> +<img src="https://raw.githubusercontent.com/ProGamerGov/neural-style-pt/master/examples/outputs/tubingen_scream.png" height="250px"> + +<img src="https://raw.githubusercontent.com/ProGamerGov/neural-style-pt/master/examples/outputs/tubingen_seated_nude.png" height="250px"> +<img src="https://raw.githubusercontent.com/ProGamerGov/neural-style-pt/master/examples/outputs/tubingen_composition_vii.png" height="250px"> + +</div> + +Here are the results of applying the style of various pieces of artwork to this photograph of the +golden gate bridge: + + +<div align="center" +<img src="https://raw.githubusercontent.com/ProGamerGov/neural-style-pt/master/examples/inputs/golden_gate.jpg" height="200px"> + +<img src="https://raw.githubusercontent.com/ProGamerGov/neural-style-pt/master/examples/inputs/frida_kahlo.jpg" height="160px"> +<img src="https://raw.githubusercontent.com/ProGamerGov/neural-style-pt/master/examples/outputs/golden_gate_kahlo.png" height="160px"> +<img src="https://raw.githubusercontent.com/ProGamerGov/neural-style-pt/master/examples/inputs/escher_sphere.jpg" height="160px"> +<img src="https://raw.githubusercontent.com/ProGamerGov/neural-style-pt/master/examples/outputs/golden_gate_escher.png" height="160px"> +</div> + +<div align="center"> +<img src="https://raw.githubusercontent.com/ProGamerGov/neural-style-pt/master/examples/inputs/woman-with-hat-matisse.jpg" height="160px"> +<img src="https://raw.githubusercontent.com/ProGamerGov/neural-style-pt/master/examples/outputs/golden_gate_matisse.png" height="160px"> +<img src="https://raw.githubusercontent.com/ProGamerGov/neural-style-pt/master/examples/inputs/the_scream.jpg" height="160px"> +<img src="https://raw.githubusercontent.com/ProGamerGov/neural-style-pt/master/examples/outputs/golden_gate_scream.png" height="160px"> +</div> + +<div align="center"> +<img src="https://raw.githubusercontent.com/ProGamerGov/neural-style-pt/master/examples/inputs/starry_night_crop.png" height="160px"> +<img src="https://raw.githubusercontent.com/ProGamerGov/neural-style-pt/master/examples/outputs/golden_gate_starry.png" height="160px"> +<img src="https://raw.githubusercontent.com/ProGamerGov/neural-style-pt/master/examples/inputs/seated-nude.jpg" height="160px"> +<img src="https://raw.githubusercontent.com/ProGamerGov/neural-style-pt/master/examples/outputs/golden_gate_seated.png" height="160px"> +</div> + +### Content / Style Tradeoff + +The algorithm allows the user to trade-off the relative weight of the style and content reconstruction terms, +as shown in this example where we port the style of [Picasso's 1907 self-portrait](http://www.wikiart.org/en/pablo-picasso/self-portrait-1907) onto Brad Pitt: + +<div align="center"> +<img src="https://raw.githubusercontent.com/ProGamerGov/neural-style-pt/master/examples/inputs/picasso_selfport1907.jpg" height="220px"> +<img src="https://raw.githubusercontent.com/ProGamerGov/neural-style-pt/master/examples/inputs/brad_pitt.jpg" height="220px"> +</div> + +<div align="center"> +<img src="https://raw.githubusercontent.com/ProGamerGov/neural-style-pt/master/examples/outputs/pitt_picasso_content_5_style_100.png" height="220px"> +<img src="https://raw.githubusercontent.com/ProGamerGov/neural-style-pt/master/examples/outputs/pitt_picasso_content_1_style_100.png" height="220px"> +<img src="https://raw.githubusercontent.com/ProGamerGov/neural-style-pt/master/examples/outputs/pitt_picasso_content_01_style_100.png" height="220px"> +<img src="https://raw.githubusercontent.com/ProGamerGov/neural-style-pt/master/examples/outputs/pitt_picasso_content_0025_style_100.png" height="220px"> +</div> + +### Style Scale + +By resizing the style image before extracting style features, we can control the types of artistic +features that are transfered from the style image; you can control this behavior with the `-style_scale` flag. +Below we see three examples of rendering the Golden Gate Bridge in the style of The Starry Night. +From left to right, `-style_scale` is 2.0, 1.0, and 0.5. + +<div align="center"> +<img src="https://raw.githubusercontent.com/ProGamerGov/neural-style-pt/master/examples/outputs/golden_gate_starry_scale2.png" height=175px> +<img src="https://raw.githubusercontent.com/ProGamerGov/neural-style-pt/master/examples/outputs/golden_gate_starry_scale1.png" height=175px> +<img src="https://raw.githubusercontent.com/ProGamerGov/neural-style-pt/master/examples/outputs/golden_gate_starry_scale05.png" height=175px> +</div> + +### Multiple Style Images +You can use more than one style image to blend multiple artistic styles. + +Clockwise from upper left: "The Starry Night" + "The Scream", "The Scream" + "Composition VII", +"Seated Nude" + "Composition VII", and "Seated Nude" + "The Starry Night" + +<div align="center"> +<img src="https://raw.githubusercontent.com/ProGamerGov/neural-style-pt/master/examples/outputs/tubingen_starry_scream.png" height="250px"> +<img src="https://raw.githubusercontent.com/ProGamerGov/neural-style-pt/master/examples/outputs/tubingen_scream_composition_vii.png" height="250px"> + +<img src="https://raw.githubusercontent.com/ProGamerGov/neural-style-pt/master/examples/outputs/tubingen_starry_seated.png" height="250px"> +<img src="https://raw.githubusercontent.com/ProGamerGov/neural-style-pt/master/examples/outputs/tubingen_seated_nude_composition_vii.png" height="250px"> +</div> + + +### Style Interpolation +When using multiple style images, you can control the degree to which they are blended: + +<div align="center"> +<img src="https://raw.githubusercontent.com/ProGamerGov/neural-style-pt/master/examples/outputs/golden_gate_starry_scream_3_7.png" height="175px"> +<img src="https://raw.githubusercontent.com/ProGamerGov/neural-style-pt/master/examples/outputs/golden_gate_starry_scream_5_5.png" height="175px"> +<img src="https://raw.githubusercontent.com/ProGamerGov/neural-style-pt/master/examples/outputs/golden_gate_starry_scream_7_3.png" height="175px"> +</div> + +### Transfer style but not color +If you add the flag `-original_colors 1` then the output image will retain the colors of the original image. + +<div align="center"> +<img src="https://raw.githubusercontent.com/ProGamerGov/neural-style-pt/master/examples/outputs/tubingen_starry.png" height="185px"> +<img src="https://raw.githubusercontent.com/ProGamerGov/neural-style-pt/master/examples/outputs/tubingen_scream.png" height="185px"> +<img src="https://raw.githubusercontent.com/ProGamerGov/neural-style-pt/master/examples/outputs/tubingen_composition_vii.png" height="185px"> + +<img src="https://raw.githubusercontent.com/ProGamerGov/neural-style-pt/master/examples/outputs/original_color/tubingen_starry.png" height="185px"> +<img src="https://raw.githubusercontent.com/ProGamerGov/neural-style-pt/master/examples/outputs/original_color/tubingen_scream.png" height="185px"> +<img src="https://raw.githubusercontent.com/ProGamerGov/neural-style-pt/master/examples/outputs/original_color/tubingen_composition_vii.png" height="185px"> +</div> + +## Setup: + +While you can use Python 2's pip, it's recommended that you use Python 3's pip: + +``` +# in a terminal, run the command +pip3 install neural-style +``` + + +After installing neural-style-pt, you'll need to run the following script to download the default VGG and NIN models: + + +``` +neural-style -download_models +``` + +By default the models are downloaded to your home directory, but you can specify a download location with: + +``` +neural-style -download_models <download_path> +``` + +This will download the original [VGG-19 model](https://gist.github.com/ksimonyan/3785162f95cd2d5fee77#file-readme-md). +The original [VGG-16 model](https://gist.github.com/ksimonyan/211839e770f7b538e2d8#file-readme-md) will also be downloaded. By default the original VGG-19 model is used. + +If you have a smaller memory GPU then using NIN Imagenet model will be better and gives slightly worse yet comparable results. You can get the details on the model from [BVLC Caffe ModelZoo](https://github.com/BVLC/caffe/wiki/Model-Zoo). The NIN model is downloaded when you run `neural-style -download_models`. + +## Usage +Basic usage: +``` +neural-style -style_image <image.jpg> -content_image <image.jpg> +``` + +cuDNN usage with NIN Model: +``` +neural-style -style_image examples/inputs/picasso_selfport1907.jpg -content_image examples/inputs/brad_pitt.jpg -output_image profile.png -model_file models/nin_imagenet.pth -gpu 0 -backend cudnn -num_iterations 1000 -seed 123 -content_layers relu0,relu3,relu7,relu12 -style_layers relu0,relu3,relu7,relu12 -content_weight 10 -style_weight 500 -image_size 512 -optimizer adam +``` + + + + +To use multiple style images, pass a comma-separated list like this: + +`-style_image starry_night.jpg,the_scream.jpg`. + +Note that paths to images should not contain the `~` character to represent your home directory; you should instead use a relative +path or a full absolute path. + +**Options**: + +* `-image_size`: Maximum side length (in pixels) of the generated image. Default is 512. +* `-style_blend_weights`: The weight for blending the style of multiple style images, as a + comma-separated list, such as `-style_blend_weights 3,7`. By default all style images + are equally weighted. +* `-gpu`: Zero-indexed ID of the GPU to use; for CPU mode set `-gpu` to `c`. + +**Optimization options**: + +* `-content_weight`: How much to weight the content reconstruction term. Default is 5e0. +* `-style_weight`: How much to weight the style reconstruction term. Default is 1e2. +* `-tv_weight`: Weight of total-variation (TV) regularization; this helps to smooth the image. + Default is 1e-3. Set to 0 to disable TV regularization. +* `-num_iterations`: Default is 1000. +* `-init`: Method for generating the generated image; one of `random` or `image`. + Default is `random` which uses a noise initialization as in the paper; `image` + initializes with the content image. +* `-init_image`: Replaces the initialization image with a user specified image. +* `-optimizer`: The optimization algorithm to use; either `lbfgs` or `adam`; default is `lbfgs`. + L-BFGS tends to give better results, but uses more memory. Switching to ADAM will reduce memory usage; + when using ADAM you will probably need to play with other parameters to get good results, especially + the style weight, content weight, and learning rate. +* `-learning_rate`: Learning rate to use with the ADAM optimizer. Default is 1e1. + +**Output options**: + +* `-output_image`: Name of the output image. Default is `out.png`. +* `-print_iter`: Print progress every `print_iter` iterations. Set to 0 to disable printing. +* `-save_iter`: Save the image every `save_iter` iterations. Set to 0 to disable saving intermediate results. + +**Layer options**: + +* `-content_layers`: Comma-separated list of layer names to use for content reconstruction. + Default is `relu4_2`. +* `-style_layers`: Comma-separated list of layer names to use for style reconstruction. + Default is `relu1_1,relu2_1,relu3_1,relu4_1,relu5_1`. + +**Other options**: + +* `-style_scale`: Scale at which to extract features from the style image. Default is 1.0. +* `-original_colors`: If you set this to 1, then the output image will keep the colors of the content image. +* `-model_file`: Path to the `.pth` file for the VGG Caffe model. Default is the original VGG-19 model; you can also try the original VGG-16 model. +* `-pooling`: The type of pooling layers to use; one of `max` or `avg`. Default is `max`. + The VGG-19 models uses max pooling layers, but the paper mentions that replacing these layers with average + pooling layers can improve the results. I haven't been able to get good results using average pooling, but + the option is here. +* `-seed`: An integer value that you can specify for repeatable results. By default this value is random for each run. +* `-multidevice_strategy`: A comma-separated list of layer indices at which to split the network when using multiple devices. See [Multi-GPU scaling](https://github.com/ProGamerGov/neural-style-pt/tree/pip-master#multi-gpu-scaling) for more details. +* `-backend`: `nn`, `cudnn`, or `mkl`. Default is `nn`. + `mkl` requires Intel's MKL backend. +* `-cudnn_autotune`: When using the cuDNN backend, pass this flag to use the built-in cuDNN autotuner to select + the best convolution algorithms for your architecture. This will make the first iteration a bit slower and can + take a bit more memory, but may significantly speed up the cuDNN backend. +* `-download_models`: Path to where the VGG-19, VGG-16, and NIN models will be downloaded to. If no path is specified, the models will be downloaded to your home directory. + +## Frequently Asked Questions + +**Problem:** The program runs out of memory and dies + +**Solution:** Try reducing the image size: `-image_size 256` (or lower). Note that different image sizes will likely +require non-default values for `-style_weight` and `-content_weight` for optimal results. +If you are running on a GPU, you can also try running with `-backend cudnn` to reduce memory usage. + +**Problem:** `-backend cudnn` is slower than default NN backend + +**Solution:** Add the flag `-cudnn_autotune`; this will use the built-in cuDNN autotuner to select the best convolution algorithms. + +**Problem:** Get the following error message: + +`Missing key(s) in state_dict: "classifier.0.bias", "classifier.0.weight", "classifier.3.bias", "classifier.3.weight". Unexpected key(s) in state_dict: "classifier.1.weight", "classifier.1.bias", "classifier.4.weight", "classifier.4.bias".` + +**Solution:** Due to a mix up with layer locations, older models require a fix to be compatible with newer versions of PyTorch. Donwloading the models with `neural-style -download_models` will automatically perform these fixes after downloading the models. You can find other compatible models [here](https://github.com/ProGamerGov/neural-style-pt/wiki/Other-Models). + + + +## Memory Usage +By default, `neural-style-pt` uses the `nn` backend for convolutions and L-BFGS for optimization. These give good results, but can both use a lot of memory. You can reduce memory usage with the following: + +* **Use cuDNN**: Add the flag `-backend cudnn` to use the cuDNN backend. This will only work in GPU mode. +* **Use ADAM**: Add the flag `-optimizer adam` to use ADAM instead of L-BFGS. This should significantly + reduce memory usage, but may require tuning of other parameters for good results; in particular you should + play with the learning rate, content weight, and style weight. + This should work in both CPU and GPU modes. +* **Reduce image size**: If the above tricks are not enough, you can reduce the size of the generated image; + pass the flag `-image_size 256` to generate an image at half the default size. + +With the default settings, neural-style-pt uses about 3.7 GB of GPU memory on my system; switching to ADAM and cuDNN reduces the GPU memory footprint to about 1GB. + +## Speed +Speed can vary a lot depending on the backend and the optimizer. +Here are some times for running 500 iterations with `-image_size=512` on a Tesla K80 with different settings: +* `-backend nn -optimizer lbfgs`: 117 seconds +* `-backend nn -optimizer adam`: 100 seconds +* `-backend cudnn -optimizer lbfgs`: 124 seconds +* `-backend cudnn -optimizer adam`: 107 seconds +* `-backend cudnn -cudnn_autotune -optimizer lbfgs`: 109 seconds +* `-backend cudnn -cudnn_autotune -optimizer adam`: 91 seconds + +Here are the same benchmarks on a GTX 1080: +* `-backend nn -optimizer lbfgs`: 56 seconds +* `-backend nn -optimizer adam`: 38 seconds +* `-backend cudnn -optimizer lbfgs`: 40 seconds +* `-backend cudnn -optimizer adam`: 40 seconds +* `-backend cudnn -cudnn_autotune -optimizer lbfgs`: 23 seconds +* `-backend cudnn -cudnn_autotune -optimizer adam`: 24 seconds + +## Multi-GPU scaling +You can use multiple CPU and GPU devices to process images at higher resolutions; different layers of the network will be +computed on different devices. You can control which GPU and CPU devices are used with the `-gpu` flag, and you can control +how to split layers across devices using the `-multidevice_strategy` flag. + +For example in a server with four GPUs, you can give the flag `-gpu 0,1,2,3` to process on GPUs 0, 1, 2, and 3 in that order; by also giving the flag `-multidevice_strategy 3,6,12` you indicate that the first two layers should be computed on GPU 0, layers 3 to 5 should be computed on GPU 1, layers 6 to 11 should be computed on GPU 2, and the remaining layers should be computed on GPU 3. You will need to tune the `-multidevice_strategy` for your setup in order to achieve maximal resolution. + +We can achieve very high quality results at high resolution by combining multi-GPU processing with multiscale +generation as described in the paper +<a href="https://arxiv.org/abs/1611.07865">**Controlling Perceptual Factors in Neural Style Transfer**</a> by Leon A. Gatys, +Alexander S. Ecker, Matthias Bethge, Aaron Hertzmann and Eli Shechtman. + + +Here is a 4016 x 2213 image generated on a server with eight Tesla K80 GPUs: + +<img src="https://raw.githubusercontent.com/ProGamerGov/neural-style-pt/master/examples/outputs/starry_stanford_bigger.png" height="400px"> + +The script used to generate this image <a href='examples/scripts/starry_stanford_bigger.sh'>can be found here</a>. + +## Implementation details +Images are initialized with white noise and optimized using L-BFGS. + +We perform style reconstructions using the `conv1_1`, `conv2_1`, `conv3_1`, `conv4_1`, and `conv5_1` layers +and content reconstructions using the `conv4_2` layer. As in the paper, the five style reconstruction losses have +equal weights. + +## Citation + +If you find this code useful for your research, please cite: + +``` +@misc{ProGamerGov2018, +author = {ProGamerGov}, +title = {neural-style-pt}, +year = {2018}, +publisher = {GitHub}, +journal = {GitHub repository}, +howpublished = {\url{https://github.com/ProGamerGov/neural-style-pt}}, +} +``` + + + + +%prep +%autosetup -n neural-style-0.5.7 + +%build +%py3_build + +%install +%py3_install +install -d -m755 %{buildroot}/%{_pkgdocdir} +if [ -d doc ]; then cp -arf doc %{buildroot}/%{_pkgdocdir}; fi +if [ -d docs ]; then cp -arf docs %{buildroot}/%{_pkgdocdir}; fi +if [ -d example ]; then cp -arf example %{buildroot}/%{_pkgdocdir}; fi +if [ -d examples ]; then cp -arf examples %{buildroot}/%{_pkgdocdir}; fi +pushd %{buildroot} +if [ -d usr/lib ]; then + find usr/lib -type f -printf "/%h/%f\n" >> filelist.lst +fi +if [ -d usr/lib64 ]; then + find usr/lib64 -type f -printf "/%h/%f\n" >> filelist.lst +fi +if [ -d usr/bin ]; then + find usr/bin -type f -printf "/%h/%f\n" >> filelist.lst +fi +if [ -d usr/sbin ]; then + find usr/sbin -type f -printf "/%h/%f\n" >> filelist.lst +fi +touch doclist.lst +if [ -d usr/share/man ]; then + find usr/share/man -type f -printf "/%h/%f.gz\n" >> doclist.lst +fi +popd +mv %{buildroot}/filelist.lst . +mv %{buildroot}/doclist.lst . + +%files -n python3-neural-style -f filelist.lst +%dir %{python3_sitelib}/* + +%files help -f doclist.lst +%{_docdir}/* + +%changelog +* Mon May 29 2023 Python_Bot <Python_Bot@openeuler.org> - 0.5.7-1 +- Package Spec generated @@ -0,0 +1 @@ +499ffd8a5fafc412fe4eba172ee4d827 neural-style-0.5.7.tar.gz |