%global _empty_manifest_terminate_build 0
Name: python-tycho-api
Version: 1.13.0
Release: 1
Summary: Tycho is an API, compiler, and executor for cloud native distributed systems.
License: MIT License
URL: https://pypi.org/project/tycho-api/
Source0: https://mirrors.nju.edu.cn/pypi/web/packages/b8/70/00027367a7e709da65e32a36793ea4b65583bb62cb57974323bdda8a1f4b/tycho-api-1.13.0.tar.gz
BuildArch: noarch
Requires: python3-deepmerge
Requires: python3-docker-compose
Requires: python3-flasgger
Requires: python3-Flask
Requires: python3-flask-cors
Requires: python3-flask-restful
Requires: python3-GitPython
Requires: python3-Jinja2
Requires: python3-jsonschema
Requires: python3-kubernetes
Requires: python3-netifaces
Requires: python3-PyYAML
Requires: python3-requests
Requires: python3-requests-cache
%description
# Docker compose formatted system.
version: "3"
services:
jupyter-datascience:
image: jupyter/datascience-notebook
entrypoint: start.sh jupyter lab --LabApp.token=
ports:
- 8888:8888
```
In one shell, run the API:
```
$ export PATH=~/dev/tycho/bin:$PATH
$ tycho api --debug
```
In another shell, launch three notebook instances.
```
$ export PATH=~/dev/tycho/bin:$PATH
$ tycho up -f sample/jupyter-ds/docker-compose.yaml
SYSTEM GUID PORT
jupyter-ds 909f2e60b83340cd905ae3865d461156 32693
$ tycho up -f sample/jupyter-ds/docker-compose.yaml
SYSTEM GUID PORT
jupyter-ds 6fc07ab865d14c4c8fd2d6e0380b270e 31333
$ tycho up -f sample/jupyter-ds/docker-compose.yaml
SYSTEM GUID PORT
jupyter-ds 38f01c140f0141d9b4dc1baa33960362 32270
```
Then make a request to each instance to show it's running. It may take a moment for the instances to be ready, especially if you're pulling a container for the first time.
```
$ for p in $(tycho status | grep -v PORT | awk '{ print $4 }'); do
url=http://$(minikube ip):$p; echo $url; wget -q -O- $url | grep /title;
done
http://192.168.99.111:32270
JupyterLab
http://192.168.99.111:31333
JupyterLab
http://192.168.99.111:32693
JupyterLab
```
Delete all running deployments.
```
$ tycho down $(tycho status --terse)
38f01c140f0141d9b4dc1baa33960362
6fc07ab865d14c4c8fd2d6e0380b270e
909f2e60b83340cd905ae3865d461156
```
And show that they're gone
```
$ tycho status
None running
```
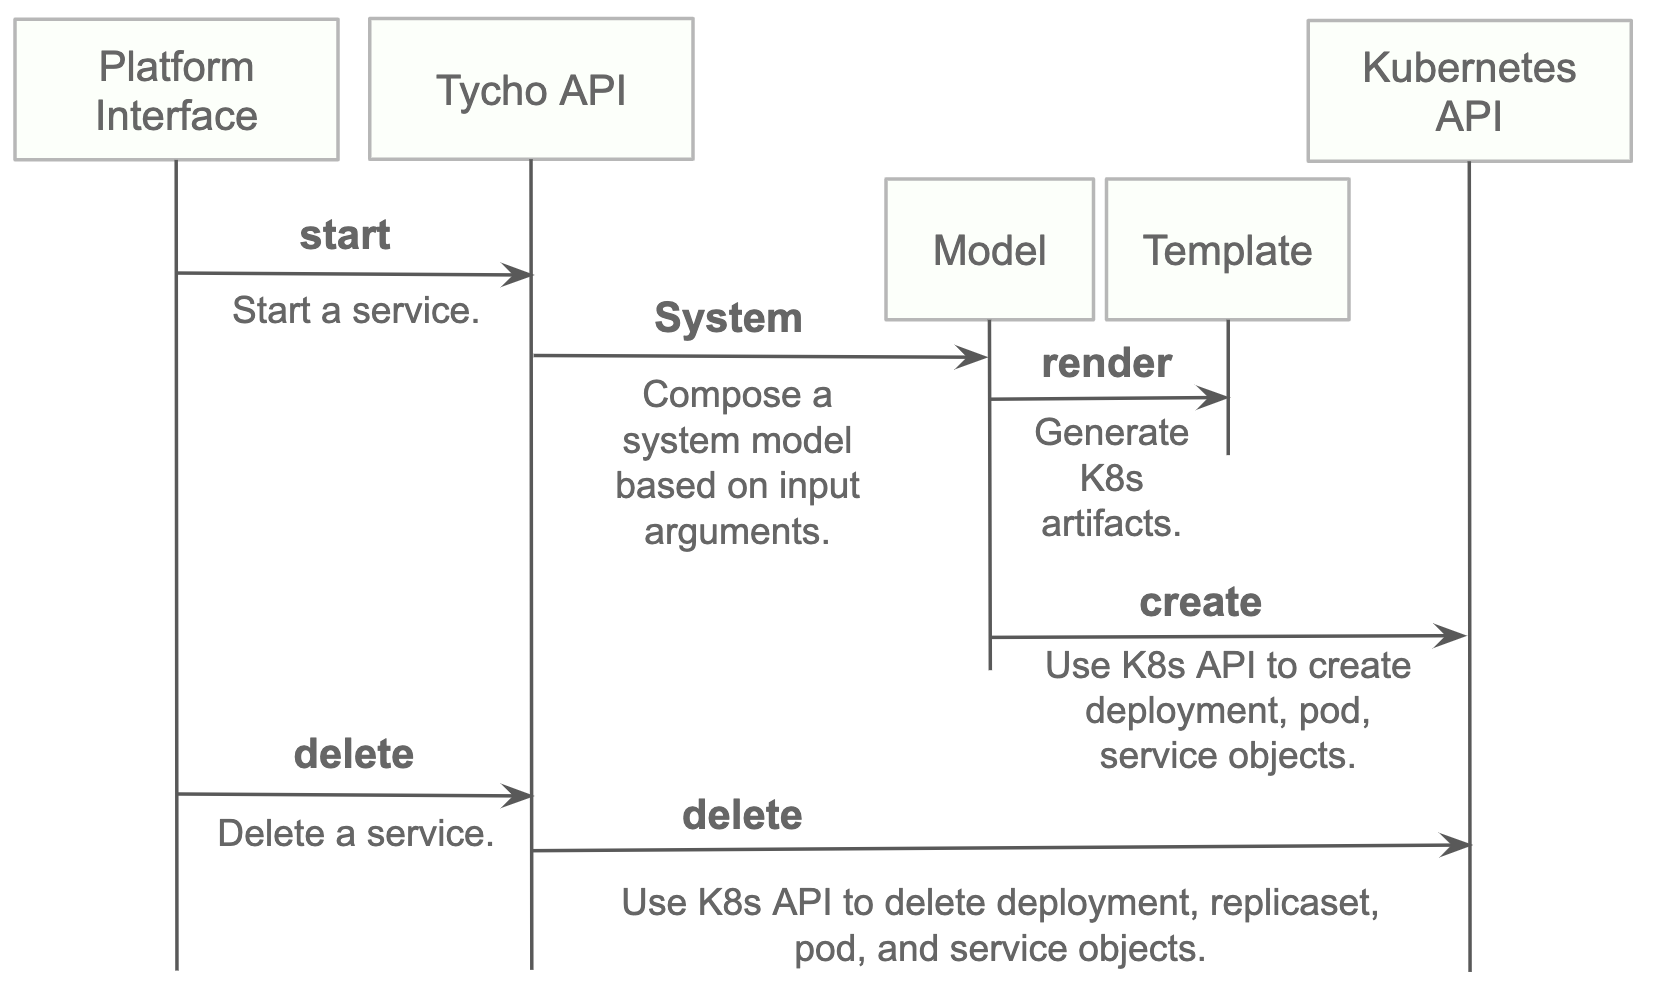
### Architecture
## Install
* Install python 3.7.x or greater.
* Create a virtual environment.
* Install the requirements.
* Start the server.
```
python3 -m venv environmentName
source environmentName/bin/activate
pip install -r requirements.txt
export PATH=/bin:$PATH
tycho api
```
### Usage - A. Development Environment Next to Minikube
This mode uses a local minikube instance with Tycho running outside of Minikube. This is the easiest way to add and test new features quickly.
Run minikube:
```
minikbue start
```
Run the minikube dashboard:
```
minikube dashboard
```
Run the Tycho API:
```
cd tycho
PYTHONPATH=$PWD/.. python api.py
```
Launch the Swagger interface `http://localhost:5000/apidocs/`.
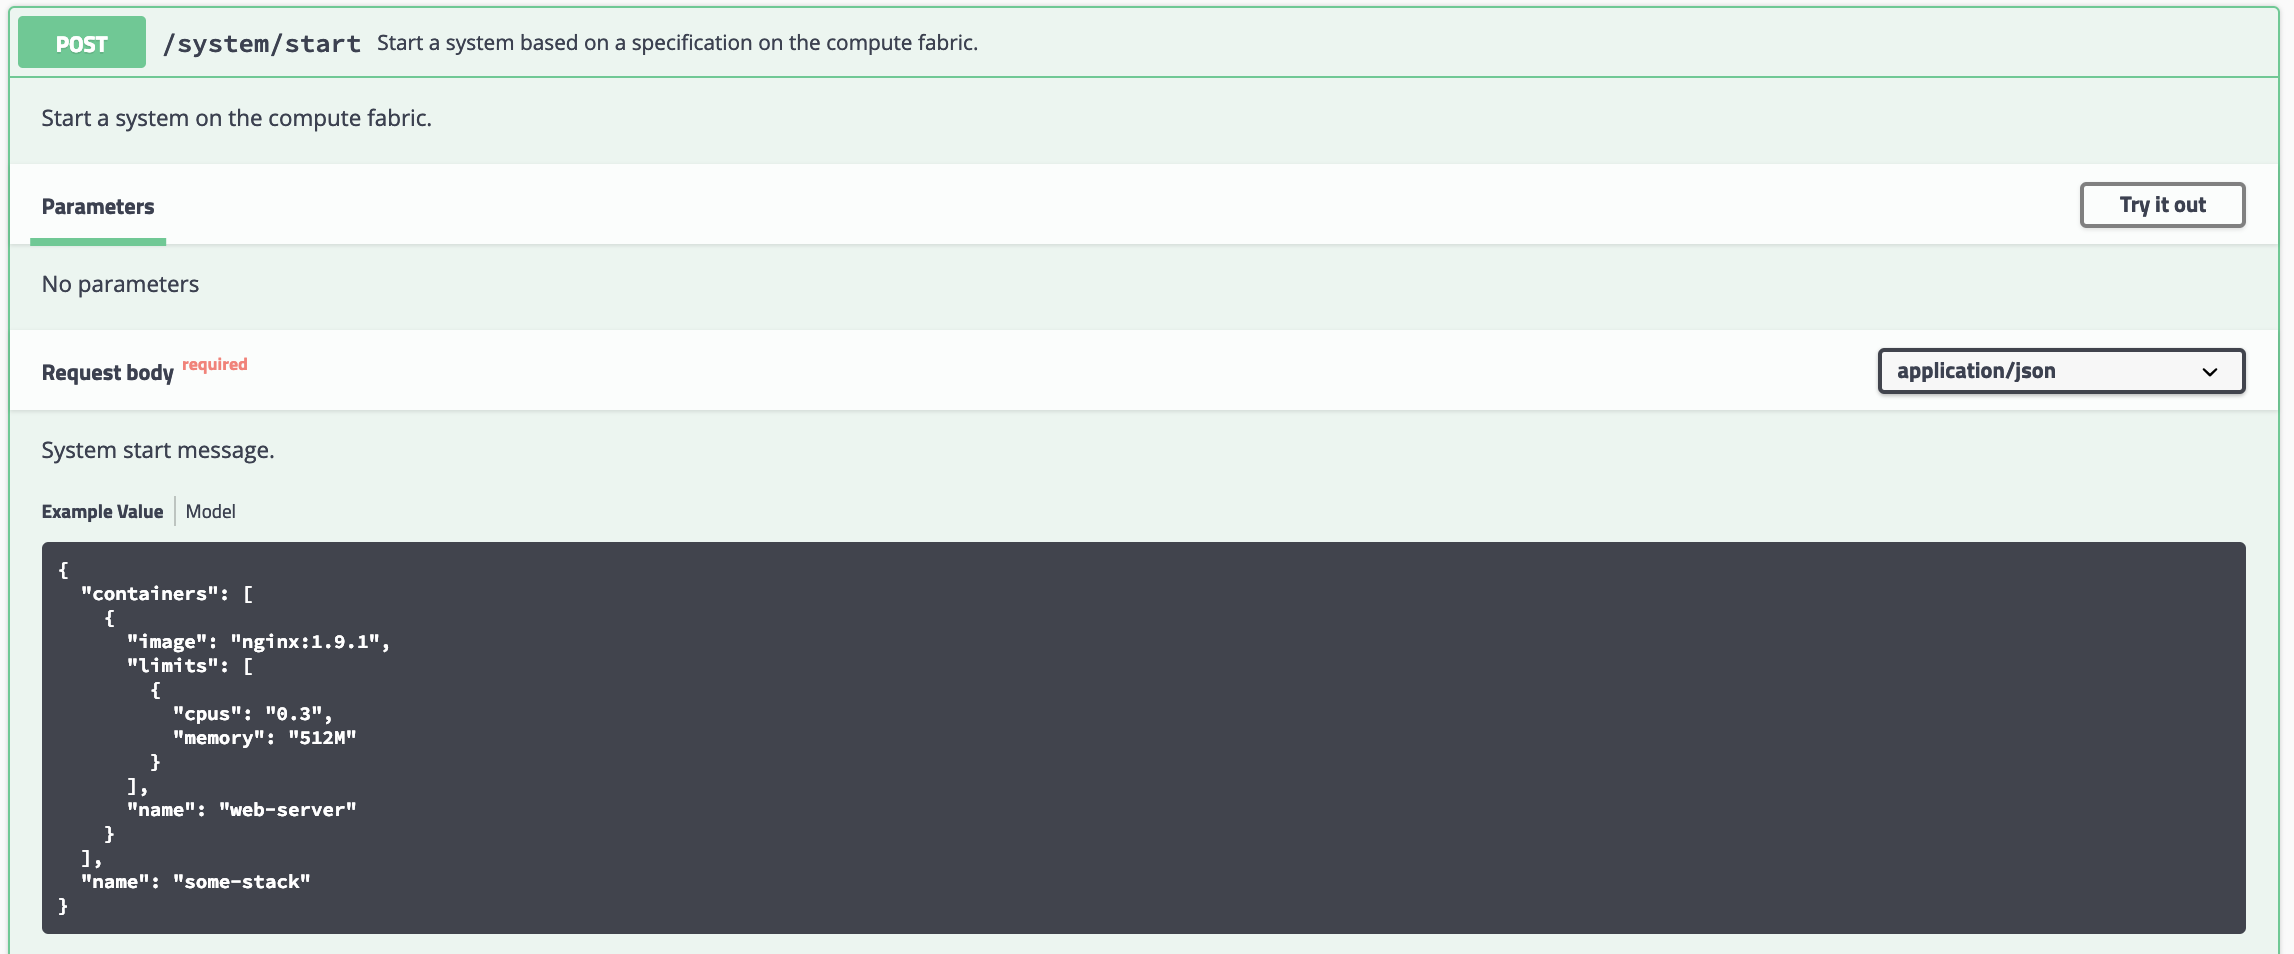
Use the Tycho CLI client as shown above or invoke the API.
### Usage - B. Development Environment Within Minikube
When we deploy Tycho into Minikube it is now able to get its Kubernetes API configuration from within the cluster.
In the repo's kubernetes directory, we define deployment, pod, service, clusterrole, and clusterrolebinding models for Tycho. The following interaction shows deploying Tycho into Minikube and interacting with the API.
We first deploy all Kubernetes Tycho-api artifacts into Minkube:
```
(tycho) [scox@mac~/dev/tycho/tycho]$ kubectl create -f ../kubernetes/
deployment.extensions/tycho-api created
pod/tycho-api created
clusterrole.rbac.authorization.k8s.io/tycho-api-access created
clusterrolebinding.rbac.authorization.k8s.io/tycho-api-access created
service/tycho-api created
```
Then we use the client as usual.
### Usage - C. Within Google Kubernetes Engine from the Google Cloud Shell
Starting out, Tycho's not running on the cluster:
First deploy the Tycho API
```
$ kubectl create -f ../kubernetes/
deployment.extensions/tycho-api created
pod/tycho-api created
clusterrole.rbac.authorization.k8s.io/tycho-api-access created
clusterrolebinding.rbac.authorization.k8s.io/tycho-api-access created
service/tycho-api created
```
Note, here we've edited the Tycho service def to create the service as type:LoadBalancer for the purposes of a command line demo. In general, we'll access the service from within the cluster rather than exposing it externally.
That runs Tycho:

Initialize the Tycho API's load balancer IP and node port.
```
$ lb_ip=$(kubectl get svc tycho-api -o json | jq .status.loadBalancer.ingress[0].ip | sed -e s,\",,g)
$ tycho_port=$(kubectl get service tycho-api --output json | jq .spec.ports[0].port)
```
Launch an application (deployment, pod, service). Note the `--command` flag is used to specify the command to run in the container. We use this to specify a flag that will cause the notebook to start without prompting for authentication credentials.
```
$ PYTHONPATH=$PWD/.. python client.py --up -n jupyter-data-science-3425 -c jupyter/datascience-notebook -p 8888 --command "start.sh jupyter lab --LabApp.token='
'"
200
{
"status": "success",
"result": {
"containers": {
"jupyter-data-science-3425-c": {
"port": 32414
}
}
},
"message": "Started system jupyter-data-science-3425"
}
```
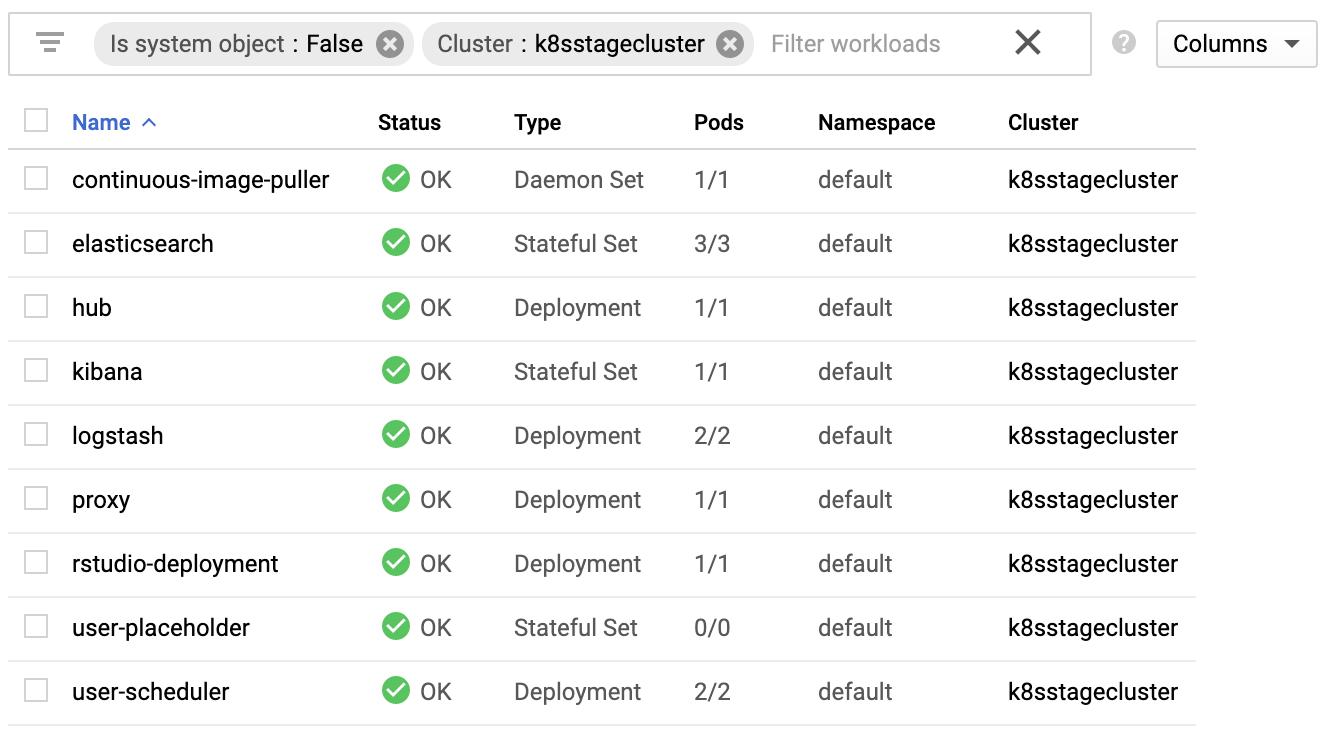
Refreshing the GKE cluster monitoring UI will now show the service starting:

Then running

Get the job's load balancer ip and make a request to test the service.
```
$ job_lb_ip=$(kubectl get svc jupyter-data-science-3425 -o json | jq .status.loadBalancer.ingress[0].ip | sed -e s,\",,g)
$ wget --quiet -O- http://$job_lb_ip:8888 | grep -i /title
Jupyter Notebook
```
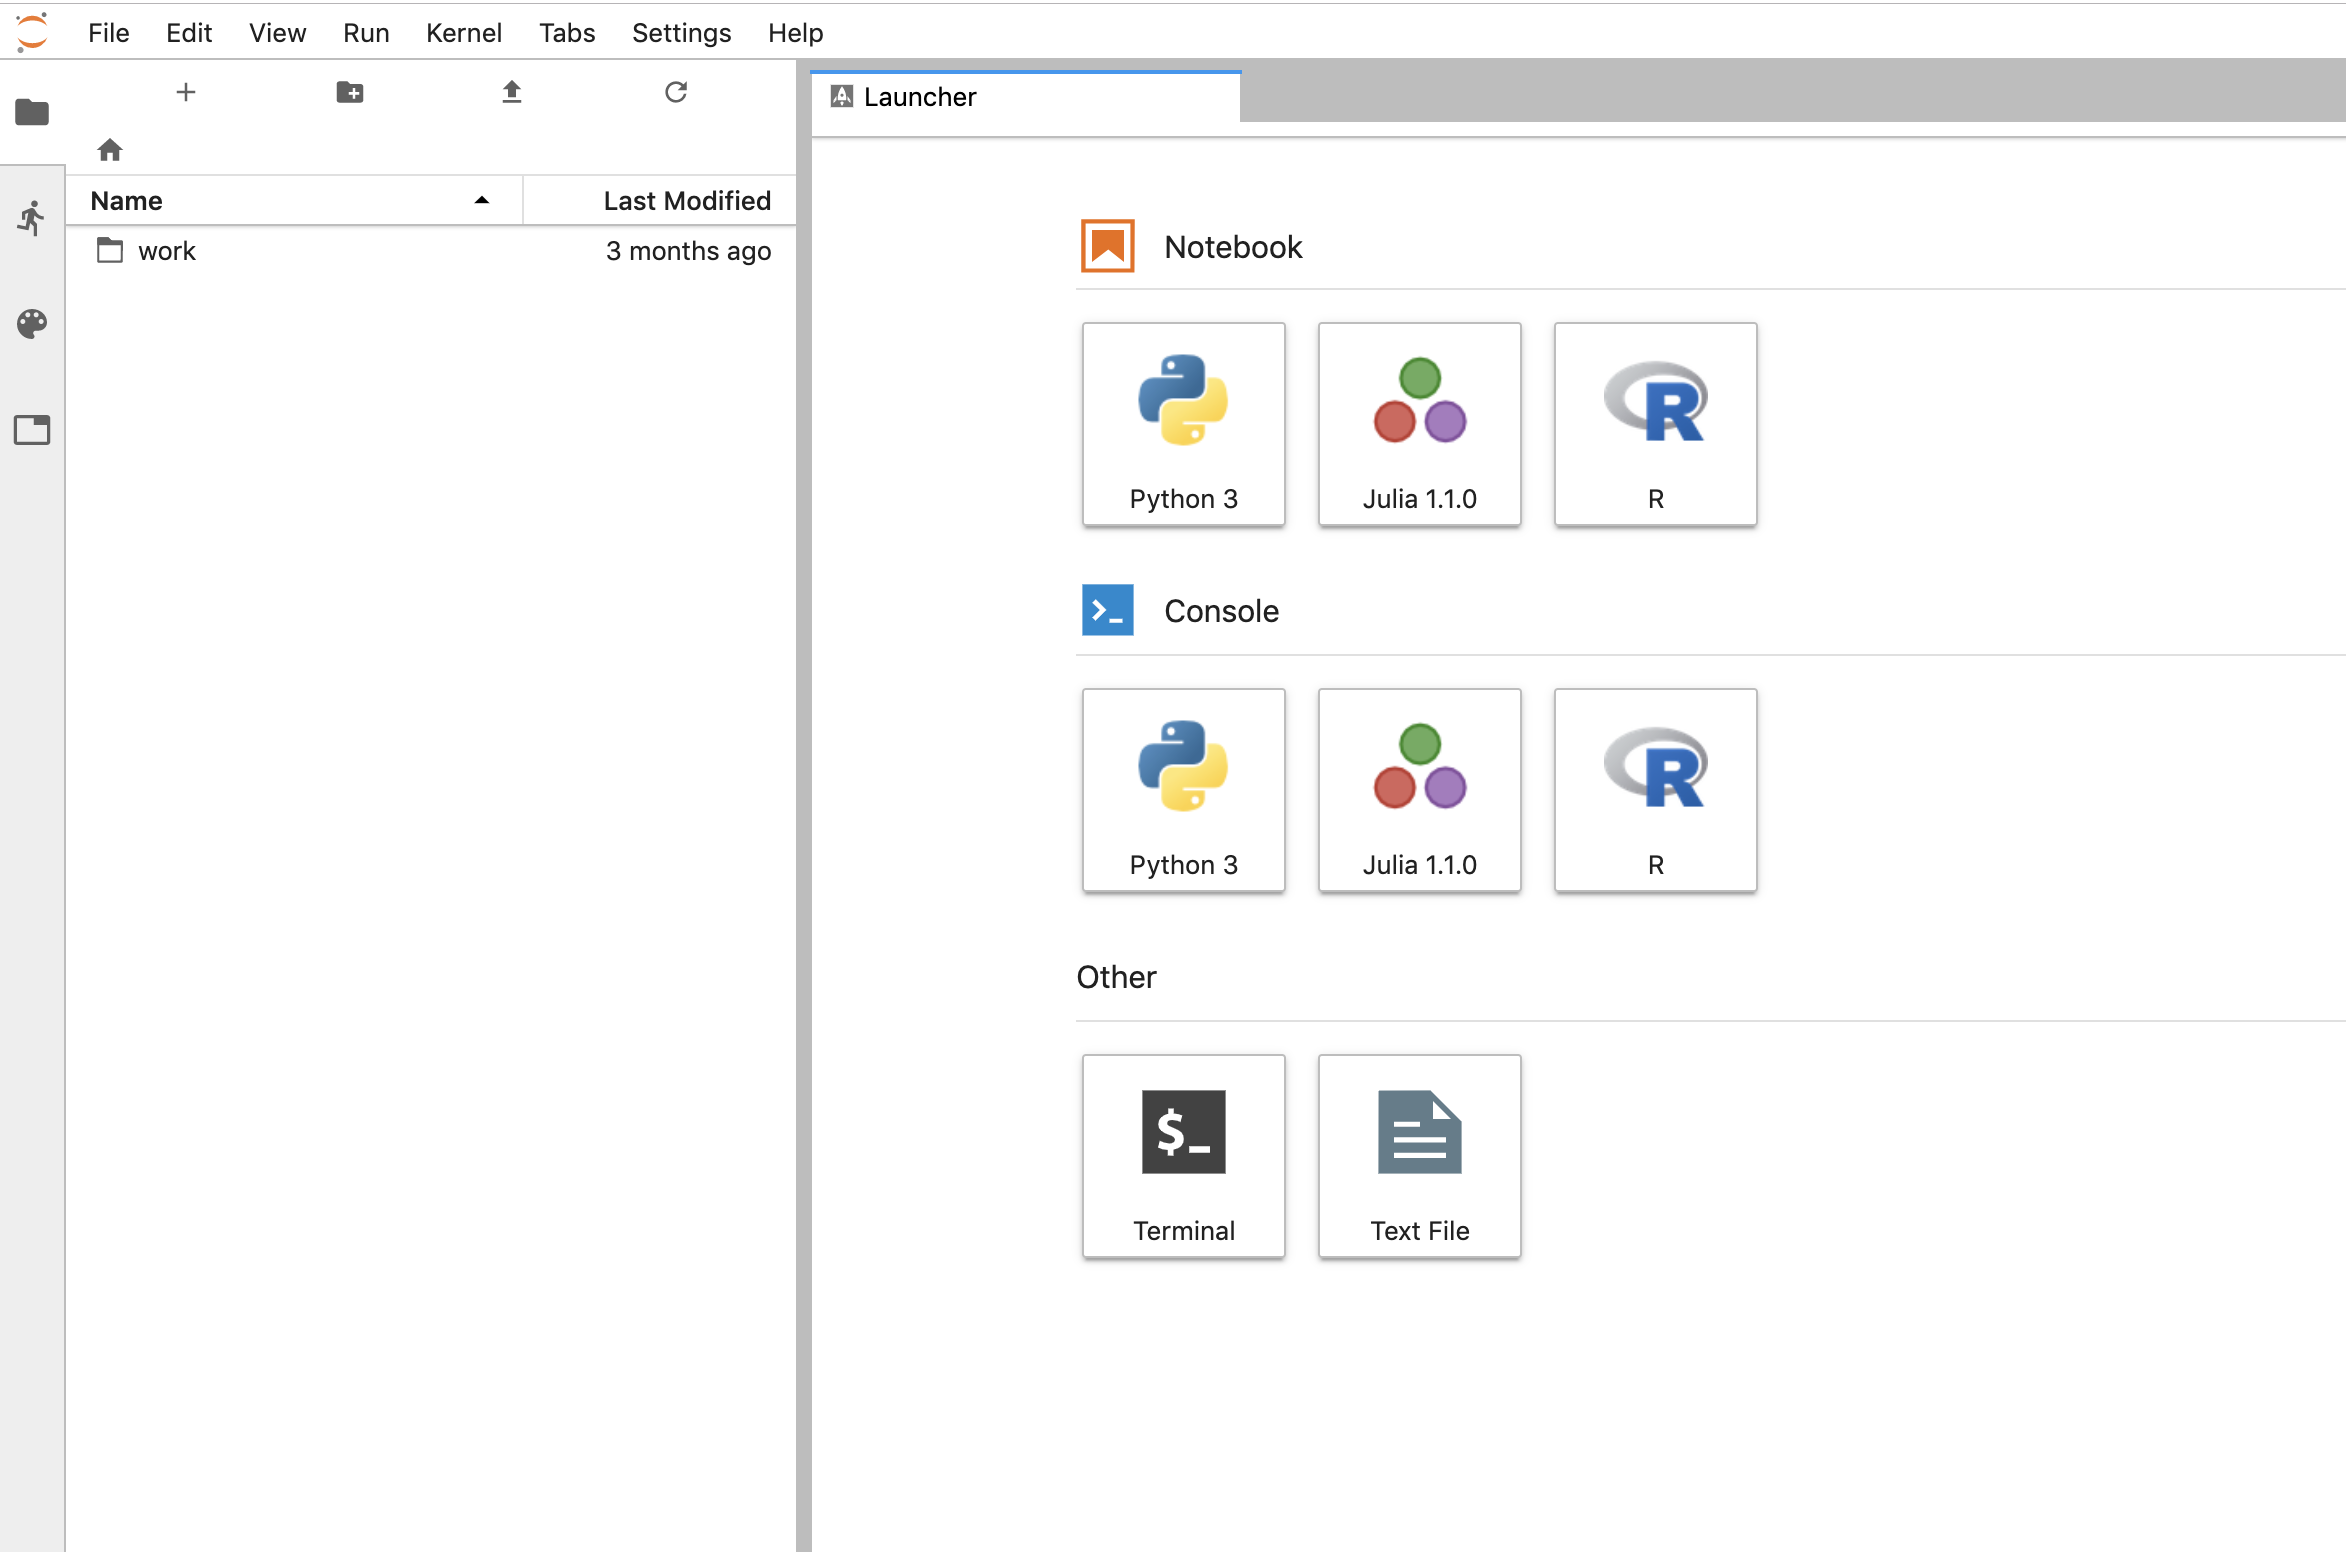
From a browser, that URL takes us directly to the Jupyter Lab IDE:
And shut the service down:
```
$ PYTHONPATH=$PWD/.. python client.py --down -n jupyter-data-science-3425 -s http://$lb_ip:$tycho_port
200
{
"status": "success",
"result": null,
"message": "Deleted system jupyter-data-science-3425"
}
```
This removes the deployment, pod, service, and replicasets created by the launcher.
### Client Endpoint Autodiscovery
Using the command lines above without the `-s` flag for server will work on GKE. That is, the client is created by first using the K8s API to locate the Tycho-API endpoint and port. It builds the URL automatically and creates a TychoAPI object ready to use.
```
client_factory = TychoClientFactory ()
client = client_factory.get_client ()
```
%package -n python3-tycho-api
Summary: Tycho is an API, compiler, and executor for cloud native distributed systems.
Provides: python-tycho-api
BuildRequires: python3-devel
BuildRequires: python3-setuptools
BuildRequires: python3-pip
%description -n python3-tycho-api
# Docker compose formatted system.
version: "3"
services:
jupyter-datascience:
image: jupyter/datascience-notebook
entrypoint: start.sh jupyter lab --LabApp.token=
ports:
- 8888:8888
```
In one shell, run the API:
```
$ export PATH=~/dev/tycho/bin:$PATH
$ tycho api --debug
```
In another shell, launch three notebook instances.
```
$ export PATH=~/dev/tycho/bin:$PATH
$ tycho up -f sample/jupyter-ds/docker-compose.yaml
SYSTEM GUID PORT
jupyter-ds 909f2e60b83340cd905ae3865d461156 32693
$ tycho up -f sample/jupyter-ds/docker-compose.yaml
SYSTEM GUID PORT
jupyter-ds 6fc07ab865d14c4c8fd2d6e0380b270e 31333
$ tycho up -f sample/jupyter-ds/docker-compose.yaml
SYSTEM GUID PORT
jupyter-ds 38f01c140f0141d9b4dc1baa33960362 32270
```
Then make a request to each instance to show it's running. It may take a moment for the instances to be ready, especially if you're pulling a container for the first time.
```
$ for p in $(tycho status | grep -v PORT | awk '{ print $4 }'); do
url=http://$(minikube ip):$p; echo $url; wget -q -O- $url | grep /title;
done
http://192.168.99.111:32270
JupyterLab
http://192.168.99.111:31333
JupyterLab
http://192.168.99.111:32693
JupyterLab
```
Delete all running deployments.
```
$ tycho down $(tycho status --terse)
38f01c140f0141d9b4dc1baa33960362
6fc07ab865d14c4c8fd2d6e0380b270e
909f2e60b83340cd905ae3865d461156
```
And show that they're gone
```
$ tycho status
None running
```
### Architecture

## Install
* Install python 3.7.x or greater.
* Create a virtual environment.
* Install the requirements.
* Start the server.
```
python3 -m venv environmentName
source environmentName/bin/activate
pip install -r requirements.txt
export PATH=/bin:$PATH
tycho api
```
### Usage - A. Development Environment Next to Minikube
This mode uses a local minikube instance with Tycho running outside of Minikube. This is the easiest way to add and test new features quickly.
Run minikube:
```
minikbue start
```
Run the minikube dashboard:
```
minikube dashboard
```
Run the Tycho API:
```
cd tycho
PYTHONPATH=$PWD/.. python api.py
```
Launch the Swagger interface `http://localhost:5000/apidocs/`.

Use the Tycho CLI client as shown above or invoke the API.
### Usage - B. Development Environment Within Minikube
When we deploy Tycho into Minikube it is now able to get its Kubernetes API configuration from within the cluster.
In the repo's kubernetes directory, we define deployment, pod, service, clusterrole, and clusterrolebinding models for Tycho. The following interaction shows deploying Tycho into Minikube and interacting with the API.
We first deploy all Kubernetes Tycho-api artifacts into Minkube:
```
(tycho) [scox@mac~/dev/tycho/tycho]$ kubectl create -f ../kubernetes/
deployment.extensions/tycho-api created
pod/tycho-api created
clusterrole.rbac.authorization.k8s.io/tycho-api-access created
clusterrolebinding.rbac.authorization.k8s.io/tycho-api-access created
service/tycho-api created
```
Then we use the client as usual.
### Usage - C. Within Google Kubernetes Engine from the Google Cloud Shell
Starting out, Tycho's not running on the cluster:

First deploy the Tycho API
```
$ kubectl create -f ../kubernetes/
deployment.extensions/tycho-api created
pod/tycho-api created
clusterrole.rbac.authorization.k8s.io/tycho-api-access created
clusterrolebinding.rbac.authorization.k8s.io/tycho-api-access created
service/tycho-api created
```
Note, here we've edited the Tycho service def to create the service as type:LoadBalancer for the purposes of a command line demo. In general, we'll access the service from within the cluster rather than exposing it externally.
That runs Tycho:

Initialize the Tycho API's load balancer IP and node port.
```
$ lb_ip=$(kubectl get svc tycho-api -o json | jq .status.loadBalancer.ingress[0].ip | sed -e s,\",,g)
$ tycho_port=$(kubectl get service tycho-api --output json | jq .spec.ports[0].port)
```
Launch an application (deployment, pod, service). Note the `--command` flag is used to specify the command to run in the container. We use this to specify a flag that will cause the notebook to start without prompting for authentication credentials.
```
$ PYTHONPATH=$PWD/.. python client.py --up -n jupyter-data-science-3425 -c jupyter/datascience-notebook -p 8888 --command "start.sh jupyter lab --LabApp.token='
'"
200
{
"status": "success",
"result": {
"containers": {
"jupyter-data-science-3425-c": {
"port": 32414
}
}
},
"message": "Started system jupyter-data-science-3425"
}
```
Refreshing the GKE cluster monitoring UI will now show the service starting:

Then running

Get the job's load balancer ip and make a request to test the service.
```
$ job_lb_ip=$(kubectl get svc jupyter-data-science-3425 -o json | jq .status.loadBalancer.ingress[0].ip | sed -e s,\",,g)
$ wget --quiet -O- http://$job_lb_ip:8888 | grep -i /title
Jupyter Notebook
```
From a browser, that URL takes us directly to the Jupyter Lab IDE:

And shut the service down:
```
$ PYTHONPATH=$PWD/.. python client.py --down -n jupyter-data-science-3425 -s http://$lb_ip:$tycho_port
200
{
"status": "success",
"result": null,
"message": "Deleted system jupyter-data-science-3425"
}
```
This removes the deployment, pod, service, and replicasets created by the launcher.
### Client Endpoint Autodiscovery
Using the command lines above without the `-s` flag for server will work on GKE. That is, the client is created by first using the K8s API to locate the Tycho-API endpoint and port. It builds the URL automatically and creates a TychoAPI object ready to use.
```
client_factory = TychoClientFactory ()
client = client_factory.get_client ()
```
%package help
Summary: Development documents and examples for tycho-api
Provides: python3-tycho-api-doc
%description help
# Docker compose formatted system.
version: "3"
services:
jupyter-datascience:
image: jupyter/datascience-notebook
entrypoint: start.sh jupyter lab --LabApp.token=
ports:
- 8888:8888
```
In one shell, run the API:
```
$ export PATH=~/dev/tycho/bin:$PATH
$ tycho api --debug
```
In another shell, launch three notebook instances.
```
$ export PATH=~/dev/tycho/bin:$PATH
$ tycho up -f sample/jupyter-ds/docker-compose.yaml
SYSTEM GUID PORT
jupyter-ds 909f2e60b83340cd905ae3865d461156 32693
$ tycho up -f sample/jupyter-ds/docker-compose.yaml
SYSTEM GUID PORT
jupyter-ds 6fc07ab865d14c4c8fd2d6e0380b270e 31333
$ tycho up -f sample/jupyter-ds/docker-compose.yaml
SYSTEM GUID PORT
jupyter-ds 38f01c140f0141d9b4dc1baa33960362 32270
```
Then make a request to each instance to show it's running. It may take a moment for the instances to be ready, especially if you're pulling a container for the first time.
```
$ for p in $(tycho status | grep -v PORT | awk '{ print $4 }'); do
url=http://$(minikube ip):$p; echo $url; wget -q -O- $url | grep /title;
done
http://192.168.99.111:32270
JupyterLab
http://192.168.99.111:31333
JupyterLab
http://192.168.99.111:32693
JupyterLab
```
Delete all running deployments.
```
$ tycho down $(tycho status --terse)
38f01c140f0141d9b4dc1baa33960362
6fc07ab865d14c4c8fd2d6e0380b270e
909f2e60b83340cd905ae3865d461156
```
And show that they're gone
```
$ tycho status
None running
```
### Architecture

## Install
* Install python 3.7.x or greater.
* Create a virtual environment.
* Install the requirements.
* Start the server.
```
python3 -m venv environmentName
source environmentName/bin/activate
pip install -r requirements.txt
export PATH=/bin:$PATH
tycho api
```
### Usage - A. Development Environment Next to Minikube
This mode uses a local minikube instance with Tycho running outside of Minikube. This is the easiest way to add and test new features quickly.
Run minikube:
```
minikbue start
```
Run the minikube dashboard:
```
minikube dashboard
```
Run the Tycho API:
```
cd tycho
PYTHONPATH=$PWD/.. python api.py
```
Launch the Swagger interface `http://localhost:5000/apidocs/`.

Use the Tycho CLI client as shown above or invoke the API.
### Usage - B. Development Environment Within Minikube
When we deploy Tycho into Minikube it is now able to get its Kubernetes API configuration from within the cluster.
In the repo's kubernetes directory, we define deployment, pod, service, clusterrole, and clusterrolebinding models for Tycho. The following interaction shows deploying Tycho into Minikube and interacting with the API.
We first deploy all Kubernetes Tycho-api artifacts into Minkube:
```
(tycho) [scox@mac~/dev/tycho/tycho]$ kubectl create -f ../kubernetes/
deployment.extensions/tycho-api created
pod/tycho-api created
clusterrole.rbac.authorization.k8s.io/tycho-api-access created
clusterrolebinding.rbac.authorization.k8s.io/tycho-api-access created
service/tycho-api created
```
Then we use the client as usual.
### Usage - C. Within Google Kubernetes Engine from the Google Cloud Shell
Starting out, Tycho's not running on the cluster:

First deploy the Tycho API
```
$ kubectl create -f ../kubernetes/
deployment.extensions/tycho-api created
pod/tycho-api created
clusterrole.rbac.authorization.k8s.io/tycho-api-access created
clusterrolebinding.rbac.authorization.k8s.io/tycho-api-access created
service/tycho-api created
```
Note, here we've edited the Tycho service def to create the service as type:LoadBalancer for the purposes of a command line demo. In general, we'll access the service from within the cluster rather than exposing it externally.
That runs Tycho:

Initialize the Tycho API's load balancer IP and node port.
```
$ lb_ip=$(kubectl get svc tycho-api -o json | jq .status.loadBalancer.ingress[0].ip | sed -e s,\",,g)
$ tycho_port=$(kubectl get service tycho-api --output json | jq .spec.ports[0].port)
```
Launch an application (deployment, pod, service). Note the `--command` flag is used to specify the command to run in the container. We use this to specify a flag that will cause the notebook to start without prompting for authentication credentials.
```
$ PYTHONPATH=$PWD/.. python client.py --up -n jupyter-data-science-3425 -c jupyter/datascience-notebook -p 8888 --command "start.sh jupyter lab --LabApp.token='
'"
200
{
"status": "success",
"result": {
"containers": {
"jupyter-data-science-3425-c": {
"port": 32414
}
}
},
"message": "Started system jupyter-data-science-3425"
}
```
Refreshing the GKE cluster monitoring UI will now show the service starting:

Then running

Get the job's load balancer ip and make a request to test the service.
```
$ job_lb_ip=$(kubectl get svc jupyter-data-science-3425 -o json | jq .status.loadBalancer.ingress[0].ip | sed -e s,\",,g)
$ wget --quiet -O- http://$job_lb_ip:8888 | grep -i /title
Jupyter Notebook
```
From a browser, that URL takes us directly to the Jupyter Lab IDE:

And shut the service down:
```
$ PYTHONPATH=$PWD/.. python client.py --down -n jupyter-data-science-3425 -s http://$lb_ip:$tycho_port
200
{
"status": "success",
"result": null,
"message": "Deleted system jupyter-data-science-3425"
}
```
This removes the deployment, pod, service, and replicasets created by the launcher.
### Client Endpoint Autodiscovery
Using the command lines above without the `-s` flag for server will work on GKE. That is, the client is created by first using the K8s API to locate the Tycho-API endpoint and port. It builds the URL automatically and creates a TychoAPI object ready to use.
```
client_factory = TychoClientFactory ()
client = client_factory.get_client ()
```
%prep
%autosetup -n tycho-api-1.13.0
%build
%py3_build
%install
%py3_install
install -d -m755 %{buildroot}/%{_pkgdocdir}
if [ -d doc ]; then cp -arf doc %{buildroot}/%{_pkgdocdir}; fi
if [ -d docs ]; then cp -arf docs %{buildroot}/%{_pkgdocdir}; fi
if [ -d example ]; then cp -arf example %{buildroot}/%{_pkgdocdir}; fi
if [ -d examples ]; then cp -arf examples %{buildroot}/%{_pkgdocdir}; fi
pushd %{buildroot}
if [ -d usr/lib ]; then
find usr/lib -type f -printf "/%h/%f\n" >> filelist.lst
fi
if [ -d usr/lib64 ]; then
find usr/lib64 -type f -printf "/%h/%f\n" >> filelist.lst
fi
if [ -d usr/bin ]; then
find usr/bin -type f -printf "/%h/%f\n" >> filelist.lst
fi
if [ -d usr/sbin ]; then
find usr/sbin -type f -printf "/%h/%f\n" >> filelist.lst
fi
touch doclist.lst
if [ -d usr/share/man ]; then
find usr/share/man -type f -printf "/%h/%f.gz\n" >> doclist.lst
fi
popd
mv %{buildroot}/filelist.lst .
mv %{buildroot}/doclist.lst .
%files -n python3-tycho-api -f filelist.lst
%dir %{python3_sitelib}/*
%files help -f doclist.lst
%{_docdir}/*
%changelog
* Fri May 05 2023 Python_Bot - 1.13.0-1
- Package Spec generated