%global _empty_manifest_terminate_build 0
Name: python-cimetrics
Version: 0.3.15
Release: 1
Summary: Lightweight python module to track crucial metrics
License: MIT License
URL: https://github.com/jumaffre/cimetrics
Source0: https://mirrors.nju.edu.cn/pypi/web/packages/d2/a3/755e4c8d40488e63ba52d82d93c485cf7e0f614b755e400bd5aa8eb1ef19/cimetrics-0.3.15.tar.gz
BuildArch: noarch
%description
# cimetrics
[](https://dev.azure.com/jumaffre/metrics-devops/_build/latest?definitionId=2&branchName=main)
[](https://badge.fury.io/py/cimetrics)
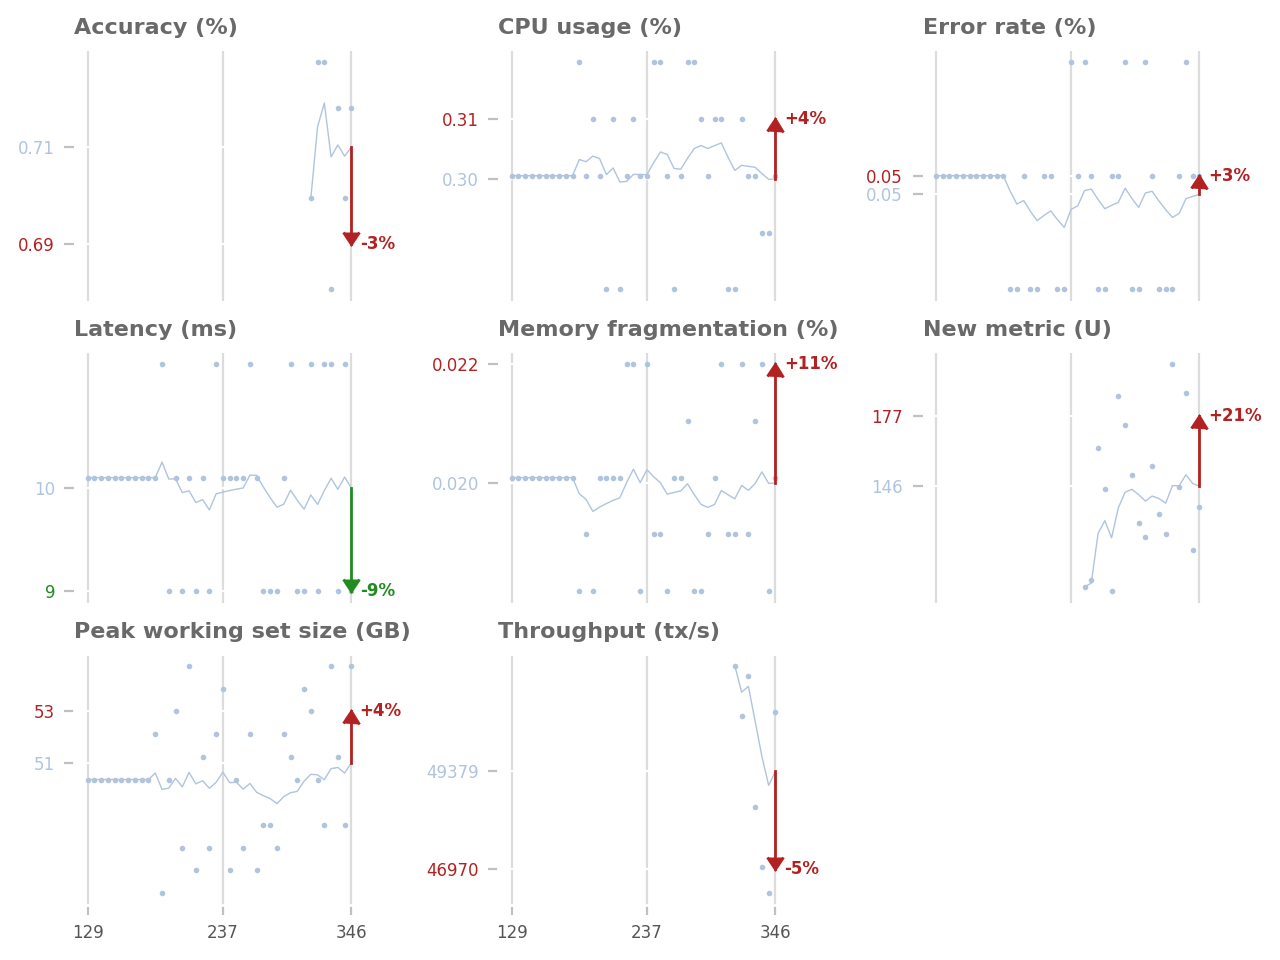
`cimetrics` lets you track crucial metrics to avoid unwanted regressions. It is easy to integrate with your existing projects and automatically provides quick feedback in your GitHub Pull Requests. See it in action [here](https://github.com/jumaffre/cimetrics/pull/66#issuecomment-573324351).
## Install
```sh
pip install cimetrics
```
## Using cimetrics
### Setup storage
Metrics data are stored in any MongoDB-compatible database.
An easy way to get storage set up is to spin up a [Cosmos DB](https://docs.microsoft.com/en-us/azure/cosmos-db/introduction) instance in Azure. The connection string should be stored as the `METRICS_MONGO_CONNECTION` secret variable in your CI system.
### Pushing metrics from your tests
You can use the simple Python API to push your metrics to your storage:
```python
import cimetrics.upload
with cimetrics.upload.metrics() as metrics:
# Run some tests and collect some data
metrics.put("metric1 name (unit)", metric_1)
metrics.put("metric2 name (unit)", metric_2)
```
Note that `metric_1` and `metric_2` must be instances of [numbers.Real](https://docs.python.org/3.7/library/numbers.html#numbers.Real), for example `float` or `int`.
If a build publishes metrics from multiple instances of a `cimetrics.upload.Metrics`, for example because
it is running multiple concurrent jobs, it it necessary to publish those as "incomplete",
and to publish a "complete" entry only once they have all run. This is to prevent metrics comparison from
happening against an incomplete set of metrics for a build.
For example:
```python
# Job 1
with cimetrics.upload.metrics(complete=False) as metrics:
metrics.put("metric1 name (unit)", metric_1)
# Job 2
with cimetrics.upload.metrics(complete=False) as metrics:
metrics.put("metric2 name (unit)", metric_2)
# Job running after Job 1 and 2 are complete
with cimetrics.upload.metrics() as metrics:
pass
```
It is often convenient to use the same job to mark a set of metrics as complete and to plot them.
A convenience entry-point is supplied to mark the metrics complete for a build:
```python
python -m cimetrics.upload_complete
```
### Setup the CI
Your CI is responsible for rendering the metrics report and posting them to your Pull Requests in GitHub. For this, you should create a [personal authentication token](https://help.github.com/en/articles/creating-a-personal-access-token-for-the-command-line) with Write access to the repository for the account you want to post on behalf of `cimetrics`. Then, you should set up the token as the `GITHUB_TOKEN` secret variable in your CI system. Don't forget to add that user as a personal contributor (Write access) to your Github repository as well.
Then, you should add the following steps to your CI configuration file, e.g. for Azure Pipelines:
```yaml
# Your application. This step collects and uploads your metrics
# to your MongoDB instance.
- script: python app/main.py
env:
METRICS_MONGO_CONNECTION: $(METRICS_MONGO_CONNECTION)
displayName: 'Run app and collect metrics'
# This step generates a graph reporting the differences between
# your branch and the target branch.
# Only run on Pull Requests build.
- script: python -m cimetrics.plot
env:
METRICS_MONGO_CONNECTION: $(METRICS_MONGO_CONNECTION)
displayName: 'Plot metrics'
condition: eq(variables['Build.Reason'], 'PullRequest')
# This step publishes a report comment on the GitHub Pull Request
# using GITHUB_TOKEN as authentication (use secret variables!)
# Only run on Pull Requests build.
- script: python -m cimetrics.github_pr
env:
GITHUB_TOKEN: $(GITHUB_TOKEN)
displayName: 'Post metrics graphs as PR comment'
condition: eq(variables['Build.Reason'], 'PullRequest')
```
See [azure-pipelines.yml](https://github.com/jumaffre/cimetrics/blob/main/azure-pipelines.yml) for a full working example.
### Create the `metrics.yml` file
The last step is to create a new `metrics.yml` configuration file at the root of your repository. The file should specify the name of the database and collection used for MongoDB. For example:
```yaml
db: 'metrics'
collection: 'metrics_performance'
```
That's it! The next time you create a Pull Request, your CI will automatically store your metrics and publish a graph comparing your metrics against the same metrics on the branch you are merging to. Note that the cimetrics PR comment is updated for each subsequent build.
## Caveats
- If the CI has never run on the target branch (e.g. `main` - likely to happen when you first set up `cimetrics`), the report will only show the values that have been uploaded, without any comparison.
- The rendered images are currently hosted in the target GitHub repository itself, under the `cimetrics` branch, in the `cimetrics` directory.
## Supported CI pipelines
CI Metrics currently supports [Azure Pipelines](https://azure.microsoft.com/en-us/services/devops/pipelines/), but it should be very easy to add support for other build pipelines by [subclassing GitEnv](https://github.com/jumaffre/cimetrics/blob/main/cimetrics/env.py#L72) and providing the right attributes.
%package -n python3-cimetrics
Summary: Lightweight python module to track crucial metrics
Provides: python-cimetrics
BuildRequires: python3-devel
BuildRequires: python3-setuptools
BuildRequires: python3-pip
%description -n python3-cimetrics
# cimetrics
[](https://dev.azure.com/jumaffre/metrics-devops/_build/latest?definitionId=2&branchName=main)
[](https://badge.fury.io/py/cimetrics)
`cimetrics` lets you track crucial metrics to avoid unwanted regressions. It is easy to integrate with your existing projects and automatically provides quick feedback in your GitHub Pull Requests. See it in action [here](https://github.com/jumaffre/cimetrics/pull/66#issuecomment-573324351).
## Install
```sh
pip install cimetrics
```
## Using cimetrics
### Setup storage
Metrics data are stored in any MongoDB-compatible database.
An easy way to get storage set up is to spin up a [Cosmos DB](https://docs.microsoft.com/en-us/azure/cosmos-db/introduction) instance in Azure. The connection string should be stored as the `METRICS_MONGO_CONNECTION` secret variable in your CI system.
### Pushing metrics from your tests
You can use the simple Python API to push your metrics to your storage:
```python
import cimetrics.upload
with cimetrics.upload.metrics() as metrics:
# Run some tests and collect some data
metrics.put("metric1 name (unit)", metric_1)
metrics.put("metric2 name (unit)", metric_2)
```
Note that `metric_1` and `metric_2` must be instances of [numbers.Real](https://docs.python.org/3.7/library/numbers.html#numbers.Real), for example `float` or `int`.
If a build publishes metrics from multiple instances of a `cimetrics.upload.Metrics`, for example because
it is running multiple concurrent jobs, it it necessary to publish those as "incomplete",
and to publish a "complete" entry only once they have all run. This is to prevent metrics comparison from
happening against an incomplete set of metrics for a build.
For example:
```python
# Job 1
with cimetrics.upload.metrics(complete=False) as metrics:
metrics.put("metric1 name (unit)", metric_1)
# Job 2
with cimetrics.upload.metrics(complete=False) as metrics:
metrics.put("metric2 name (unit)", metric_2)
# Job running after Job 1 and 2 are complete
with cimetrics.upload.metrics() as metrics:
pass
```
It is often convenient to use the same job to mark a set of metrics as complete and to plot them.
A convenience entry-point is supplied to mark the metrics complete for a build:
```python
python -m cimetrics.upload_complete
```
### Setup the CI
Your CI is responsible for rendering the metrics report and posting them to your Pull Requests in GitHub. For this, you should create a [personal authentication token](https://help.github.com/en/articles/creating-a-personal-access-token-for-the-command-line) with Write access to the repository for the account you want to post on behalf of `cimetrics`. Then, you should set up the token as the `GITHUB_TOKEN` secret variable in your CI system. Don't forget to add that user as a personal contributor (Write access) to your Github repository as well.
Then, you should add the following steps to your CI configuration file, e.g. for Azure Pipelines:
```yaml
# Your application. This step collects and uploads your metrics
# to your MongoDB instance.
- script: python app/main.py
env:
METRICS_MONGO_CONNECTION: $(METRICS_MONGO_CONNECTION)
displayName: 'Run app and collect metrics'
# This step generates a graph reporting the differences between
# your branch and the target branch.
# Only run on Pull Requests build.
- script: python -m cimetrics.plot
env:
METRICS_MONGO_CONNECTION: $(METRICS_MONGO_CONNECTION)
displayName: 'Plot metrics'
condition: eq(variables['Build.Reason'], 'PullRequest')
# This step publishes a report comment on the GitHub Pull Request
# using GITHUB_TOKEN as authentication (use secret variables!)
# Only run on Pull Requests build.
- script: python -m cimetrics.github_pr
env:
GITHUB_TOKEN: $(GITHUB_TOKEN)
displayName: 'Post metrics graphs as PR comment'
condition: eq(variables['Build.Reason'], 'PullRequest')
```
See [azure-pipelines.yml](https://github.com/jumaffre/cimetrics/blob/main/azure-pipelines.yml) for a full working example.
### Create the `metrics.yml` file
The last step is to create a new `metrics.yml` configuration file at the root of your repository. The file should specify the name of the database and collection used for MongoDB. For example:
```yaml
db: 'metrics'
collection: 'metrics_performance'
```
That's it! The next time you create a Pull Request, your CI will automatically store your metrics and publish a graph comparing your metrics against the same metrics on the branch you are merging to. Note that the cimetrics PR comment is updated for each subsequent build.
## Caveats
- If the CI has never run on the target branch (e.g. `main` - likely to happen when you first set up `cimetrics`), the report will only show the values that have been uploaded, without any comparison.
- The rendered images are currently hosted in the target GitHub repository itself, under the `cimetrics` branch, in the `cimetrics` directory.
## Supported CI pipelines
CI Metrics currently supports [Azure Pipelines](https://azure.microsoft.com/en-us/services/devops/pipelines/), but it should be very easy to add support for other build pipelines by [subclassing GitEnv](https://github.com/jumaffre/cimetrics/blob/main/cimetrics/env.py#L72) and providing the right attributes.
%package help
Summary: Development documents and examples for cimetrics
Provides: python3-cimetrics-doc
%description help
# cimetrics
[](https://dev.azure.com/jumaffre/metrics-devops/_build/latest?definitionId=2&branchName=main)
[](https://badge.fury.io/py/cimetrics)
`cimetrics` lets you track crucial metrics to avoid unwanted regressions. It is easy to integrate with your existing projects and automatically provides quick feedback in your GitHub Pull Requests. See it in action [here](https://github.com/jumaffre/cimetrics/pull/66#issuecomment-573324351).
## Install
```sh
pip install cimetrics
```
## Using cimetrics
### Setup storage
Metrics data are stored in any MongoDB-compatible database.
An easy way to get storage set up is to spin up a [Cosmos DB](https://docs.microsoft.com/en-us/azure/cosmos-db/introduction) instance in Azure. The connection string should be stored as the `METRICS_MONGO_CONNECTION` secret variable in your CI system.
### Pushing metrics from your tests
You can use the simple Python API to push your metrics to your storage:
```python
import cimetrics.upload
with cimetrics.upload.metrics() as metrics:
# Run some tests and collect some data
metrics.put("metric1 name (unit)", metric_1)
metrics.put("metric2 name (unit)", metric_2)
```
Note that `metric_1` and `metric_2` must be instances of [numbers.Real](https://docs.python.org/3.7/library/numbers.html#numbers.Real), for example `float` or `int`.
If a build publishes metrics from multiple instances of a `cimetrics.upload.Metrics`, for example because
it is running multiple concurrent jobs, it it necessary to publish those as "incomplete",
and to publish a "complete" entry only once they have all run. This is to prevent metrics comparison from
happening against an incomplete set of metrics for a build.
For example:
```python
# Job 1
with cimetrics.upload.metrics(complete=False) as metrics:
metrics.put("metric1 name (unit)", metric_1)
# Job 2
with cimetrics.upload.metrics(complete=False) as metrics:
metrics.put("metric2 name (unit)", metric_2)
# Job running after Job 1 and 2 are complete
with cimetrics.upload.metrics() as metrics:
pass
```
It is often convenient to use the same job to mark a set of metrics as complete and to plot them.
A convenience entry-point is supplied to mark the metrics complete for a build:
```python
python -m cimetrics.upload_complete
```
### Setup the CI
Your CI is responsible for rendering the metrics report and posting them to your Pull Requests in GitHub. For this, you should create a [personal authentication token](https://help.github.com/en/articles/creating-a-personal-access-token-for-the-command-line) with Write access to the repository for the account you want to post on behalf of `cimetrics`. Then, you should set up the token as the `GITHUB_TOKEN` secret variable in your CI system. Don't forget to add that user as a personal contributor (Write access) to your Github repository as well.
Then, you should add the following steps to your CI configuration file, e.g. for Azure Pipelines:
```yaml
# Your application. This step collects and uploads your metrics
# to your MongoDB instance.
- script: python app/main.py
env:
METRICS_MONGO_CONNECTION: $(METRICS_MONGO_CONNECTION)
displayName: 'Run app and collect metrics'
# This step generates a graph reporting the differences between
# your branch and the target branch.
# Only run on Pull Requests build.
- script: python -m cimetrics.plot
env:
METRICS_MONGO_CONNECTION: $(METRICS_MONGO_CONNECTION)
displayName: 'Plot metrics'
condition: eq(variables['Build.Reason'], 'PullRequest')
# This step publishes a report comment on the GitHub Pull Request
# using GITHUB_TOKEN as authentication (use secret variables!)
# Only run on Pull Requests build.
- script: python -m cimetrics.github_pr
env:
GITHUB_TOKEN: $(GITHUB_TOKEN)
displayName: 'Post metrics graphs as PR comment'
condition: eq(variables['Build.Reason'], 'PullRequest')
```
See [azure-pipelines.yml](https://github.com/jumaffre/cimetrics/blob/main/azure-pipelines.yml) for a full working example.
### Create the `metrics.yml` file
The last step is to create a new `metrics.yml` configuration file at the root of your repository. The file should specify the name of the database and collection used for MongoDB. For example:
```yaml
db: 'metrics'
collection: 'metrics_performance'
```
That's it! The next time you create a Pull Request, your CI will automatically store your metrics and publish a graph comparing your metrics against the same metrics on the branch you are merging to. Note that the cimetrics PR comment is updated for each subsequent build.
## Caveats
- If the CI has never run on the target branch (e.g. `main` - likely to happen when you first set up `cimetrics`), the report will only show the values that have been uploaded, without any comparison.
- The rendered images are currently hosted in the target GitHub repository itself, under the `cimetrics` branch, in the `cimetrics` directory.
## Supported CI pipelines
CI Metrics currently supports [Azure Pipelines](https://azure.microsoft.com/en-us/services/devops/pipelines/), but it should be very easy to add support for other build pipelines by [subclassing GitEnv](https://github.com/jumaffre/cimetrics/blob/main/cimetrics/env.py#L72) and providing the right attributes.
%prep
%autosetup -n cimetrics-0.3.15
%build
%py3_build
%install
%py3_install
install -d -m755 %{buildroot}/%{_pkgdocdir}
if [ -d doc ]; then cp -arf doc %{buildroot}/%{_pkgdocdir}; fi
if [ -d docs ]; then cp -arf docs %{buildroot}/%{_pkgdocdir}; fi
if [ -d example ]; then cp -arf example %{buildroot}/%{_pkgdocdir}; fi
if [ -d examples ]; then cp -arf examples %{buildroot}/%{_pkgdocdir}; fi
pushd %{buildroot}
if [ -d usr/lib ]; then
find usr/lib -type f -printf "/%h/%f\n" >> filelist.lst
fi
if [ -d usr/lib64 ]; then
find usr/lib64 -type f -printf "/%h/%f\n" >> filelist.lst
fi
if [ -d usr/bin ]; then
find usr/bin -type f -printf "/%h/%f\n" >> filelist.lst
fi
if [ -d usr/sbin ]; then
find usr/sbin -type f -printf "/%h/%f\n" >> filelist.lst
fi
touch doclist.lst
if [ -d usr/share/man ]; then
find usr/share/man -type f -printf "/%h/%f.gz\n" >> doclist.lst
fi
popd
mv %{buildroot}/filelist.lst .
mv %{buildroot}/doclist.lst .
%files -n python3-cimetrics -f filelist.lst
%dir %{python3_sitelib}/*
%files help -f doclist.lst
%{_docdir}/*
%changelog
* Fri May 05 2023 Python_Bot - 0.3.15-1
- Package Spec generated