%global _empty_manifest_terminate_build 0
Name: python-jupyter-bbox-widget
Version: 0.5.0
Release: 1
Summary: A Jupyter widget for annotating images with bounding boxes
License: BSD
URL: https://github.com/gereleth/jupyter-bbox-widget
Source0: https://mirrors.aliyun.com/pypi/web/packages/ca/3c/e370d7277f77855cb0655c57d8e4b8ad32449c82c9c41f191280062d23a8/jupyter_bbox_widget-0.5.0.tar.gz
BuildArch: noarch
Requires: python3-ipywidgets
%description
[](https://mybinder.org/v2/gh/gereleth/jupyter-bbox-widget/HEAD?filepath=examples%2Fintroduction.ipynb&urlpath=tree%2Fexamples%2Fintroduction.ipynb)
# jupyter\_bbox\_widget
A Jupyter widget for annotating images with bounding boxes. **See a [live demo on Binder](https://mybinder.org/v2/gh/gereleth/jupyter-bbox-widget/HEAD?filepath=examples%2Fintroduction.ipynb&urlpath=tree%2Fexamples%2Fintroduction.ipynb).**
```python
from jupyter_bbox_widget import BBoxWidget
widget = BBoxWidget(
image='fruit.jpg',
classes=['apple', 'orange', 'pear'],
)
widget
```
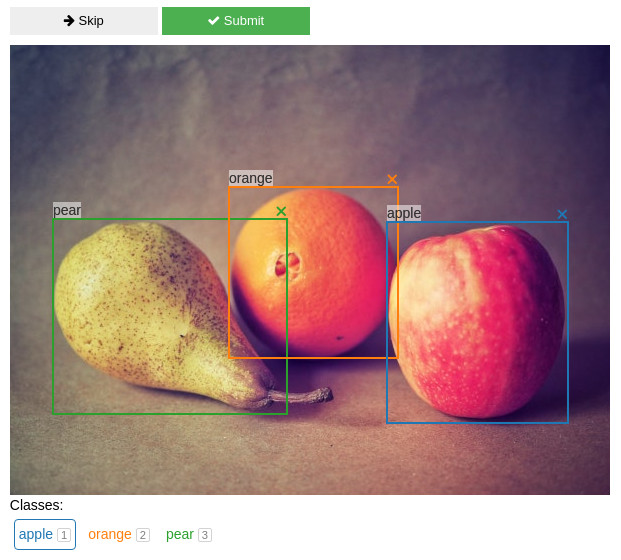
Create, edit, move, resize and delete bounding box annotations using the mouse.
Use `widget.bboxes` to get current annotations values:
```python
widget.bboxes
# [{'x': 377, 'y': 177, 'width': 181, 'height': 201, 'label': 'apple'},
# {'x': 219, 'y': 142, 'width': 169, 'height': 171, 'label': 'orange'},
# {'x': 43, 'y': 174, 'width': 234, 'height': 195, 'label': 'pear'}]
```
You can also assign to `widget.bboxes` to display any annotations. For example, use the output of an object detection model to do model-assisted labeling.
```python
widget.bboxes = [
{'x': 377, 'y': 177, 'width': 181, 'height': 201, 'label': 'apple'},
{'x': 219, 'y': 142, 'width': 169, 'height': 171, 'label': 'orange'},
{'x': 43, 'y': 174, 'width': 234, 'height': 195, 'label': 'pear'}
]
```
*Fruit photo by Umanoide on Unsplash*
## Installation
You can install using `pip`:
```bash
pip install jupyter_bbox_widget
```
If you are using Jupyter Notebook 5.2 or earlier, you may also need to enable
the nbextension:
```bash
jupyter nbextension enable --py [--sys-prefix|--user|--system] jupyter_bbox_widget
```
## Usage
### Create and edit annotations with the mouse
- click and drag to create a bbox
- click and drag corners or edges to resize a bbox
- click and drag inside a bbox to move it
- in order to change a label select a new label below the image and click on label text
### Keyboard shortcuts
When you click inside the widget area it will gain focus and start receiving keyboard events. An outline usually indicates that the element is focused. Normal Jupyter keyboard shortcuts won't work in this state. To unfocus the widget area click outside it or press `Esc`.
Some shortcuts act on the selected bbox. New bboxes are selected automatically when created. You can also select a bbox by clicking on it. Selected bbox is displayed on top of others and with a thicker border.
- Digit keys 1-9 and 0 select a class label.
- `Esc` unfocuses the widget
- `Enter` is the same as pressing Submit button
- `Space` is the same as pressing Skip button
- `Tab` / `Shift-Tab` select next/previous bbox.
- Keys acting on the selected bbox (assuming a QWERTY keyboard, other layouts should use any keys in the same locations):
- `W` move up
- `A` move left
- `S` move down
- `D` move right
- `Q` shrink width
- `E` grow width
- `R` grow height
- `F` shrink height
- `C` assign selected class label
- Holding `Shift` while pressing movement keys will increase step size
### Skip and Submit events
You can define functions that will be called automatically when you press Skip or Submit buttons. This is useful for creating a workflow for annotating multiple images.
```python
@widget.on_skip
def skip():
# move on to the next image
@widget.on_submit
def save():
# do stuff to save current annotations and move on
```
There is an example of a simple annotation workflow in [`examples/introduction.ipynb`](https://github.com/gereleth/jupyter-bbox-widget/blob/main/examples/introduction.ipynb) notebook.
### View only mode
You can disable editing of annotations by setting `widget.view_only = True`. This is useful for viewing annotation outputs without accidentally changing them.
### Recording additional data
Sometimes you need to record more info about an object than just a location and a class label. For example, you might want to specify whether the object is in focus or blurred, record its size or other properties.
Let's say we want to apply a rating on a scale from 1 to 5 to every object in the image. We create a slider widget to edit the rating values:
```python
w_rating = widgets.IntSlider(value=3, min=1, max=5, description='Rating')
```
And we attach it to the bbox widget.
```python
widget.attach(w_rating, name='rating')
```
As a result all bboxes created afterwards will have a `rating` property and the `w_rating` widget can be used to display and manipulate the rating of the currently selected bbox.
Any number and any kind of `ipywidgets` widgets may be used in this way for creating richer annotations - number inputs, text inputs, checkboxes and so on (see [widget list](https://ipywidgets.readthedocs.io/en/stable/examples/Widget%20List.html)).
The notebook in [`examples/introduction.ipynb`](https://github.com/gereleth/jupyter-bbox-widget/blob/main/examples/introduction.ipynb) has an example and a more detailed explanation of this feature.
## Changelog
- v0.5.0
- enabled use of `widget.on_skip` and `widget.on_submit` methods as decorators
- v0.4.0
- exposed selected class label to the python side as `widget.label`
- v0.3.4
- set max-width: 100% on image so that it respects layout
- v0.3.3
- fixed bboxes not updating after class change by keyboard shortcut
- v0.3.2
- added `hide_buttons` option
- fixed bbox delete icon not displayed properly
- v0.3.1
- unselect a bbox on click outside in view only mode
- fixed a bug with overwriting attached properties on unselect
- v0.3.0
- added `view_only` mode
- v0.2.0
- added Skip and Submit buttons
- added attach widget functionality for recording extra properties
- multiple fixes and improvements
- v0.1.0
- initial release
## Development Installation
This project was inspired by a blogpost [Creating Reactive Jupyter Widgets With Svelte](https://cabreraalex.medium.com/creating-reactive-jupyter-widgets-with-svelte-ef2fb580c05) and was created based on [widget-svelte-cookiecutter](https://github.com/cabreraalex/widget-svelte-cookiecutter) template.
```bash
# First install the python package. This will also build the JS packages.
pip install -e .
```
When developing your extensions, you need to manually enable your extensions with the
notebook / lab frontend. For lab, this is done by the command:
```
jupyter labextension install @jupyter-widgets/jupyterlab-manager --no-build
jupyter labextension install .
```
For classic notebook, you can run:
```
jupyter nbextension install --sys-prefix --symlink --overwrite --py jupyter_bbox_widget
jupyter nbextension enable --sys-prefix --py jupyter_bbox_widget
```
Note that the `--symlink` flag doesn't work on Windows, so you will here have to run
the `install` command every time that you rebuild your extension. For certain installations
you might also need another flag instead of `--sys-prefix`, but we won't cover the meaning
of those flags here.
### How to see your changes
#### Typescript:
To continuously monitor the project for changes and automatically trigger a rebuild, start Jupyter in watch mode:
```bash
jupyter lab --watch
```
And in a separate session, begin watching the source directory for changes:
```bash
npm run watch
```
After a change wait for the build to finish and then refresh your browser and the changes should take effect.
#### Python:
If you make a change to the python code then you will need to restart the notebook kernel to have it take effect.
%package -n python3-jupyter-bbox-widget
Summary: A Jupyter widget for annotating images with bounding boxes
Provides: python-jupyter-bbox-widget
BuildRequires: python3-devel
BuildRequires: python3-setuptools
BuildRequires: python3-pip
%description -n python3-jupyter-bbox-widget
[](https://mybinder.org/v2/gh/gereleth/jupyter-bbox-widget/HEAD?filepath=examples%2Fintroduction.ipynb&urlpath=tree%2Fexamples%2Fintroduction.ipynb)
# jupyter\_bbox\_widget
A Jupyter widget for annotating images with bounding boxes. **See a [live demo on Binder](https://mybinder.org/v2/gh/gereleth/jupyter-bbox-widget/HEAD?filepath=examples%2Fintroduction.ipynb&urlpath=tree%2Fexamples%2Fintroduction.ipynb).**
```python
from jupyter_bbox_widget import BBoxWidget
widget = BBoxWidget(
image='fruit.jpg',
classes=['apple', 'orange', 'pear'],
)
widget
```

Create, edit, move, resize and delete bounding box annotations using the mouse.
Use `widget.bboxes` to get current annotations values:
```python
widget.bboxes
# [{'x': 377, 'y': 177, 'width': 181, 'height': 201, 'label': 'apple'},
# {'x': 219, 'y': 142, 'width': 169, 'height': 171, 'label': 'orange'},
# {'x': 43, 'y': 174, 'width': 234, 'height': 195, 'label': 'pear'}]
```
You can also assign to `widget.bboxes` to display any annotations. For example, use the output of an object detection model to do model-assisted labeling.
```python
widget.bboxes = [
{'x': 377, 'y': 177, 'width': 181, 'height': 201, 'label': 'apple'},
{'x': 219, 'y': 142, 'width': 169, 'height': 171, 'label': 'orange'},
{'x': 43, 'y': 174, 'width': 234, 'height': 195, 'label': 'pear'}
]
```
*Fruit photo by Umanoide on Unsplash*
## Installation
You can install using `pip`:
```bash
pip install jupyter_bbox_widget
```
If you are using Jupyter Notebook 5.2 or earlier, you may also need to enable
the nbextension:
```bash
jupyter nbextension enable --py [--sys-prefix|--user|--system] jupyter_bbox_widget
```
## Usage
### Create and edit annotations with the mouse
- click and drag to create a bbox
- click and drag corners or edges to resize a bbox
- click and drag inside a bbox to move it
- in order to change a label select a new label below the image and click on label text
### Keyboard shortcuts
When you click inside the widget area it will gain focus and start receiving keyboard events. An outline usually indicates that the element is focused. Normal Jupyter keyboard shortcuts won't work in this state. To unfocus the widget area click outside it or press `Esc`.
Some shortcuts act on the selected bbox. New bboxes are selected automatically when created. You can also select a bbox by clicking on it. Selected bbox is displayed on top of others and with a thicker border.
- Digit keys 1-9 and 0 select a class label.
- `Esc` unfocuses the widget
- `Enter` is the same as pressing Submit button
- `Space` is the same as pressing Skip button
- `Tab` / `Shift-Tab` select next/previous bbox.
- Keys acting on the selected bbox (assuming a QWERTY keyboard, other layouts should use any keys in the same locations):
- `W` move up
- `A` move left
- `S` move down
- `D` move right
- `Q` shrink width
- `E` grow width
- `R` grow height
- `F` shrink height
- `C` assign selected class label
- Holding `Shift` while pressing movement keys will increase step size
### Skip and Submit events
You can define functions that will be called automatically when you press Skip or Submit buttons. This is useful for creating a workflow for annotating multiple images.
```python
@widget.on_skip
def skip():
# move on to the next image
@widget.on_submit
def save():
# do stuff to save current annotations and move on
```
There is an example of a simple annotation workflow in [`examples/introduction.ipynb`](https://github.com/gereleth/jupyter-bbox-widget/blob/main/examples/introduction.ipynb) notebook.
### View only mode
You can disable editing of annotations by setting `widget.view_only = True`. This is useful for viewing annotation outputs without accidentally changing them.
### Recording additional data
Sometimes you need to record more info about an object than just a location and a class label. For example, you might want to specify whether the object is in focus or blurred, record its size or other properties.
Let's say we want to apply a rating on a scale from 1 to 5 to every object in the image. We create a slider widget to edit the rating values:
```python
w_rating = widgets.IntSlider(value=3, min=1, max=5, description='Rating')
```
And we attach it to the bbox widget.
```python
widget.attach(w_rating, name='rating')
```
As a result all bboxes created afterwards will have a `rating` property and the `w_rating` widget can be used to display and manipulate the rating of the currently selected bbox.
Any number and any kind of `ipywidgets` widgets may be used in this way for creating richer annotations - number inputs, text inputs, checkboxes and so on (see [widget list](https://ipywidgets.readthedocs.io/en/stable/examples/Widget%20List.html)).
The notebook in [`examples/introduction.ipynb`](https://github.com/gereleth/jupyter-bbox-widget/blob/main/examples/introduction.ipynb) has an example and a more detailed explanation of this feature.
## Changelog
- v0.5.0
- enabled use of `widget.on_skip` and `widget.on_submit` methods as decorators
- v0.4.0
- exposed selected class label to the python side as `widget.label`
- v0.3.4
- set max-width: 100% on image so that it respects layout
- v0.3.3
- fixed bboxes not updating after class change by keyboard shortcut
- v0.3.2
- added `hide_buttons` option
- fixed bbox delete icon not displayed properly
- v0.3.1
- unselect a bbox on click outside in view only mode
- fixed a bug with overwriting attached properties on unselect
- v0.3.0
- added `view_only` mode
- v0.2.0
- added Skip and Submit buttons
- added attach widget functionality for recording extra properties
- multiple fixes and improvements
- v0.1.0
- initial release
## Development Installation
This project was inspired by a blogpost [Creating Reactive Jupyter Widgets With Svelte](https://cabreraalex.medium.com/creating-reactive-jupyter-widgets-with-svelte-ef2fb580c05) and was created based on [widget-svelte-cookiecutter](https://github.com/cabreraalex/widget-svelte-cookiecutter) template.
```bash
# First install the python package. This will also build the JS packages.
pip install -e .
```
When developing your extensions, you need to manually enable your extensions with the
notebook / lab frontend. For lab, this is done by the command:
```
jupyter labextension install @jupyter-widgets/jupyterlab-manager --no-build
jupyter labextension install .
```
For classic notebook, you can run:
```
jupyter nbextension install --sys-prefix --symlink --overwrite --py jupyter_bbox_widget
jupyter nbextension enable --sys-prefix --py jupyter_bbox_widget
```
Note that the `--symlink` flag doesn't work on Windows, so you will here have to run
the `install` command every time that you rebuild your extension. For certain installations
you might also need another flag instead of `--sys-prefix`, but we won't cover the meaning
of those flags here.
### How to see your changes
#### Typescript:
To continuously monitor the project for changes and automatically trigger a rebuild, start Jupyter in watch mode:
```bash
jupyter lab --watch
```
And in a separate session, begin watching the source directory for changes:
```bash
npm run watch
```
After a change wait for the build to finish and then refresh your browser and the changes should take effect.
#### Python:
If you make a change to the python code then you will need to restart the notebook kernel to have it take effect.
%package help
Summary: Development documents and examples for jupyter-bbox-widget
Provides: python3-jupyter-bbox-widget-doc
%description help
[](https://mybinder.org/v2/gh/gereleth/jupyter-bbox-widget/HEAD?filepath=examples%2Fintroduction.ipynb&urlpath=tree%2Fexamples%2Fintroduction.ipynb)
# jupyter\_bbox\_widget
A Jupyter widget for annotating images with bounding boxes. **See a [live demo on Binder](https://mybinder.org/v2/gh/gereleth/jupyter-bbox-widget/HEAD?filepath=examples%2Fintroduction.ipynb&urlpath=tree%2Fexamples%2Fintroduction.ipynb).**
```python
from jupyter_bbox_widget import BBoxWidget
widget = BBoxWidget(
image='fruit.jpg',
classes=['apple', 'orange', 'pear'],
)
widget
```

Create, edit, move, resize and delete bounding box annotations using the mouse.
Use `widget.bboxes` to get current annotations values:
```python
widget.bboxes
# [{'x': 377, 'y': 177, 'width': 181, 'height': 201, 'label': 'apple'},
# {'x': 219, 'y': 142, 'width': 169, 'height': 171, 'label': 'orange'},
# {'x': 43, 'y': 174, 'width': 234, 'height': 195, 'label': 'pear'}]
```
You can also assign to `widget.bboxes` to display any annotations. For example, use the output of an object detection model to do model-assisted labeling.
```python
widget.bboxes = [
{'x': 377, 'y': 177, 'width': 181, 'height': 201, 'label': 'apple'},
{'x': 219, 'y': 142, 'width': 169, 'height': 171, 'label': 'orange'},
{'x': 43, 'y': 174, 'width': 234, 'height': 195, 'label': 'pear'}
]
```
*Fruit photo by Umanoide on Unsplash*
## Installation
You can install using `pip`:
```bash
pip install jupyter_bbox_widget
```
If you are using Jupyter Notebook 5.2 or earlier, you may also need to enable
the nbextension:
```bash
jupyter nbextension enable --py [--sys-prefix|--user|--system] jupyter_bbox_widget
```
## Usage
### Create and edit annotations with the mouse
- click and drag to create a bbox
- click and drag corners or edges to resize a bbox
- click and drag inside a bbox to move it
- in order to change a label select a new label below the image and click on label text
### Keyboard shortcuts
When you click inside the widget area it will gain focus and start receiving keyboard events. An outline usually indicates that the element is focused. Normal Jupyter keyboard shortcuts won't work in this state. To unfocus the widget area click outside it or press `Esc`.
Some shortcuts act on the selected bbox. New bboxes are selected automatically when created. You can also select a bbox by clicking on it. Selected bbox is displayed on top of others and with a thicker border.
- Digit keys 1-9 and 0 select a class label.
- `Esc` unfocuses the widget
- `Enter` is the same as pressing Submit button
- `Space` is the same as pressing Skip button
- `Tab` / `Shift-Tab` select next/previous bbox.
- Keys acting on the selected bbox (assuming a QWERTY keyboard, other layouts should use any keys in the same locations):
- `W` move up
- `A` move left
- `S` move down
- `D` move right
- `Q` shrink width
- `E` grow width
- `R` grow height
- `F` shrink height
- `C` assign selected class label
- Holding `Shift` while pressing movement keys will increase step size
### Skip and Submit events
You can define functions that will be called automatically when you press Skip or Submit buttons. This is useful for creating a workflow for annotating multiple images.
```python
@widget.on_skip
def skip():
# move on to the next image
@widget.on_submit
def save():
# do stuff to save current annotations and move on
```
There is an example of a simple annotation workflow in [`examples/introduction.ipynb`](https://github.com/gereleth/jupyter-bbox-widget/blob/main/examples/introduction.ipynb) notebook.
### View only mode
You can disable editing of annotations by setting `widget.view_only = True`. This is useful for viewing annotation outputs without accidentally changing them.
### Recording additional data
Sometimes you need to record more info about an object than just a location and a class label. For example, you might want to specify whether the object is in focus or blurred, record its size or other properties.
Let's say we want to apply a rating on a scale from 1 to 5 to every object in the image. We create a slider widget to edit the rating values:
```python
w_rating = widgets.IntSlider(value=3, min=1, max=5, description='Rating')
```
And we attach it to the bbox widget.
```python
widget.attach(w_rating, name='rating')
```
As a result all bboxes created afterwards will have a `rating` property and the `w_rating` widget can be used to display and manipulate the rating of the currently selected bbox.
Any number and any kind of `ipywidgets` widgets may be used in this way for creating richer annotations - number inputs, text inputs, checkboxes and so on (see [widget list](https://ipywidgets.readthedocs.io/en/stable/examples/Widget%20List.html)).
The notebook in [`examples/introduction.ipynb`](https://github.com/gereleth/jupyter-bbox-widget/blob/main/examples/introduction.ipynb) has an example and a more detailed explanation of this feature.
## Changelog
- v0.5.0
- enabled use of `widget.on_skip` and `widget.on_submit` methods as decorators
- v0.4.0
- exposed selected class label to the python side as `widget.label`
- v0.3.4
- set max-width: 100% on image so that it respects layout
- v0.3.3
- fixed bboxes not updating after class change by keyboard shortcut
- v0.3.2
- added `hide_buttons` option
- fixed bbox delete icon not displayed properly
- v0.3.1
- unselect a bbox on click outside in view only mode
- fixed a bug with overwriting attached properties on unselect
- v0.3.0
- added `view_only` mode
- v0.2.0
- added Skip and Submit buttons
- added attach widget functionality for recording extra properties
- multiple fixes and improvements
- v0.1.0
- initial release
## Development Installation
This project was inspired by a blogpost [Creating Reactive Jupyter Widgets With Svelte](https://cabreraalex.medium.com/creating-reactive-jupyter-widgets-with-svelte-ef2fb580c05) and was created based on [widget-svelte-cookiecutter](https://github.com/cabreraalex/widget-svelte-cookiecutter) template.
```bash
# First install the python package. This will also build the JS packages.
pip install -e .
```
When developing your extensions, you need to manually enable your extensions with the
notebook / lab frontend. For lab, this is done by the command:
```
jupyter labextension install @jupyter-widgets/jupyterlab-manager --no-build
jupyter labextension install .
```
For classic notebook, you can run:
```
jupyter nbextension install --sys-prefix --symlink --overwrite --py jupyter_bbox_widget
jupyter nbextension enable --sys-prefix --py jupyter_bbox_widget
```
Note that the `--symlink` flag doesn't work on Windows, so you will here have to run
the `install` command every time that you rebuild your extension. For certain installations
you might also need another flag instead of `--sys-prefix`, but we won't cover the meaning
of those flags here.
### How to see your changes
#### Typescript:
To continuously monitor the project for changes and automatically trigger a rebuild, start Jupyter in watch mode:
```bash
jupyter lab --watch
```
And in a separate session, begin watching the source directory for changes:
```bash
npm run watch
```
After a change wait for the build to finish and then refresh your browser and the changes should take effect.
#### Python:
If you make a change to the python code then you will need to restart the notebook kernel to have it take effect.
%prep
%autosetup -n jupyter_bbox_widget-0.5.0
%build
%py3_build
%install
%py3_install
install -d -m755 %{buildroot}/%{_pkgdocdir}
if [ -d doc ]; then cp -arf doc %{buildroot}/%{_pkgdocdir}; fi
if [ -d docs ]; then cp -arf docs %{buildroot}/%{_pkgdocdir}; fi
if [ -d example ]; then cp -arf example %{buildroot}/%{_pkgdocdir}; fi
if [ -d examples ]; then cp -arf examples %{buildroot}/%{_pkgdocdir}; fi
pushd %{buildroot}
if [ -d usr/lib ]; then
find usr/lib -type f -printf "\"/%h/%f\"\n" >> filelist.lst
fi
if [ -d usr/lib64 ]; then
find usr/lib64 -type f -printf "\"/%h/%f\"\n" >> filelist.lst
fi
if [ -d usr/bin ]; then
find usr/bin -type f -printf "\"/%h/%f\"\n" >> filelist.lst
fi
if [ -d usr/sbin ]; then
find usr/sbin -type f -printf "\"/%h/%f\"\n" >> filelist.lst
fi
touch doclist.lst
if [ -d usr/share/man ]; then
find usr/share/man -type f -printf "\"/%h/%f.gz\"\n" >> doclist.lst
fi
popd
mv %{buildroot}/filelist.lst .
mv %{buildroot}/doclist.lst .
%files -n python3-jupyter-bbox-widget -f filelist.lst
%dir %{python3_sitelib}/*
%files help -f doclist.lst
%{_docdir}/*
%changelog
* Tue Jun 20 2023 Python_Bot - 0.5.0-1
- Package Spec generated