
diff options
| author | CoprDistGit <infra@openeuler.org> | 2023-05-05 15:25:26 +0000 |
|---|---|---|
| committer | CoprDistGit <infra@openeuler.org> | 2023-05-05 15:25:26 +0000 |
| commit | 811f792957d1b7b55a9140117beba76e3155680a (patch) | |
| tree | 64a230709bafc538f2e902105a97dc0a2c840bec | |
| parent | 0273b24738a84d885dc87356d1091ab9c4f7c661 (diff) | |
automatic import of python-tycho-apiopeneuler20.03
| -rw-r--r-- | .gitignore | 1 | ||||
| -rw-r--r-- | python-tycho-api.spec | 569 | ||||
| -rw-r--r-- | sources | 1 |
3 files changed, 571 insertions, 0 deletions
@@ -0,0 +1 @@ +/tycho-api-1.13.0.tar.gz diff --git a/python-tycho-api.spec b/python-tycho-api.spec new file mode 100644 index 0000000..916cf7e --- /dev/null +++ b/python-tycho-api.spec @@ -0,0 +1,569 @@ +%global _empty_manifest_terminate_build 0 +Name: python-tycho-api +Version: 1.13.0 +Release: 1 +Summary: Tycho is an API, compiler, and executor for cloud native distributed systems. +License: MIT License +URL: https://pypi.org/project/tycho-api/ +Source0: https://mirrors.nju.edu.cn/pypi/web/packages/b8/70/00027367a7e709da65e32a36793ea4b65583bb62cb57974323bdda8a1f4b/tycho-api-1.13.0.tar.gz +BuildArch: noarch + +Requires: python3-deepmerge +Requires: python3-docker-compose +Requires: python3-flasgger +Requires: python3-Flask +Requires: python3-flask-cors +Requires: python3-flask-restful +Requires: python3-GitPython +Requires: python3-Jinja2 +Requires: python3-jsonschema +Requires: python3-kubernetes +Requires: python3-netifaces +Requires: python3-PyYAML +Requires: python3-requests +Requires: python3-requests-cache + +%description +# Docker compose formatted system. +version: "3" +services: + jupyter-datascience: + image: jupyter/datascience-notebook + entrypoint: start.sh jupyter lab --LabApp.token= + ports: + - 8888:8888 +``` +In one shell, run the API: +``` +$ export PATH=~/dev/tycho/bin:$PATH +$ tycho api --debug +``` +In another shell, launch three notebook instances. +``` +$ export PATH=~/dev/tycho/bin:$PATH +$ tycho up -f sample/jupyter-ds/docker-compose.yaml +SYSTEM GUID PORT +jupyter-ds 909f2e60b83340cd905ae3865d461156 32693 +$ tycho up -f sample/jupyter-ds/docker-compose.yaml +SYSTEM GUID PORT +jupyter-ds 6fc07ab865d14c4c8fd2d6e0380b270e 31333 +$ tycho up -f sample/jupyter-ds/docker-compose.yaml +SYSTEM GUID PORT +jupyter-ds 38f01c140f0141d9b4dc1baa33960362 32270 +``` +Then make a request to each instance to show it's running. It may take a moment for the instances to be ready, especially if you're pulling a container for the first time. +``` +$ for p in $(tycho status | grep -v PORT | awk '{ print $4 }'); do + url=http://$(minikube ip):$p; echo $url; wget -q -O- $url | grep /title; +done +http://192.168.99.111:32270 + <title>JupyterLab</title> +http://192.168.99.111:31333 + <title>JupyterLab</title> +http://192.168.99.111:32693 + <title>JupyterLab</title> +``` +Delete all running deployments. +``` +$ tycho down $(tycho status --terse) +38f01c140f0141d9b4dc1baa33960362 +6fc07ab865d14c4c8fd2d6e0380b270e +909f2e60b83340cd905ae3865d461156 +``` +And show that they're gone +``` +$ tycho status +None running +``` +### Architecture +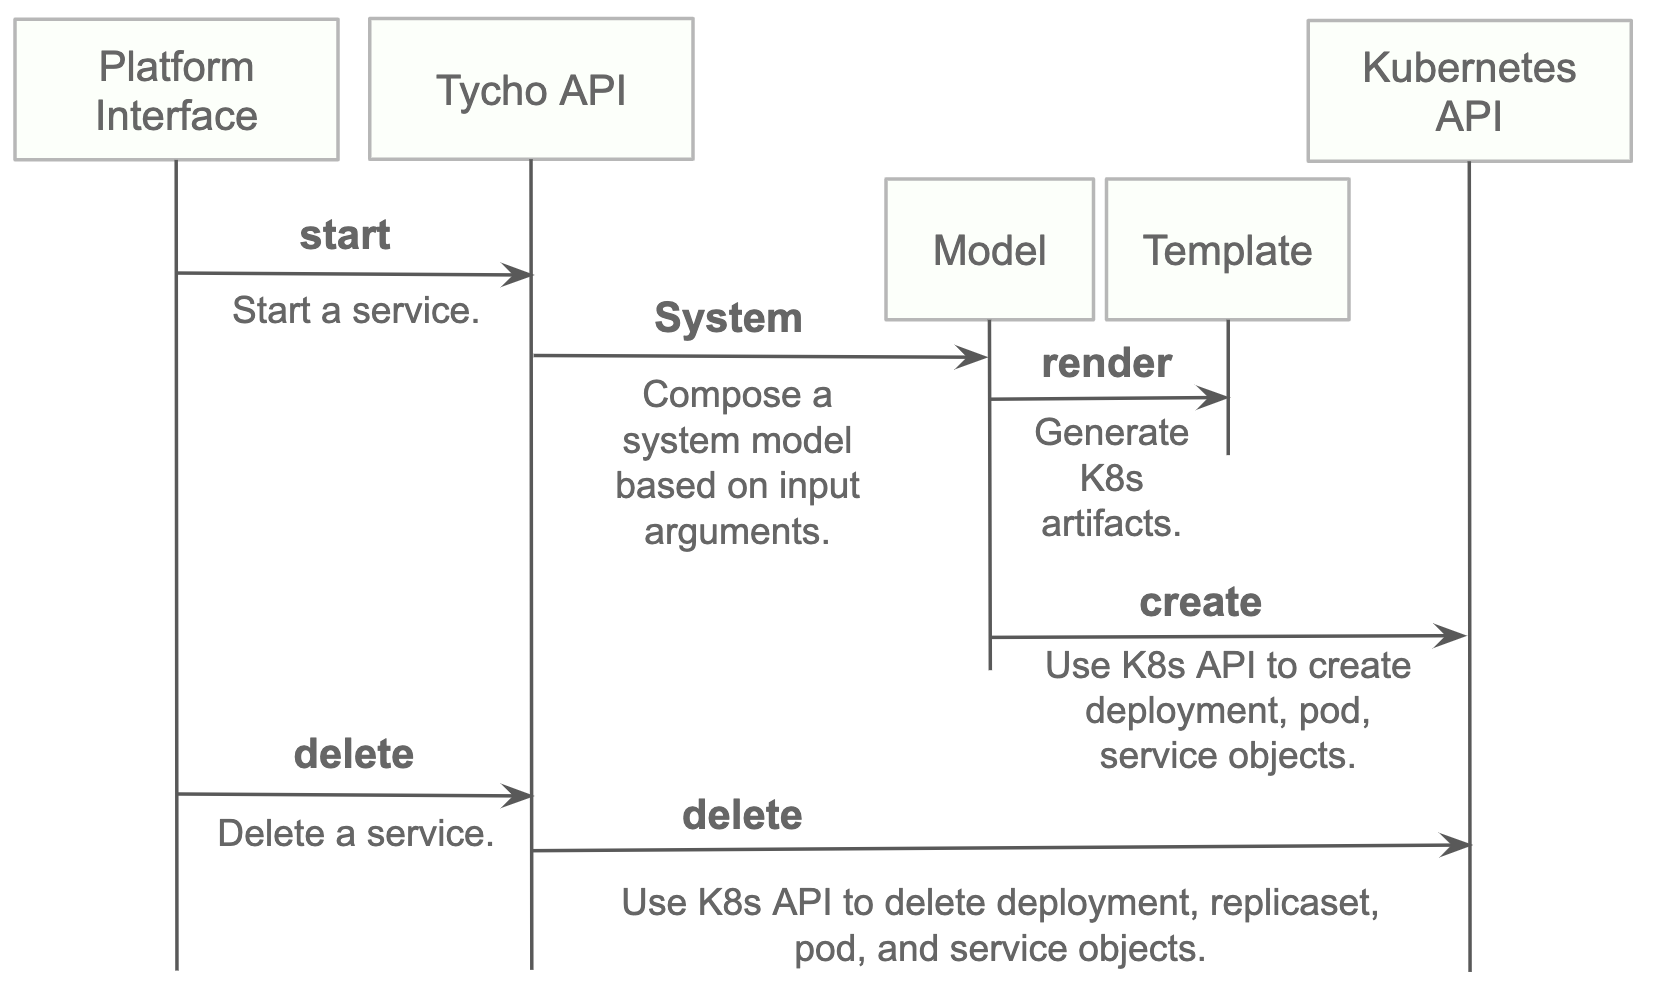 +## Install +* Install python 3.7.x or greater. +* Create a virtual environment. +* Install the requirements. +* Start the server. +``` +python3 -m venv environmentName +source environmentName/bin/activate +pip install -r requirements.txt +export PATH=<tycho-repo-dir>/bin:$PATH +tycho api +``` +### Usage - A. Development Environment Next to Minikube +This mode uses a local minikube instance with Tycho running outside of Minikube. This is the easiest way to add and test new features quickly. +Run minikube: +``` +minikbue start +``` +Run the minikube dashboard: +``` +minikube dashboard +``` +Run the Tycho API: +``` +cd tycho +PYTHONPATH=$PWD/.. python api.py +``` +Launch the Swagger interface `http://localhost:5000/apidocs/`. +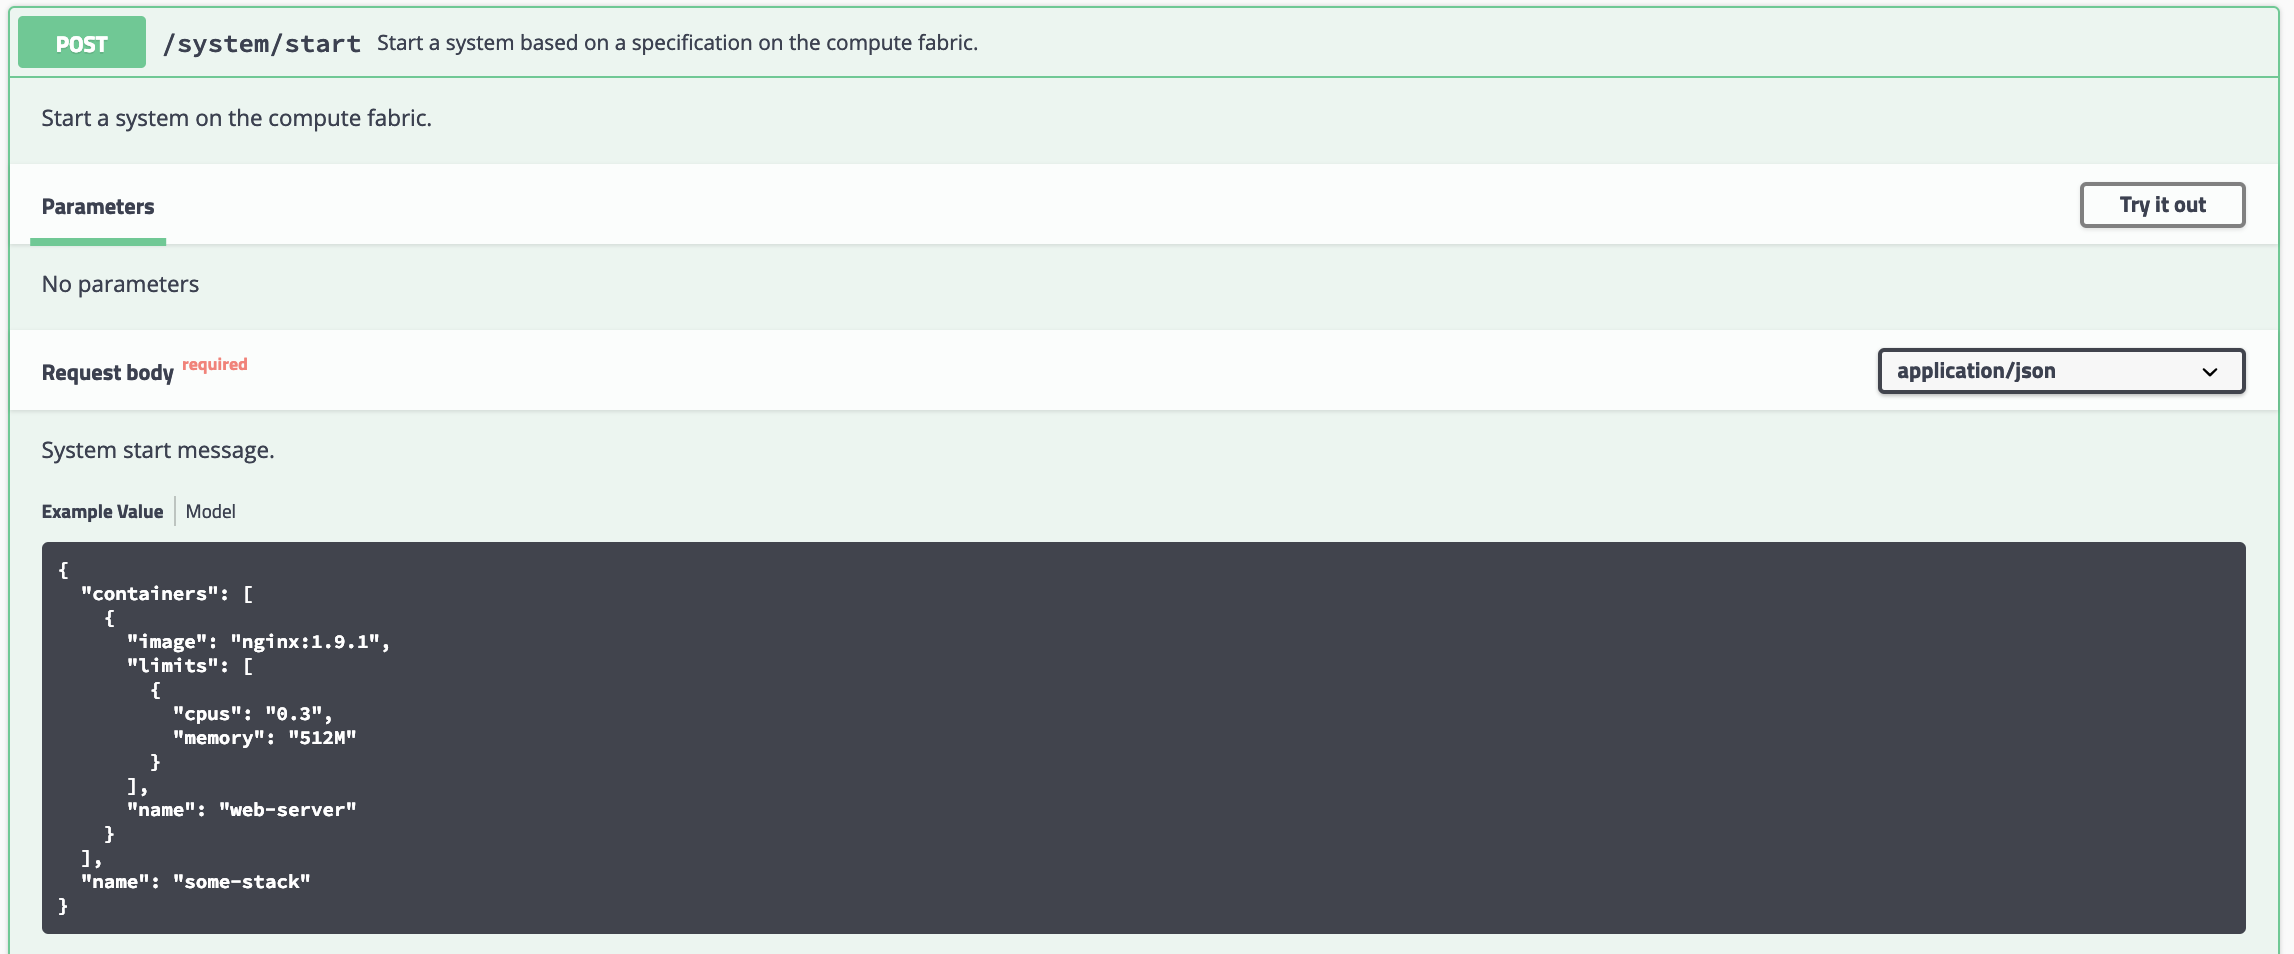 +Use the Tycho CLI client as shown above or invoke the API. +### Usage - B. Development Environment Within Minikube +When we deploy Tycho into Minikube it is now able to get its Kubernetes API configuration from within the cluster. +In the repo's kubernetes directory, we define deployment, pod, service, clusterrole, and clusterrolebinding models for Tycho. The following interaction shows deploying Tycho into Minikube and interacting with the API. +We first deploy all Kubernetes Tycho-api artifacts into Minkube: +``` +(tycho) [scox@mac~/dev/tycho/tycho]$ kubectl create -f ../kubernetes/ +deployment.extensions/tycho-api created +pod/tycho-api created +clusterrole.rbac.authorization.k8s.io/tycho-api-access created +clusterrolebinding.rbac.authorization.k8s.io/tycho-api-access created +service/tycho-api created +``` +Then we use the client as usual. +### Usage - C. Within Google Kubernetes Engine from the Google Cloud Shell +Starting out, Tycho's not running on the cluster: +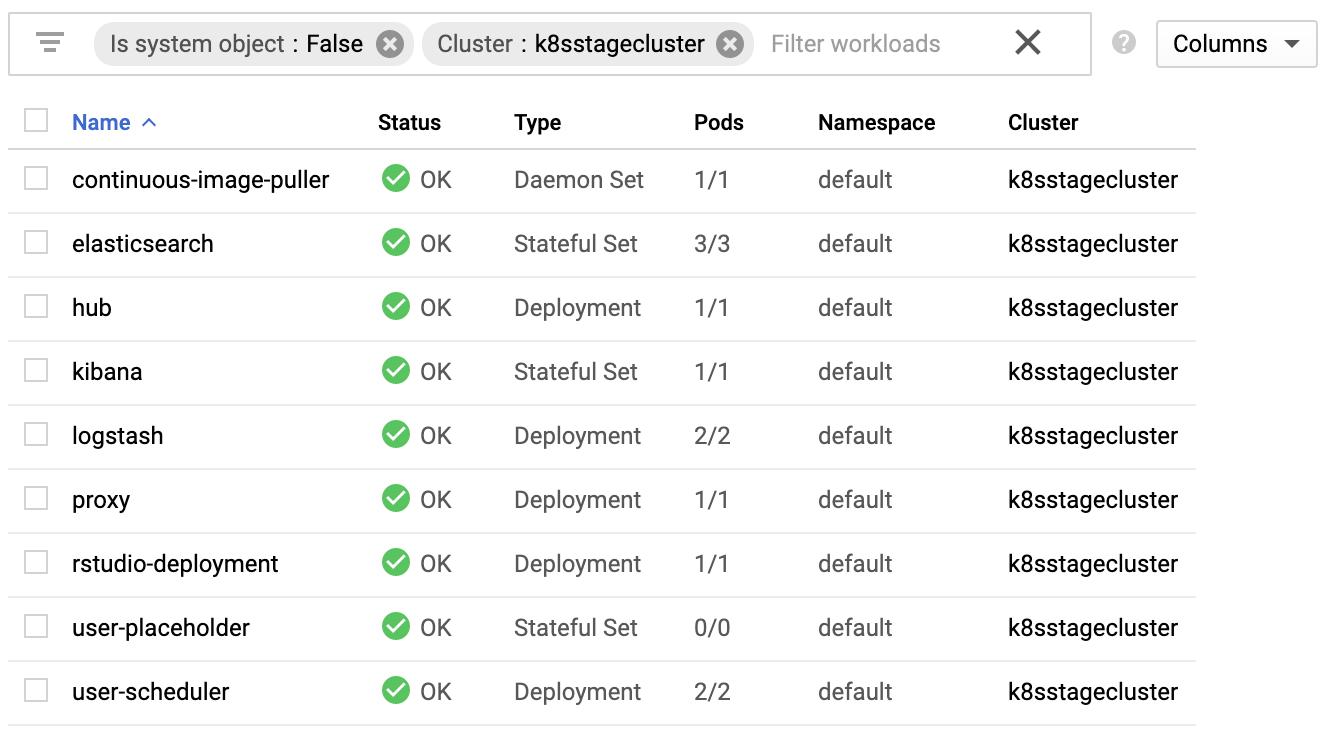 +First deploy the Tycho API +``` +$ kubectl create -f ../kubernetes/ +deployment.extensions/tycho-api created +pod/tycho-api created +clusterrole.rbac.authorization.k8s.io/tycho-api-access created +clusterrolebinding.rbac.authorization.k8s.io/tycho-api-access created +service/tycho-api created +``` +Note, here we've edited the Tycho service def to create the service as type:LoadBalancer for the purposes of a command line demo. In general, we'll access the service from within the cluster rather than exposing it externally. +That runs Tycho: + +Initialize the Tycho API's load balancer IP and node port. +``` +$ lb_ip=$(kubectl get svc tycho-api -o json | jq .status.loadBalancer.ingress[0].ip | sed -e s,\",,g) +$ tycho_port=$(kubectl get service tycho-api --output json | jq .spec.ports[0].port) +``` +Launch an application (deployment, pod, service). Note the `--command` flag is used to specify the command to run in the container. We use this to specify a flag that will cause the notebook to start without prompting for authentication credentials. +``` +$ PYTHONPATH=$PWD/.. python client.py --up -n jupyter-data-science-3425 -c jupyter/datascience-notebook -p 8888 --command "start.sh jupyter lab --LabApp.token=' +'" +200 +{ + "status": "success", + "result": { + "containers": { + "jupyter-data-science-3425-c": { + "port": 32414 + } + } + }, + "message": "Started system jupyter-data-science-3425" +} +``` +Refreshing the GKE cluster monitoring UI will now show the service starting: + +Then running + +Get the job's load balancer ip and make a request to test the service. +``` +$ job_lb_ip=$(kubectl get svc jupyter-data-science-3425 -o json | jq .status.loadBalancer.ingress[0].ip | sed -e s,\",,g) +$ wget --quiet -O- http://$job_lb_ip:8888 | grep -i /title + <title>Jupyter Notebook</title> +``` +From a browser, that URL takes us directly to the Jupyter Lab IDE: +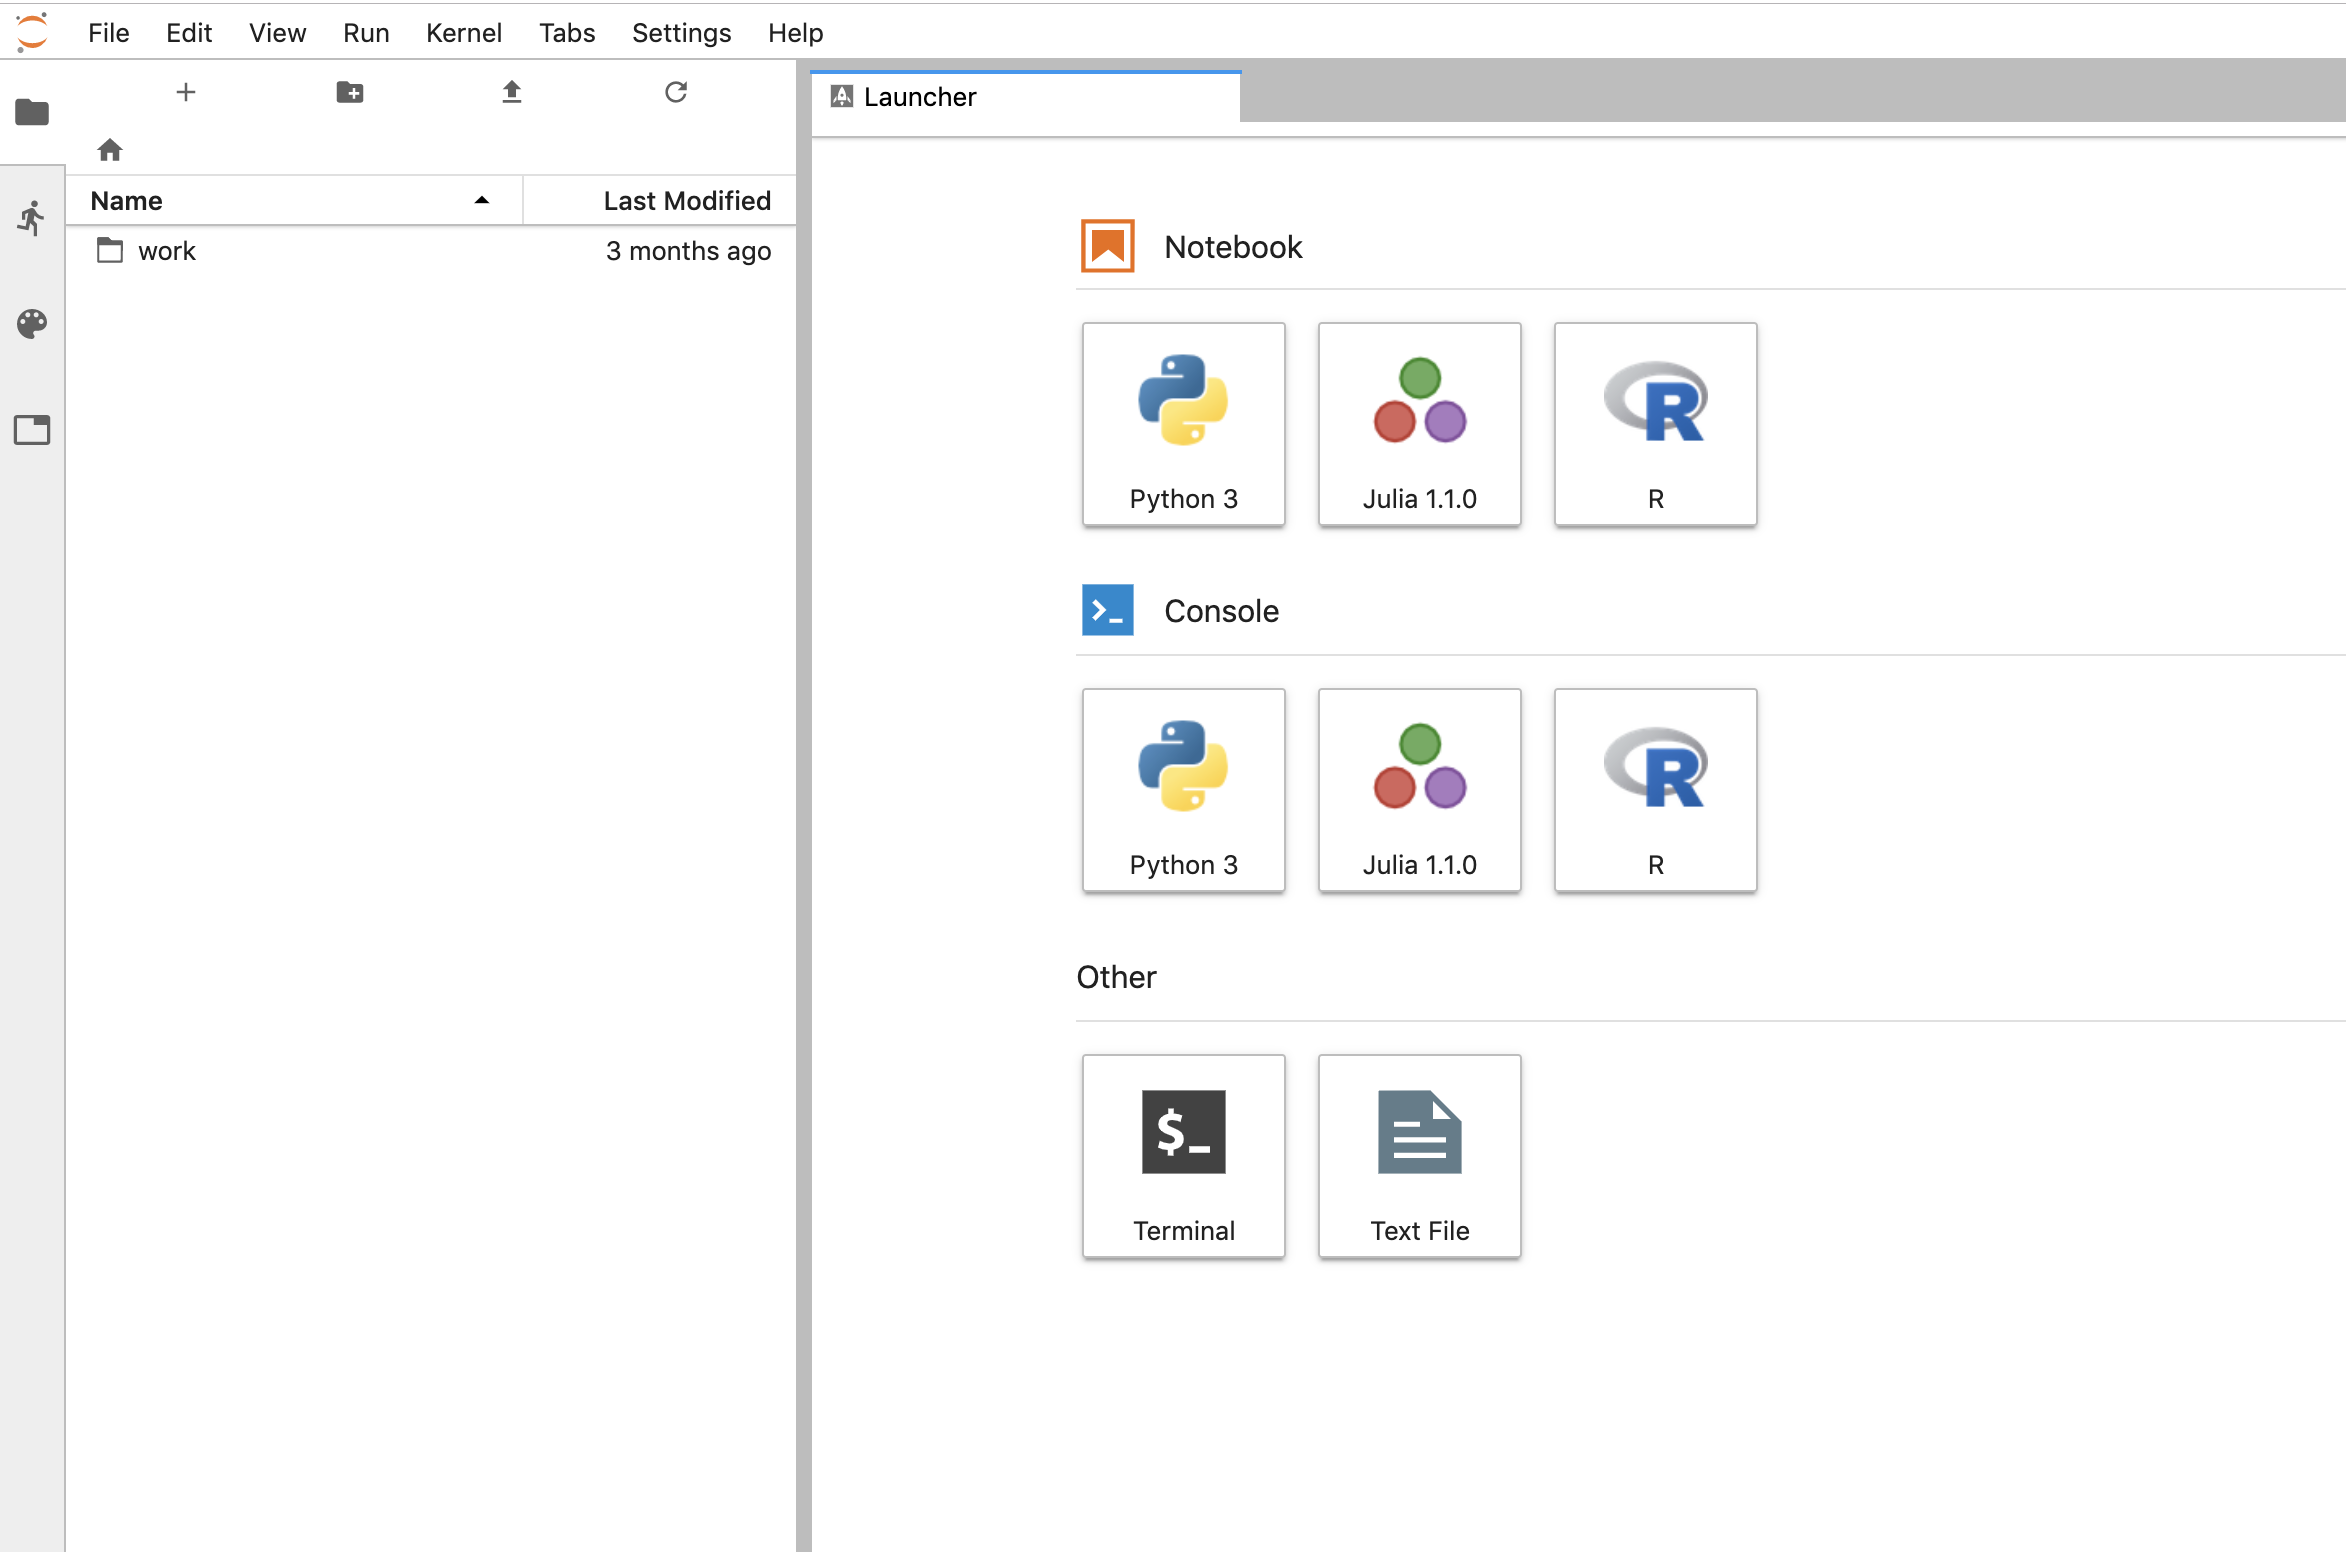 +And shut the service down: +``` +$ PYTHONPATH=$PWD/.. python client.py --down -n jupyter-data-science-3425 -s http://$lb_ip:$tycho_port +200 +{ + "status": "success", + "result": null, + "message": "Deleted system jupyter-data-science-3425" +} +``` +This removes the deployment, pod, service, and replicasets created by the launcher. +### Client Endpoint Autodiscovery +Using the command lines above without the `-s` flag for server will work on GKE. That is, the client is created by first using the K8s API to locate the Tycho-API endpoint and port. It builds the URL automatically and creates a TychoAPI object ready to use. +``` +client_factory = TychoClientFactory () +client = client_factory.get_client () +``` + +%package -n python3-tycho-api +Summary: Tycho is an API, compiler, and executor for cloud native distributed systems. +Provides: python-tycho-api +BuildRequires: python3-devel +BuildRequires: python3-setuptools +BuildRequires: python3-pip +%description -n python3-tycho-api +# Docker compose formatted system. +version: "3" +services: + jupyter-datascience: + image: jupyter/datascience-notebook + entrypoint: start.sh jupyter lab --LabApp.token= + ports: + - 8888:8888 +``` +In one shell, run the API: +``` +$ export PATH=~/dev/tycho/bin:$PATH +$ tycho api --debug +``` +In another shell, launch three notebook instances. +``` +$ export PATH=~/dev/tycho/bin:$PATH +$ tycho up -f sample/jupyter-ds/docker-compose.yaml +SYSTEM GUID PORT +jupyter-ds 909f2e60b83340cd905ae3865d461156 32693 +$ tycho up -f sample/jupyter-ds/docker-compose.yaml +SYSTEM GUID PORT +jupyter-ds 6fc07ab865d14c4c8fd2d6e0380b270e 31333 +$ tycho up -f sample/jupyter-ds/docker-compose.yaml +SYSTEM GUID PORT +jupyter-ds 38f01c140f0141d9b4dc1baa33960362 32270 +``` +Then make a request to each instance to show it's running. It may take a moment for the instances to be ready, especially if you're pulling a container for the first time. +``` +$ for p in $(tycho status | grep -v PORT | awk '{ print $4 }'); do + url=http://$(minikube ip):$p; echo $url; wget -q -O- $url | grep /title; +done +http://192.168.99.111:32270 + <title>JupyterLab</title> +http://192.168.99.111:31333 + <title>JupyterLab</title> +http://192.168.99.111:32693 + <title>JupyterLab</title> +``` +Delete all running deployments. +``` +$ tycho down $(tycho status --terse) +38f01c140f0141d9b4dc1baa33960362 +6fc07ab865d14c4c8fd2d6e0380b270e +909f2e60b83340cd905ae3865d461156 +``` +And show that they're gone +``` +$ tycho status +None running +``` +### Architecture + +## Install +* Install python 3.7.x or greater. +* Create a virtual environment. +* Install the requirements. +* Start the server. +``` +python3 -m venv environmentName +source environmentName/bin/activate +pip install -r requirements.txt +export PATH=<tycho-repo-dir>/bin:$PATH +tycho api +``` +### Usage - A. Development Environment Next to Minikube +This mode uses a local minikube instance with Tycho running outside of Minikube. This is the easiest way to add and test new features quickly. +Run minikube: +``` +minikbue start +``` +Run the minikube dashboard: +``` +minikube dashboard +``` +Run the Tycho API: +``` +cd tycho +PYTHONPATH=$PWD/.. python api.py +``` +Launch the Swagger interface `http://localhost:5000/apidocs/`. + +Use the Tycho CLI client as shown above or invoke the API. +### Usage - B. Development Environment Within Minikube +When we deploy Tycho into Minikube it is now able to get its Kubernetes API configuration from within the cluster. +In the repo's kubernetes directory, we define deployment, pod, service, clusterrole, and clusterrolebinding models for Tycho. The following interaction shows deploying Tycho into Minikube and interacting with the API. +We first deploy all Kubernetes Tycho-api artifacts into Minkube: +``` +(tycho) [scox@mac~/dev/tycho/tycho]$ kubectl create -f ../kubernetes/ +deployment.extensions/tycho-api created +pod/tycho-api created +clusterrole.rbac.authorization.k8s.io/tycho-api-access created +clusterrolebinding.rbac.authorization.k8s.io/tycho-api-access created +service/tycho-api created +``` +Then we use the client as usual. +### Usage - C. Within Google Kubernetes Engine from the Google Cloud Shell +Starting out, Tycho's not running on the cluster: + +First deploy the Tycho API +``` +$ kubectl create -f ../kubernetes/ +deployment.extensions/tycho-api created +pod/tycho-api created +clusterrole.rbac.authorization.k8s.io/tycho-api-access created +clusterrolebinding.rbac.authorization.k8s.io/tycho-api-access created +service/tycho-api created +``` +Note, here we've edited the Tycho service def to create the service as type:LoadBalancer for the purposes of a command line demo. In general, we'll access the service from within the cluster rather than exposing it externally. +That runs Tycho: + +Initialize the Tycho API's load balancer IP and node port. +``` +$ lb_ip=$(kubectl get svc tycho-api -o json | jq .status.loadBalancer.ingress[0].ip | sed -e s,\",,g) +$ tycho_port=$(kubectl get service tycho-api --output json | jq .spec.ports[0].port) +``` +Launch an application (deployment, pod, service). Note the `--command` flag is used to specify the command to run in the container. We use this to specify a flag that will cause the notebook to start without prompting for authentication credentials. +``` +$ PYTHONPATH=$PWD/.. python client.py --up -n jupyter-data-science-3425 -c jupyter/datascience-notebook -p 8888 --command "start.sh jupyter lab --LabApp.token=' +'" +200 +{ + "status": "success", + "result": { + "containers": { + "jupyter-data-science-3425-c": { + "port": 32414 + } + } + }, + "message": "Started system jupyter-data-science-3425" +} +``` +Refreshing the GKE cluster monitoring UI will now show the service starting: + +Then running + +Get the job's load balancer ip and make a request to test the service. +``` +$ job_lb_ip=$(kubectl get svc jupyter-data-science-3425 -o json | jq .status.loadBalancer.ingress[0].ip | sed -e s,\",,g) +$ wget --quiet -O- http://$job_lb_ip:8888 | grep -i /title + <title>Jupyter Notebook</title> +``` +From a browser, that URL takes us directly to the Jupyter Lab IDE: + +And shut the service down: +``` +$ PYTHONPATH=$PWD/.. python client.py --down -n jupyter-data-science-3425 -s http://$lb_ip:$tycho_port +200 +{ + "status": "success", + "result": null, + "message": "Deleted system jupyter-data-science-3425" +} +``` +This removes the deployment, pod, service, and replicasets created by the launcher. +### Client Endpoint Autodiscovery +Using the command lines above without the `-s` flag for server will work on GKE. That is, the client is created by first using the K8s API to locate the Tycho-API endpoint and port. It builds the URL automatically and creates a TychoAPI object ready to use. +``` +client_factory = TychoClientFactory () +client = client_factory.get_client () +``` + +%package help +Summary: Development documents and examples for tycho-api +Provides: python3-tycho-api-doc +%description help +# Docker compose formatted system. +version: "3" +services: + jupyter-datascience: + image: jupyter/datascience-notebook + entrypoint: start.sh jupyter lab --LabApp.token= + ports: + - 8888:8888 +``` +In one shell, run the API: +``` +$ export PATH=~/dev/tycho/bin:$PATH +$ tycho api --debug +``` +In another shell, launch three notebook instances. +``` +$ export PATH=~/dev/tycho/bin:$PATH +$ tycho up -f sample/jupyter-ds/docker-compose.yaml +SYSTEM GUID PORT +jupyter-ds 909f2e60b83340cd905ae3865d461156 32693 +$ tycho up -f sample/jupyter-ds/docker-compose.yaml +SYSTEM GUID PORT +jupyter-ds 6fc07ab865d14c4c8fd2d6e0380b270e 31333 +$ tycho up -f sample/jupyter-ds/docker-compose.yaml +SYSTEM GUID PORT +jupyter-ds 38f01c140f0141d9b4dc1baa33960362 32270 +``` +Then make a request to each instance to show it's running. It may take a moment for the instances to be ready, especially if you're pulling a container for the first time. +``` +$ for p in $(tycho status | grep -v PORT | awk '{ print $4 }'); do + url=http://$(minikube ip):$p; echo $url; wget -q -O- $url | grep /title; +done +http://192.168.99.111:32270 + <title>JupyterLab</title> +http://192.168.99.111:31333 + <title>JupyterLab</title> +http://192.168.99.111:32693 + <title>JupyterLab</title> +``` +Delete all running deployments. +``` +$ tycho down $(tycho status --terse) +38f01c140f0141d9b4dc1baa33960362 +6fc07ab865d14c4c8fd2d6e0380b270e +909f2e60b83340cd905ae3865d461156 +``` +And show that they're gone +``` +$ tycho status +None running +``` +### Architecture + +## Install +* Install python 3.7.x or greater. +* Create a virtual environment. +* Install the requirements. +* Start the server. +``` +python3 -m venv environmentName +source environmentName/bin/activate +pip install -r requirements.txt +export PATH=<tycho-repo-dir>/bin:$PATH +tycho api +``` +### Usage - A. Development Environment Next to Minikube +This mode uses a local minikube instance with Tycho running outside of Minikube. This is the easiest way to add and test new features quickly. +Run minikube: +``` +minikbue start +``` +Run the minikube dashboard: +``` +minikube dashboard +``` +Run the Tycho API: +``` +cd tycho +PYTHONPATH=$PWD/.. python api.py +``` +Launch the Swagger interface `http://localhost:5000/apidocs/`. + +Use the Tycho CLI client as shown above or invoke the API. +### Usage - B. Development Environment Within Minikube +When we deploy Tycho into Minikube it is now able to get its Kubernetes API configuration from within the cluster. +In the repo's kubernetes directory, we define deployment, pod, service, clusterrole, and clusterrolebinding models for Tycho. The following interaction shows deploying Tycho into Minikube and interacting with the API. +We first deploy all Kubernetes Tycho-api artifacts into Minkube: +``` +(tycho) [scox@mac~/dev/tycho/tycho]$ kubectl create -f ../kubernetes/ +deployment.extensions/tycho-api created +pod/tycho-api created +clusterrole.rbac.authorization.k8s.io/tycho-api-access created +clusterrolebinding.rbac.authorization.k8s.io/tycho-api-access created +service/tycho-api created +``` +Then we use the client as usual. +### Usage - C. Within Google Kubernetes Engine from the Google Cloud Shell +Starting out, Tycho's not running on the cluster: + +First deploy the Tycho API +``` +$ kubectl create -f ../kubernetes/ +deployment.extensions/tycho-api created +pod/tycho-api created +clusterrole.rbac.authorization.k8s.io/tycho-api-access created +clusterrolebinding.rbac.authorization.k8s.io/tycho-api-access created +service/tycho-api created +``` +Note, here we've edited the Tycho service def to create the service as type:LoadBalancer for the purposes of a command line demo. In general, we'll access the service from within the cluster rather than exposing it externally. +That runs Tycho: + +Initialize the Tycho API's load balancer IP and node port. +``` +$ lb_ip=$(kubectl get svc tycho-api -o json | jq .status.loadBalancer.ingress[0].ip | sed -e s,\",,g) +$ tycho_port=$(kubectl get service tycho-api --output json | jq .spec.ports[0].port) +``` +Launch an application (deployment, pod, service). Note the `--command` flag is used to specify the command to run in the container. We use this to specify a flag that will cause the notebook to start without prompting for authentication credentials. +``` +$ PYTHONPATH=$PWD/.. python client.py --up -n jupyter-data-science-3425 -c jupyter/datascience-notebook -p 8888 --command "start.sh jupyter lab --LabApp.token=' +'" +200 +{ + "status": "success", + "result": { + "containers": { + "jupyter-data-science-3425-c": { + "port": 32414 + } + } + }, + "message": "Started system jupyter-data-science-3425" +} +``` +Refreshing the GKE cluster monitoring UI will now show the service starting: + +Then running + +Get the job's load balancer ip and make a request to test the service. +``` +$ job_lb_ip=$(kubectl get svc jupyter-data-science-3425 -o json | jq .status.loadBalancer.ingress[0].ip | sed -e s,\",,g) +$ wget --quiet -O- http://$job_lb_ip:8888 | grep -i /title + <title>Jupyter Notebook</title> +``` +From a browser, that URL takes us directly to the Jupyter Lab IDE: + +And shut the service down: +``` +$ PYTHONPATH=$PWD/.. python client.py --down -n jupyter-data-science-3425 -s http://$lb_ip:$tycho_port +200 +{ + "status": "success", + "result": null, + "message": "Deleted system jupyter-data-science-3425" +} +``` +This removes the deployment, pod, service, and replicasets created by the launcher. +### Client Endpoint Autodiscovery +Using the command lines above without the `-s` flag for server will work on GKE. That is, the client is created by first using the K8s API to locate the Tycho-API endpoint and port. It builds the URL automatically and creates a TychoAPI object ready to use. +``` +client_factory = TychoClientFactory () +client = client_factory.get_client () +``` + +%prep +%autosetup -n tycho-api-1.13.0 + +%build +%py3_build + +%install +%py3_install +install -d -m755 %{buildroot}/%{_pkgdocdir} +if [ -d doc ]; then cp -arf doc %{buildroot}/%{_pkgdocdir}; fi +if [ -d docs ]; then cp -arf docs %{buildroot}/%{_pkgdocdir}; fi +if [ -d example ]; then cp -arf example %{buildroot}/%{_pkgdocdir}; fi +if [ -d examples ]; then cp -arf examples %{buildroot}/%{_pkgdocdir}; fi +pushd %{buildroot} +if [ -d usr/lib ]; then + find usr/lib -type f -printf "/%h/%f\n" >> filelist.lst +fi +if [ -d usr/lib64 ]; then + find usr/lib64 -type f -printf "/%h/%f\n" >> filelist.lst +fi +if [ -d usr/bin ]; then + find usr/bin -type f -printf "/%h/%f\n" >> filelist.lst +fi +if [ -d usr/sbin ]; then + find usr/sbin -type f -printf "/%h/%f\n" >> filelist.lst +fi +touch doclist.lst +if [ -d usr/share/man ]; then + find usr/share/man -type f -printf "/%h/%f.gz\n" >> doclist.lst +fi +popd +mv %{buildroot}/filelist.lst . +mv %{buildroot}/doclist.lst . + +%files -n python3-tycho-api -f filelist.lst +%dir %{python3_sitelib}/* + +%files help -f doclist.lst +%{_docdir}/* + +%changelog +* Fri May 05 2023 Python_Bot <Python_Bot@openeuler.org> - 1.13.0-1 +- Package Spec generated @@ -0,0 +1 @@ +2d233232da7a858424ec0cb2555571d7 tycho-api-1.13.0.tar.gz |