
diff options
| -rw-r--r-- | .gitignore | 1 | ||||
| -rw-r--r-- | python-vidstab.spec | 1286 | ||||
| -rw-r--r-- | sources | 1 |
3 files changed, 1288 insertions, 0 deletions
@@ -0,0 +1 @@ +/vidstab-1.7.4.tar.gz diff --git a/python-vidstab.spec b/python-vidstab.spec new file mode 100644 index 0000000..a75e3cf --- /dev/null +++ b/python-vidstab.spec @@ -0,0 +1,1286 @@ +%global _empty_manifest_terminate_build 0 +Name: python-vidstab +Version: 1.7.4 +Release: 1 +Summary: Video Stabilization using OpenCV +License: MIT +URL: https://github.com/AdamSpannbauer/python_video_stab +Source0: https://mirrors.aliyun.com/pypi/web/packages/b5/f7/187e0249256c59a2fa6033f6ad5445cb3a01e5b539a44c50168b690095cf/vidstab-1.7.4.tar.gz +BuildArch: noarch + +Requires: python3-numpy +Requires: python3-imutils +Requires: python3-progress +Requires: python3-matplotlib +Requires: python3-opencv-contrib-python + +%description +# Python Video Stabilization <img src='https://s3.amazonaws.com/python-vidstab/logo/vidstab_logo_hex.png' width=125 align='right'/> + +<!-- noop --> + +[](https://travis-ci.org/AdamSpannbauer/python_video_stab) +[](https://codecov.io/gh/AdamSpannbauer/python_video_stab) +[](https://codeclimate.com/github/AdamSpannbauer/python_video_stab/maintainability) +[](https://pypi.org/project/vidstab/) +[](https://github.com/AdamSpannbauer/python_video_stab/commits/master) +[](https://pepy.tech/project/vidstab) + + Python video stabilization using OpenCV. Full [searchable documentation here](https://adamspannbauer.github.io/python_video_stab). + + This module contains a single class (`VidStab`) used for video stabilization. This class is based on the work presented by Nghia Ho in [SIMPLE VIDEO STABILIZATION USING OPENCV](http://nghiaho.com/?p=2093). The foundation code was found in a comment on Nghia Ho's post by the commenter with username koala. + + Input | Output +:-------------------------------:|:-------------------------: + |  + +*[Video](https://www.youtube.com/watch?v=9pypPqbV_GM) used with permission from [HappyLiving](https://www.facebook.com/happylivinginfl/)* + +## Contents: +1. [Installation](#installation) + * [Install `vidstab` without installing OpenCV](#install-vidstab-without-installing-opencv) + * [Install vidstab & OpenCV](#install-vidstab-opencv) +2. [Basic Usage](#basic-usage) + * [Using from command line](#using-from-command-line) + * [Using VidStab class](#using-vidstab-class) +3. [Advanced Usage](#advanced-usage) + * [Plotting frame to frame transformations](#plotting-frame-to-frame-transformations) + * [Using borders](#using-borders) + * [Using Frame Layering](#using-frame-layering) + * [Stabilizing a frame at a time](#stabilizing-a-frame-at-a-time) + * [Working with live video](#working-with-live-video) + * [Transform File Writing & Reading](#transform-file-writing--reading) + +## Installation + +> ```diff +> + Please report issues if you install/try to install and run into problems! +> ``` + +### Install `vidstab` without installing OpenCV + +If you've already built OpenCV with python bindings on your machine it is recommended to install `vidstab` without installing the pypi versions of OpenCV. The `opencv-python` python module can cause issues if you've already built OpenCV from source in your environment. + +The below commands will install `vidstab` without OpenCV included. + +#### From PyPi + +```bash +pip install vidstab +``` + +#### From GitHub + +```bash +pip install git+https://github.com/AdamSpannbauer/python_video_stab.git +``` + +### Install `vidstab` & OpenCV + +If you don't have OpenCV installed already there are a couple options. + +1. You can build OpenCV using one of the great online tutorials from [PyImageSearch](https://www.pyimagesearch.com/), [LearnOpenCV](https://www.learnopencv.com/), or [OpenCV](https://docs.opencv.org/3.0-beta/doc/py_tutorials/py_setup/py_table_of_contents_setup/py_table_of_contents_setup.html#py-table-of-content-setup) themselves. When building from source you have more options (e.g. [platform optimization](https://www.pyimagesearch.com/2017/10/09/optimizing-opencv-on-the-raspberry-pi/)), but more responsibility. Once installed you can use the pip install command shown above. +2. You can install a pre-built distribution of OpenCV from pypi as a dependency for `vidstab` (see command below) + +The below commands will install `vidstab` with `opencv-contrib-python` as dependencies. + +#### From PyPi + +```bash +pip install vidstab[cv2] +``` + +#### From Github + +```bash + pip install -e git+https://github.com/AdamSpannbauer/python_video_stab.git#egg=vidstab[cv2] +``` + +## Basic usage + +The `VidStab` class can be used as a command line script or in your own custom python code. + +### Using from command line + +```bash +# Using defaults +python3 -m vidstab --input input_video.mov --output stable_video.avi +``` + +```bash +# Using a specific keypoint detector +python3 -m vidstab -i input_video.mov -o stable_video.avi -k GFTT +``` + +### Using `VidStab` class + +```python +from vidstab import VidStab + +# Using defaults +stabilizer = VidStab() +stabilizer.stabilize(input_path='input_video.mov', output_path='stable_video.avi') + +# Using a specific keypoint detector +stabilizer = VidStab(kp_method='ORB') +stabilizer.stabilize(input_path='input_video.mp4', output_path='stable_video.avi') + +# Using a specific keypoint detector and customizing keypoint parameters +stabilizer = VidStab(kp_method='FAST', threshold=42, nonmaxSuppression=False) +stabilizer.stabilize(input_path='input_video.mov', output_path='stable_video.avi') +``` + +## Advanced usage + +### Plotting frame to frame transformations + +```python +from vidstab import VidStab +import matplotlib.pyplot as plt + +stabilizer = VidStab() +stabilizer.stabilize(input_path='input_video.mov', output_path='stable_video.avi') + +stabilizer.plot_trajectory() +plt.show() + +stabilizer.plot_transforms() +plt.show() +``` + +Trajectories | Transforms +:-------------------------------:|:-------------------------: +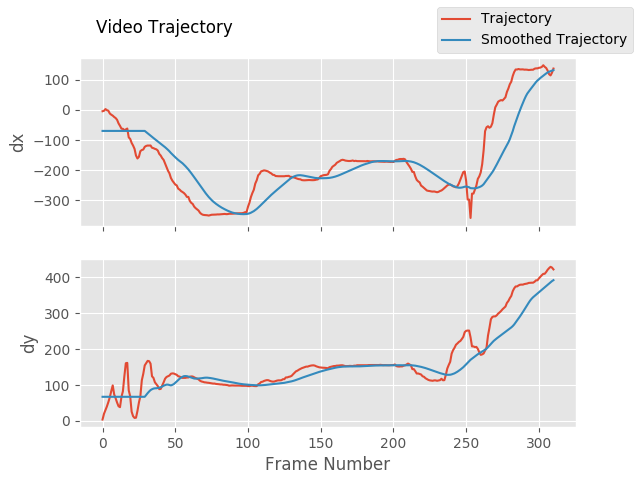 | 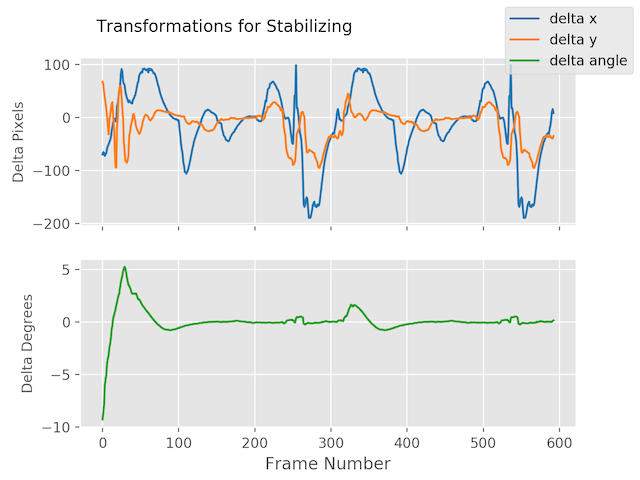 + +### Using borders + +```python +from vidstab import VidStab + +stabilizer = VidStab() + +# black borders +stabilizer.stabilize(input_path='input_video.mov', + output_path='stable_video.avi', + border_type='black') +stabilizer.stabilize(input_path='input_video.mov', + output_path='wide_stable_video.avi', + border_type='black', + border_size=100) + +# filled in borders +stabilizer.stabilize(input_path='input_video.mov', + output_path='ref_stable_video.avi', + border_type='reflect') +stabilizer.stabilize(input_path='input_video.mov', + output_path='rep_stable_video.avi', + border_type='replicate') +``` + +<table> + <tr> + <td><p align='center'><code>border_size=0</code></p></td> + <td><p align='center'><code>border_size=100</code></p></td> + </tr> + <tr> + <td><p align='center'><img src='https://s3.amazonaws.com/python-vidstab/readme/stable_ostrich.gif'></p></td> + <td><p align='center'><img src='https://s3.amazonaws.com/python-vidstab/readme/wide_stable_ostrich.gif'></p></td> + </tr> +</table> + +`border_type='reflect'` | `border_type='replicate'` +:--------------------------------------:|:-------------------------: + |  + +*[Video](https://www.youtube.com/watch?v=9pypPqbV_GM) used with permission from [HappyLiving](https://www.facebook.com/happylivinginfl/)* + +### Using Frame Layering + +```python +from vidstab import VidStab, layer_overlay, layer_blend + +# init vid stabilizer +stabilizer = VidStab() + +# use vidstab.layer_overlay for generating a trail effect +stabilizer.stabilize(input_path=INPUT_VIDEO_PATH, + output_path='trail_stable_video.avi', + border_type='black', + border_size=100, + layer_func=layer_overlay) + + +# create custom overlay function +# here we use vidstab.layer_blend with custom alpha +# layer_blend will generate a fading trail effect with some motion blur +def layer_custom(foreground, background): + return layer_blend(foreground, background, foreground_alpha=.8) + +# use custom overlay function +stabilizer.stabilize(input_path=INPUT_VIDEO_PATH, + output_path='blend_stable_video.avi', + border_type='black', + border_size=100, + layer_func=layer_custom) +``` + +`layer_func=vidstab.layer_overlay` | `layer_func=vidstab.layer_blend` +:--------------------------------------:|:-------------------------: + |  + +*[Video](https://www.youtube.com/watch?v=9pypPqbV_GM) used with permission from [HappyLiving](https://www.facebook.com/happylivinginfl/)* + + +### Automatic border sizing + +```python +from vidstab import VidStab, layer_overlay + +stabilizer = VidStab() + +stabilizer.stabilize(input_path=INPUT_VIDEO_PATH, + output_path='auto_border_stable_video.avi', + border_size='auto', + # frame layering to show performance of auto sizing + layer_func=layer_overlay) +``` + +<p align='center'> + <img width='45%' src='https://s3.amazonaws.com/python-vidstab/readme/auto_border_stable_ostrich.gif'> +</p> + + +### Stabilizing a frame at a time + +The method `VidStab.stabilize_frame()` can accept `numpy` arrays to allow stabilization processing a frame at a time. +This can allow pre/post processing for each frame to be stabilized; see examples below. + +#### Simplest form + +```python +from vidstab.VidStab import VidStab + +stabilizer = VidStab() +vidcap = cv2.VideoCapture('input_video.mov') + +while True: + grabbed_frame, frame = vidcap.read() + + if frame is not None: + # Perform any pre-processing of frame before stabilization here + pass + + # Pass frame to stabilizer even if frame is None + # stabilized_frame will be an all black frame until iteration 30 + stabilized_frame = stabilizer.stabilize_frame(input_frame=frame, + smoothing_window=30) + if stabilized_frame is None: + # There are no more frames available to stabilize + break + + # Perform any post-processing of stabilized frame here + pass +``` + +#### Example with object tracking + +```python +import os +import cv2 +from vidstab import VidStab, layer_overlay, download_ostrich_video + +# Download test video to stabilize +if not os.path.isfile("ostrich.mp4"): + download_ostrich_video("ostrich.mp4") + +# Initialize object tracker, stabilizer, and video reader +object_tracker = cv2.TrackerCSRT_create() +stabilizer = VidStab() +vidcap = cv2.VideoCapture("ostrich.mp4") + +# Initialize bounding box for drawing rectangle around tracked object +object_bounding_box = None + +while True: + grabbed_frame, frame = vidcap.read() + + # Pass frame to stabilizer even if frame is None + stabilized_frame = stabilizer.stabilize_frame(input_frame=frame, border_size=50) + + # If stabilized_frame is None then there are no frames left to process + if stabilized_frame is None: + break + + # Draw rectangle around tracked object if tracking has started + if object_bounding_box is not None: + success, object_bounding_box = object_tracker.update(stabilized_frame) + + if success: + (x, y, w, h) = [int(v) for v in object_bounding_box] + cv2.rectangle(stabilized_frame, (x, y), (x + w, y + h), + (0, 255, 0), 2) + + # Display stabilized output + cv2.imshow('Frame', stabilized_frame) + + key = cv2.waitKey(5) + + # Select ROI for tracking and begin object tracking + # Non-zero frame indicates stabilization process is warmed up + if stabilized_frame.sum() > 0 and object_bounding_box is None: + object_bounding_box = cv2.selectROI("Frame", + stabilized_frame, + fromCenter=False, + showCrosshair=True) + object_tracker.init(stabilized_frame, object_bounding_box) + elif key == 27: + break + +vidcap.release() +cv2.destroyAllWindows() +``` + +<p align='center'> + <img width='50%' src='https://s3.amazonaws.com/python-vidstab/readme/obj_tracking_vidstab_1.gif'> +</p> + + +### Working with live video + +The `VidStab` class can also process live video streams. The underlying video reader is `cv2.VideoCapture`([documentation](https://docs.opencv.org/3.0-beta/doc/py_tutorials/py_gui/py_video_display/py_video_display.html)). +The relevant snippet from the documentation for stabilizing live video is: + +> *Its argument can be either the device index or the name of a video file. Device index is just the number to specify which camera. Normally one camera will be connected (as in my case). So I simply pass 0 (or -1). You can select the second camera by passing 1 and so on.* + +The `input_path` argument of the `VidStab.stabilize` method can accept integers that will be passed directly to `cv2.VideoCapture` as a device index. You can also pass a device index to the `--input` argument for command line usage. + +One notable difference between live feeds and video files is that webcam footage does not have a definite end point. +The options for ending a live video stabilization are to set the max length using the `max_frames` argument or to manually stop the process by pressing the <kbd>Esc</kbd> key or the <kbd>Q</kbd> key. +If `max_frames` is not provided then no progress bar can be displayed for live video stabilization processes. + +#### Example + +```python +from vidstab import VidStab + +stabilizer = VidStab() +stabilizer.stabilize(input_path=0, + output_path='stable_webcam.avi', + max_frames=1000, + playback=True) +``` + +<p align='center'> + <img width='50%' src='https://s3.amazonaws.com/python-vidstab/readme/webcam_stable.gif'> +</p> + +### Transform file writing & reading + +#### Generating and saving transforms to file + +```python +import numpy as np +from vidstab import VidStab, download_ostrich_video + +# Download video if needed +download_ostrich_video(INPUT_VIDEO_PATH) + +# Generate transforms and save to TRANSFORMATIONS_PATH as csv (no headers) +stabilizer = VidStab() +stabilizer.gen_transforms(INPUT_VIDEO_PATH) +np.savetxt(TRANSFORMATIONS_PATH, stabilizer.transforms, delimiter=',') +``` + +File at `TRANSFORMATIONS_PATH` is of the form shown below. The 3 columns represent delta x, delta y, and delta angle respectively. + +``` +-9.249733913760086068e+01,2.953221378387767970e+01,-2.875918912994855636e-02 +-8.801434576214279559e+01,2.741942225927152776e+01,-2.715232319470826938e-02 +``` + +#### Reading and using transforms from file + +Below example reads a file of transforms and applies to an arbitrary video. The transform file is of the form shown in [above section](#generating-and-saving-transforms-to-file). + +```python +import numpy as np +from vidstab import VidStab + +# Read in csv transform data, of form (delta x, delta y, delta angle): +transforms = np.loadtxt(TRANSFORMATIONS_PATH, delimiter=',') + +# Create stabilizer and supply numpy array of transforms +stabilizer = VidStab() +stabilizer.transforms = transforms + +# Apply stabilizing transforms to INPUT_VIDEO_PATH and save to OUTPUT_VIDEO_PATH +stabilizer.apply_transforms(INPUT_VIDEO_PATH, OUTPUT_VIDEO_PATH) +``` + + + + +%package -n python3-vidstab +Summary: Video Stabilization using OpenCV +Provides: python-vidstab +BuildRequires: python3-devel +BuildRequires: python3-setuptools +BuildRequires: python3-pip +%description -n python3-vidstab +# Python Video Stabilization <img src='https://s3.amazonaws.com/python-vidstab/logo/vidstab_logo_hex.png' width=125 align='right'/> + +<!-- noop --> + +[](https://travis-ci.org/AdamSpannbauer/python_video_stab) +[](https://codecov.io/gh/AdamSpannbauer/python_video_stab) +[](https://codeclimate.com/github/AdamSpannbauer/python_video_stab/maintainability) +[](https://pypi.org/project/vidstab/) +[](https://github.com/AdamSpannbauer/python_video_stab/commits/master) +[](https://pepy.tech/project/vidstab) + + Python video stabilization using OpenCV. Full [searchable documentation here](https://adamspannbauer.github.io/python_video_stab). + + This module contains a single class (`VidStab`) used for video stabilization. This class is based on the work presented by Nghia Ho in [SIMPLE VIDEO STABILIZATION USING OPENCV](http://nghiaho.com/?p=2093). The foundation code was found in a comment on Nghia Ho's post by the commenter with username koala. + + Input | Output +:-------------------------------:|:-------------------------: + |  + +*[Video](https://www.youtube.com/watch?v=9pypPqbV_GM) used with permission from [HappyLiving](https://www.facebook.com/happylivinginfl/)* + +## Contents: +1. [Installation](#installation) + * [Install `vidstab` without installing OpenCV](#install-vidstab-without-installing-opencv) + * [Install vidstab & OpenCV](#install-vidstab-opencv) +2. [Basic Usage](#basic-usage) + * [Using from command line](#using-from-command-line) + * [Using VidStab class](#using-vidstab-class) +3. [Advanced Usage](#advanced-usage) + * [Plotting frame to frame transformations](#plotting-frame-to-frame-transformations) + * [Using borders](#using-borders) + * [Using Frame Layering](#using-frame-layering) + * [Stabilizing a frame at a time](#stabilizing-a-frame-at-a-time) + * [Working with live video](#working-with-live-video) + * [Transform File Writing & Reading](#transform-file-writing--reading) + +## Installation + +> ```diff +> + Please report issues if you install/try to install and run into problems! +> ``` + +### Install `vidstab` without installing OpenCV + +If you've already built OpenCV with python bindings on your machine it is recommended to install `vidstab` without installing the pypi versions of OpenCV. The `opencv-python` python module can cause issues if you've already built OpenCV from source in your environment. + +The below commands will install `vidstab` without OpenCV included. + +#### From PyPi + +```bash +pip install vidstab +``` + +#### From GitHub + +```bash +pip install git+https://github.com/AdamSpannbauer/python_video_stab.git +``` + +### Install `vidstab` & OpenCV + +If you don't have OpenCV installed already there are a couple options. + +1. You can build OpenCV using one of the great online tutorials from [PyImageSearch](https://www.pyimagesearch.com/), [LearnOpenCV](https://www.learnopencv.com/), or [OpenCV](https://docs.opencv.org/3.0-beta/doc/py_tutorials/py_setup/py_table_of_contents_setup/py_table_of_contents_setup.html#py-table-of-content-setup) themselves. When building from source you have more options (e.g. [platform optimization](https://www.pyimagesearch.com/2017/10/09/optimizing-opencv-on-the-raspberry-pi/)), but more responsibility. Once installed you can use the pip install command shown above. +2. You can install a pre-built distribution of OpenCV from pypi as a dependency for `vidstab` (see command below) + +The below commands will install `vidstab` with `opencv-contrib-python` as dependencies. + +#### From PyPi + +```bash +pip install vidstab[cv2] +``` + +#### From Github + +```bash + pip install -e git+https://github.com/AdamSpannbauer/python_video_stab.git#egg=vidstab[cv2] +``` + +## Basic usage + +The `VidStab` class can be used as a command line script or in your own custom python code. + +### Using from command line + +```bash +# Using defaults +python3 -m vidstab --input input_video.mov --output stable_video.avi +``` + +```bash +# Using a specific keypoint detector +python3 -m vidstab -i input_video.mov -o stable_video.avi -k GFTT +``` + +### Using `VidStab` class + +```python +from vidstab import VidStab + +# Using defaults +stabilizer = VidStab() +stabilizer.stabilize(input_path='input_video.mov', output_path='stable_video.avi') + +# Using a specific keypoint detector +stabilizer = VidStab(kp_method='ORB') +stabilizer.stabilize(input_path='input_video.mp4', output_path='stable_video.avi') + +# Using a specific keypoint detector and customizing keypoint parameters +stabilizer = VidStab(kp_method='FAST', threshold=42, nonmaxSuppression=False) +stabilizer.stabilize(input_path='input_video.mov', output_path='stable_video.avi') +``` + +## Advanced usage + +### Plotting frame to frame transformations + +```python +from vidstab import VidStab +import matplotlib.pyplot as plt + +stabilizer = VidStab() +stabilizer.stabilize(input_path='input_video.mov', output_path='stable_video.avi') + +stabilizer.plot_trajectory() +plt.show() + +stabilizer.plot_transforms() +plt.show() +``` + +Trajectories | Transforms +:-------------------------------:|:-------------------------: + |  + +### Using borders + +```python +from vidstab import VidStab + +stabilizer = VidStab() + +# black borders +stabilizer.stabilize(input_path='input_video.mov', + output_path='stable_video.avi', + border_type='black') +stabilizer.stabilize(input_path='input_video.mov', + output_path='wide_stable_video.avi', + border_type='black', + border_size=100) + +# filled in borders +stabilizer.stabilize(input_path='input_video.mov', + output_path='ref_stable_video.avi', + border_type='reflect') +stabilizer.stabilize(input_path='input_video.mov', + output_path='rep_stable_video.avi', + border_type='replicate') +``` + +<table> + <tr> + <td><p align='center'><code>border_size=0</code></p></td> + <td><p align='center'><code>border_size=100</code></p></td> + </tr> + <tr> + <td><p align='center'><img src='https://s3.amazonaws.com/python-vidstab/readme/stable_ostrich.gif'></p></td> + <td><p align='center'><img src='https://s3.amazonaws.com/python-vidstab/readme/wide_stable_ostrich.gif'></p></td> + </tr> +</table> + +`border_type='reflect'` | `border_type='replicate'` +:--------------------------------------:|:-------------------------: + |  + +*[Video](https://www.youtube.com/watch?v=9pypPqbV_GM) used with permission from [HappyLiving](https://www.facebook.com/happylivinginfl/)* + +### Using Frame Layering + +```python +from vidstab import VidStab, layer_overlay, layer_blend + +# init vid stabilizer +stabilizer = VidStab() + +# use vidstab.layer_overlay for generating a trail effect +stabilizer.stabilize(input_path=INPUT_VIDEO_PATH, + output_path='trail_stable_video.avi', + border_type='black', + border_size=100, + layer_func=layer_overlay) + + +# create custom overlay function +# here we use vidstab.layer_blend with custom alpha +# layer_blend will generate a fading trail effect with some motion blur +def layer_custom(foreground, background): + return layer_blend(foreground, background, foreground_alpha=.8) + +# use custom overlay function +stabilizer.stabilize(input_path=INPUT_VIDEO_PATH, + output_path='blend_stable_video.avi', + border_type='black', + border_size=100, + layer_func=layer_custom) +``` + +`layer_func=vidstab.layer_overlay` | `layer_func=vidstab.layer_blend` +:--------------------------------------:|:-------------------------: + |  + +*[Video](https://www.youtube.com/watch?v=9pypPqbV_GM) used with permission from [HappyLiving](https://www.facebook.com/happylivinginfl/)* + + +### Automatic border sizing + +```python +from vidstab import VidStab, layer_overlay + +stabilizer = VidStab() + +stabilizer.stabilize(input_path=INPUT_VIDEO_PATH, + output_path='auto_border_stable_video.avi', + border_size='auto', + # frame layering to show performance of auto sizing + layer_func=layer_overlay) +``` + +<p align='center'> + <img width='45%' src='https://s3.amazonaws.com/python-vidstab/readme/auto_border_stable_ostrich.gif'> +</p> + + +### Stabilizing a frame at a time + +The method `VidStab.stabilize_frame()` can accept `numpy` arrays to allow stabilization processing a frame at a time. +This can allow pre/post processing for each frame to be stabilized; see examples below. + +#### Simplest form + +```python +from vidstab.VidStab import VidStab + +stabilizer = VidStab() +vidcap = cv2.VideoCapture('input_video.mov') + +while True: + grabbed_frame, frame = vidcap.read() + + if frame is not None: + # Perform any pre-processing of frame before stabilization here + pass + + # Pass frame to stabilizer even if frame is None + # stabilized_frame will be an all black frame until iteration 30 + stabilized_frame = stabilizer.stabilize_frame(input_frame=frame, + smoothing_window=30) + if stabilized_frame is None: + # There are no more frames available to stabilize + break + + # Perform any post-processing of stabilized frame here + pass +``` + +#### Example with object tracking + +```python +import os +import cv2 +from vidstab import VidStab, layer_overlay, download_ostrich_video + +# Download test video to stabilize +if not os.path.isfile("ostrich.mp4"): + download_ostrich_video("ostrich.mp4") + +# Initialize object tracker, stabilizer, and video reader +object_tracker = cv2.TrackerCSRT_create() +stabilizer = VidStab() +vidcap = cv2.VideoCapture("ostrich.mp4") + +# Initialize bounding box for drawing rectangle around tracked object +object_bounding_box = None + +while True: + grabbed_frame, frame = vidcap.read() + + # Pass frame to stabilizer even if frame is None + stabilized_frame = stabilizer.stabilize_frame(input_frame=frame, border_size=50) + + # If stabilized_frame is None then there are no frames left to process + if stabilized_frame is None: + break + + # Draw rectangle around tracked object if tracking has started + if object_bounding_box is not None: + success, object_bounding_box = object_tracker.update(stabilized_frame) + + if success: + (x, y, w, h) = [int(v) for v in object_bounding_box] + cv2.rectangle(stabilized_frame, (x, y), (x + w, y + h), + (0, 255, 0), 2) + + # Display stabilized output + cv2.imshow('Frame', stabilized_frame) + + key = cv2.waitKey(5) + + # Select ROI for tracking and begin object tracking + # Non-zero frame indicates stabilization process is warmed up + if stabilized_frame.sum() > 0 and object_bounding_box is None: + object_bounding_box = cv2.selectROI("Frame", + stabilized_frame, + fromCenter=False, + showCrosshair=True) + object_tracker.init(stabilized_frame, object_bounding_box) + elif key == 27: + break + +vidcap.release() +cv2.destroyAllWindows() +``` + +<p align='center'> + <img width='50%' src='https://s3.amazonaws.com/python-vidstab/readme/obj_tracking_vidstab_1.gif'> +</p> + + +### Working with live video + +The `VidStab` class can also process live video streams. The underlying video reader is `cv2.VideoCapture`([documentation](https://docs.opencv.org/3.0-beta/doc/py_tutorials/py_gui/py_video_display/py_video_display.html)). +The relevant snippet from the documentation for stabilizing live video is: + +> *Its argument can be either the device index or the name of a video file. Device index is just the number to specify which camera. Normally one camera will be connected (as in my case). So I simply pass 0 (or -1). You can select the second camera by passing 1 and so on.* + +The `input_path` argument of the `VidStab.stabilize` method can accept integers that will be passed directly to `cv2.VideoCapture` as a device index. You can also pass a device index to the `--input` argument for command line usage. + +One notable difference between live feeds and video files is that webcam footage does not have a definite end point. +The options for ending a live video stabilization are to set the max length using the `max_frames` argument or to manually stop the process by pressing the <kbd>Esc</kbd> key or the <kbd>Q</kbd> key. +If `max_frames` is not provided then no progress bar can be displayed for live video stabilization processes. + +#### Example + +```python +from vidstab import VidStab + +stabilizer = VidStab() +stabilizer.stabilize(input_path=0, + output_path='stable_webcam.avi', + max_frames=1000, + playback=True) +``` + +<p align='center'> + <img width='50%' src='https://s3.amazonaws.com/python-vidstab/readme/webcam_stable.gif'> +</p> + +### Transform file writing & reading + +#### Generating and saving transforms to file + +```python +import numpy as np +from vidstab import VidStab, download_ostrich_video + +# Download video if needed +download_ostrich_video(INPUT_VIDEO_PATH) + +# Generate transforms and save to TRANSFORMATIONS_PATH as csv (no headers) +stabilizer = VidStab() +stabilizer.gen_transforms(INPUT_VIDEO_PATH) +np.savetxt(TRANSFORMATIONS_PATH, stabilizer.transforms, delimiter=',') +``` + +File at `TRANSFORMATIONS_PATH` is of the form shown below. The 3 columns represent delta x, delta y, and delta angle respectively. + +``` +-9.249733913760086068e+01,2.953221378387767970e+01,-2.875918912994855636e-02 +-8.801434576214279559e+01,2.741942225927152776e+01,-2.715232319470826938e-02 +``` + +#### Reading and using transforms from file + +Below example reads a file of transforms and applies to an arbitrary video. The transform file is of the form shown in [above section](#generating-and-saving-transforms-to-file). + +```python +import numpy as np +from vidstab import VidStab + +# Read in csv transform data, of form (delta x, delta y, delta angle): +transforms = np.loadtxt(TRANSFORMATIONS_PATH, delimiter=',') + +# Create stabilizer and supply numpy array of transforms +stabilizer = VidStab() +stabilizer.transforms = transforms + +# Apply stabilizing transforms to INPUT_VIDEO_PATH and save to OUTPUT_VIDEO_PATH +stabilizer.apply_transforms(INPUT_VIDEO_PATH, OUTPUT_VIDEO_PATH) +``` + + + + +%package help +Summary: Development documents and examples for vidstab +Provides: python3-vidstab-doc +%description help +# Python Video Stabilization <img src='https://s3.amazonaws.com/python-vidstab/logo/vidstab_logo_hex.png' width=125 align='right'/> + +<!-- noop --> + +[](https://travis-ci.org/AdamSpannbauer/python_video_stab) +[](https://codecov.io/gh/AdamSpannbauer/python_video_stab) +[](https://codeclimate.com/github/AdamSpannbauer/python_video_stab/maintainability) +[](https://pypi.org/project/vidstab/) +[](https://github.com/AdamSpannbauer/python_video_stab/commits/master) +[](https://pepy.tech/project/vidstab) + + Python video stabilization using OpenCV. Full [searchable documentation here](https://adamspannbauer.github.io/python_video_stab). + + This module contains a single class (`VidStab`) used for video stabilization. This class is based on the work presented by Nghia Ho in [SIMPLE VIDEO STABILIZATION USING OPENCV](http://nghiaho.com/?p=2093). The foundation code was found in a comment on Nghia Ho's post by the commenter with username koala. + + Input | Output +:-------------------------------:|:-------------------------: + |  + +*[Video](https://www.youtube.com/watch?v=9pypPqbV_GM) used with permission from [HappyLiving](https://www.facebook.com/happylivinginfl/)* + +## Contents: +1. [Installation](#installation) + * [Install `vidstab` without installing OpenCV](#install-vidstab-without-installing-opencv) + * [Install vidstab & OpenCV](#install-vidstab-opencv) +2. [Basic Usage](#basic-usage) + * [Using from command line](#using-from-command-line) + * [Using VidStab class](#using-vidstab-class) +3. [Advanced Usage](#advanced-usage) + * [Plotting frame to frame transformations](#plotting-frame-to-frame-transformations) + * [Using borders](#using-borders) + * [Using Frame Layering](#using-frame-layering) + * [Stabilizing a frame at a time](#stabilizing-a-frame-at-a-time) + * [Working with live video](#working-with-live-video) + * [Transform File Writing & Reading](#transform-file-writing--reading) + +## Installation + +> ```diff +> + Please report issues if you install/try to install and run into problems! +> ``` + +### Install `vidstab` without installing OpenCV + +If you've already built OpenCV with python bindings on your machine it is recommended to install `vidstab` without installing the pypi versions of OpenCV. The `opencv-python` python module can cause issues if you've already built OpenCV from source in your environment. + +The below commands will install `vidstab` without OpenCV included. + +#### From PyPi + +```bash +pip install vidstab +``` + +#### From GitHub + +```bash +pip install git+https://github.com/AdamSpannbauer/python_video_stab.git +``` + +### Install `vidstab` & OpenCV + +If you don't have OpenCV installed already there are a couple options. + +1. You can build OpenCV using one of the great online tutorials from [PyImageSearch](https://www.pyimagesearch.com/), [LearnOpenCV](https://www.learnopencv.com/), or [OpenCV](https://docs.opencv.org/3.0-beta/doc/py_tutorials/py_setup/py_table_of_contents_setup/py_table_of_contents_setup.html#py-table-of-content-setup) themselves. When building from source you have more options (e.g. [platform optimization](https://www.pyimagesearch.com/2017/10/09/optimizing-opencv-on-the-raspberry-pi/)), but more responsibility. Once installed you can use the pip install command shown above. +2. You can install a pre-built distribution of OpenCV from pypi as a dependency for `vidstab` (see command below) + +The below commands will install `vidstab` with `opencv-contrib-python` as dependencies. + +#### From PyPi + +```bash +pip install vidstab[cv2] +``` + +#### From Github + +```bash + pip install -e git+https://github.com/AdamSpannbauer/python_video_stab.git#egg=vidstab[cv2] +``` + +## Basic usage + +The `VidStab` class can be used as a command line script or in your own custom python code. + +### Using from command line + +```bash +# Using defaults +python3 -m vidstab --input input_video.mov --output stable_video.avi +``` + +```bash +# Using a specific keypoint detector +python3 -m vidstab -i input_video.mov -o stable_video.avi -k GFTT +``` + +### Using `VidStab` class + +```python +from vidstab import VidStab + +# Using defaults +stabilizer = VidStab() +stabilizer.stabilize(input_path='input_video.mov', output_path='stable_video.avi') + +# Using a specific keypoint detector +stabilizer = VidStab(kp_method='ORB') +stabilizer.stabilize(input_path='input_video.mp4', output_path='stable_video.avi') + +# Using a specific keypoint detector and customizing keypoint parameters +stabilizer = VidStab(kp_method='FAST', threshold=42, nonmaxSuppression=False) +stabilizer.stabilize(input_path='input_video.mov', output_path='stable_video.avi') +``` + +## Advanced usage + +### Plotting frame to frame transformations + +```python +from vidstab import VidStab +import matplotlib.pyplot as plt + +stabilizer = VidStab() +stabilizer.stabilize(input_path='input_video.mov', output_path='stable_video.avi') + +stabilizer.plot_trajectory() +plt.show() + +stabilizer.plot_transforms() +plt.show() +``` + +Trajectories | Transforms +:-------------------------------:|:-------------------------: + |  + +### Using borders + +```python +from vidstab import VidStab + +stabilizer = VidStab() + +# black borders +stabilizer.stabilize(input_path='input_video.mov', + output_path='stable_video.avi', + border_type='black') +stabilizer.stabilize(input_path='input_video.mov', + output_path='wide_stable_video.avi', + border_type='black', + border_size=100) + +# filled in borders +stabilizer.stabilize(input_path='input_video.mov', + output_path='ref_stable_video.avi', + border_type='reflect') +stabilizer.stabilize(input_path='input_video.mov', + output_path='rep_stable_video.avi', + border_type='replicate') +``` + +<table> + <tr> + <td><p align='center'><code>border_size=0</code></p></td> + <td><p align='center'><code>border_size=100</code></p></td> + </tr> + <tr> + <td><p align='center'><img src='https://s3.amazonaws.com/python-vidstab/readme/stable_ostrich.gif'></p></td> + <td><p align='center'><img src='https://s3.amazonaws.com/python-vidstab/readme/wide_stable_ostrich.gif'></p></td> + </tr> +</table> + +`border_type='reflect'` | `border_type='replicate'` +:--------------------------------------:|:-------------------------: + |  + +*[Video](https://www.youtube.com/watch?v=9pypPqbV_GM) used with permission from [HappyLiving](https://www.facebook.com/happylivinginfl/)* + +### Using Frame Layering + +```python +from vidstab import VidStab, layer_overlay, layer_blend + +# init vid stabilizer +stabilizer = VidStab() + +# use vidstab.layer_overlay for generating a trail effect +stabilizer.stabilize(input_path=INPUT_VIDEO_PATH, + output_path='trail_stable_video.avi', + border_type='black', + border_size=100, + layer_func=layer_overlay) + + +# create custom overlay function +# here we use vidstab.layer_blend with custom alpha +# layer_blend will generate a fading trail effect with some motion blur +def layer_custom(foreground, background): + return layer_blend(foreground, background, foreground_alpha=.8) + +# use custom overlay function +stabilizer.stabilize(input_path=INPUT_VIDEO_PATH, + output_path='blend_stable_video.avi', + border_type='black', + border_size=100, + layer_func=layer_custom) +``` + +`layer_func=vidstab.layer_overlay` | `layer_func=vidstab.layer_blend` +:--------------------------------------:|:-------------------------: + |  + +*[Video](https://www.youtube.com/watch?v=9pypPqbV_GM) used with permission from [HappyLiving](https://www.facebook.com/happylivinginfl/)* + + +### Automatic border sizing + +```python +from vidstab import VidStab, layer_overlay + +stabilizer = VidStab() + +stabilizer.stabilize(input_path=INPUT_VIDEO_PATH, + output_path='auto_border_stable_video.avi', + border_size='auto', + # frame layering to show performance of auto sizing + layer_func=layer_overlay) +``` + +<p align='center'> + <img width='45%' src='https://s3.amazonaws.com/python-vidstab/readme/auto_border_stable_ostrich.gif'> +</p> + + +### Stabilizing a frame at a time + +The method `VidStab.stabilize_frame()` can accept `numpy` arrays to allow stabilization processing a frame at a time. +This can allow pre/post processing for each frame to be stabilized; see examples below. + +#### Simplest form + +```python +from vidstab.VidStab import VidStab + +stabilizer = VidStab() +vidcap = cv2.VideoCapture('input_video.mov') + +while True: + grabbed_frame, frame = vidcap.read() + + if frame is not None: + # Perform any pre-processing of frame before stabilization here + pass + + # Pass frame to stabilizer even if frame is None + # stabilized_frame will be an all black frame until iteration 30 + stabilized_frame = stabilizer.stabilize_frame(input_frame=frame, + smoothing_window=30) + if stabilized_frame is None: + # There are no more frames available to stabilize + break + + # Perform any post-processing of stabilized frame here + pass +``` + +#### Example with object tracking + +```python +import os +import cv2 +from vidstab import VidStab, layer_overlay, download_ostrich_video + +# Download test video to stabilize +if not os.path.isfile("ostrich.mp4"): + download_ostrich_video("ostrich.mp4") + +# Initialize object tracker, stabilizer, and video reader +object_tracker = cv2.TrackerCSRT_create() +stabilizer = VidStab() +vidcap = cv2.VideoCapture("ostrich.mp4") + +# Initialize bounding box for drawing rectangle around tracked object +object_bounding_box = None + +while True: + grabbed_frame, frame = vidcap.read() + + # Pass frame to stabilizer even if frame is None + stabilized_frame = stabilizer.stabilize_frame(input_frame=frame, border_size=50) + + # If stabilized_frame is None then there are no frames left to process + if stabilized_frame is None: + break + + # Draw rectangle around tracked object if tracking has started + if object_bounding_box is not None: + success, object_bounding_box = object_tracker.update(stabilized_frame) + + if success: + (x, y, w, h) = [int(v) for v in object_bounding_box] + cv2.rectangle(stabilized_frame, (x, y), (x + w, y + h), + (0, 255, 0), 2) + + # Display stabilized output + cv2.imshow('Frame', stabilized_frame) + + key = cv2.waitKey(5) + + # Select ROI for tracking and begin object tracking + # Non-zero frame indicates stabilization process is warmed up + if stabilized_frame.sum() > 0 and object_bounding_box is None: + object_bounding_box = cv2.selectROI("Frame", + stabilized_frame, + fromCenter=False, + showCrosshair=True) + object_tracker.init(stabilized_frame, object_bounding_box) + elif key == 27: + break + +vidcap.release() +cv2.destroyAllWindows() +``` + +<p align='center'> + <img width='50%' src='https://s3.amazonaws.com/python-vidstab/readme/obj_tracking_vidstab_1.gif'> +</p> + + +### Working with live video + +The `VidStab` class can also process live video streams. The underlying video reader is `cv2.VideoCapture`([documentation](https://docs.opencv.org/3.0-beta/doc/py_tutorials/py_gui/py_video_display/py_video_display.html)). +The relevant snippet from the documentation for stabilizing live video is: + +> *Its argument can be either the device index or the name of a video file. Device index is just the number to specify which camera. Normally one camera will be connected (as in my case). So I simply pass 0 (or -1). You can select the second camera by passing 1 and so on.* + +The `input_path` argument of the `VidStab.stabilize` method can accept integers that will be passed directly to `cv2.VideoCapture` as a device index. You can also pass a device index to the `--input` argument for command line usage. + +One notable difference between live feeds and video files is that webcam footage does not have a definite end point. +The options for ending a live video stabilization are to set the max length using the `max_frames` argument or to manually stop the process by pressing the <kbd>Esc</kbd> key or the <kbd>Q</kbd> key. +If `max_frames` is not provided then no progress bar can be displayed for live video stabilization processes. + +#### Example + +```python +from vidstab import VidStab + +stabilizer = VidStab() +stabilizer.stabilize(input_path=0, + output_path='stable_webcam.avi', + max_frames=1000, + playback=True) +``` + +<p align='center'> + <img width='50%' src='https://s3.amazonaws.com/python-vidstab/readme/webcam_stable.gif'> +</p> + +### Transform file writing & reading + +#### Generating and saving transforms to file + +```python +import numpy as np +from vidstab import VidStab, download_ostrich_video + +# Download video if needed +download_ostrich_video(INPUT_VIDEO_PATH) + +# Generate transforms and save to TRANSFORMATIONS_PATH as csv (no headers) +stabilizer = VidStab() +stabilizer.gen_transforms(INPUT_VIDEO_PATH) +np.savetxt(TRANSFORMATIONS_PATH, stabilizer.transforms, delimiter=',') +``` + +File at `TRANSFORMATIONS_PATH` is of the form shown below. The 3 columns represent delta x, delta y, and delta angle respectively. + +``` +-9.249733913760086068e+01,2.953221378387767970e+01,-2.875918912994855636e-02 +-8.801434576214279559e+01,2.741942225927152776e+01,-2.715232319470826938e-02 +``` + +#### Reading and using transforms from file + +Below example reads a file of transforms and applies to an arbitrary video. The transform file is of the form shown in [above section](#generating-and-saving-transforms-to-file). + +```python +import numpy as np +from vidstab import VidStab + +# Read in csv transform data, of form (delta x, delta y, delta angle): +transforms = np.loadtxt(TRANSFORMATIONS_PATH, delimiter=',') + +# Create stabilizer and supply numpy array of transforms +stabilizer = VidStab() +stabilizer.transforms = transforms + +# Apply stabilizing transforms to INPUT_VIDEO_PATH and save to OUTPUT_VIDEO_PATH +stabilizer.apply_transforms(INPUT_VIDEO_PATH, OUTPUT_VIDEO_PATH) +``` + + + + +%prep +%autosetup -n vidstab-1.7.4 + +%build +%py3_build + +%install +%py3_install +install -d -m755 %{buildroot}/%{_pkgdocdir} +if [ -d doc ]; then cp -arf doc %{buildroot}/%{_pkgdocdir}; fi +if [ -d docs ]; then cp -arf docs %{buildroot}/%{_pkgdocdir}; fi +if [ -d example ]; then cp -arf example %{buildroot}/%{_pkgdocdir}; fi +if [ -d examples ]; then cp -arf examples %{buildroot}/%{_pkgdocdir}; fi +pushd %{buildroot} +if [ -d usr/lib ]; then + find usr/lib -type f -printf "\"/%h/%f\"\n" >> filelist.lst +fi +if [ -d usr/lib64 ]; then + find usr/lib64 -type f -printf "\"/%h/%f\"\n" >> filelist.lst +fi +if [ -d usr/bin ]; then + find usr/bin -type f -printf "\"/%h/%f\"\n" >> filelist.lst +fi +if [ -d usr/sbin ]; then + find usr/sbin -type f -printf "\"/%h/%f\"\n" >> filelist.lst +fi +touch doclist.lst +if [ -d usr/share/man ]; then + find usr/share/man -type f -printf "\"/%h/%f.gz\"\n" >> doclist.lst +fi +popd +mv %{buildroot}/filelist.lst . +mv %{buildroot}/doclist.lst . + +%files -n python3-vidstab -f filelist.lst +%dir %{python3_sitelib}/* + +%files help -f doclist.lst +%{_docdir}/* + +%changelog +* Tue Jun 20 2023 Python_Bot <Python_Bot@openeuler.org> - 1.7.4-1 +- Package Spec generated @@ -0,0 +1 @@ +7bf8468ccd377d25a37f0adddec547dc vidstab-1.7.4.tar.gz |